Flatter Files allows you to share links with specific email addresses. This password protected link is permanent for the particular item or items. Therefore, even as the items are updated with new revisions or properties, the same link will continue to display the most recent version of the items. This functionality is most frequently used for automatic distribution of your content to your suppliers such that they always have access to up to date drawing information.
The ability for users to share items externally is controlled via a User Setting that can easily be set by Administrators. It is obviously not recommended that all user have the ability to share content externally.
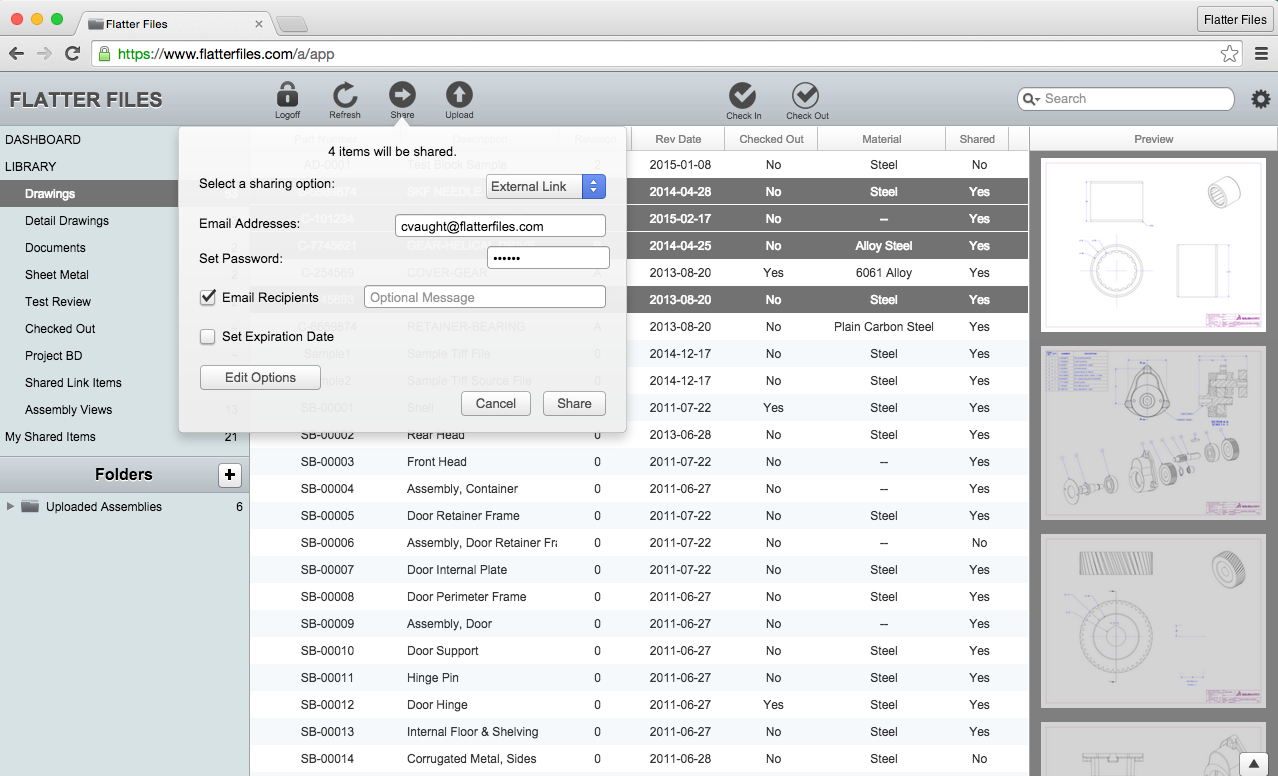
Select the item or items that you would like to share and then click the share button at the top of the web app. Optionally, you can right-click on one of the selected items and select the Share option. The share dialog will be displayed. The share dialog requires that you enter the appropriate email address along with a password. You can enter multiple email address by simply separating the addresses with a comma. There are also multiple options included in the dialog that control what is shared. Details regarding the various options are discussed in the Options section. Clicking submit will create the link and unless you select the option not to send an email, the recipient(s) will receive an email with the link, password and instructions.
An entire Library can easily be shared. A benefit of sharing a Library directly instead of just selecting the items from within the Library is that the share will automatically be updated as the corresponding Library has items added or removed from it. This makes it very simple to share an entire product line or job specific drawings with a supplier even if the list of drawings required is evolving.
To share the Library, Simply right click on the Library and select the option “Share External.” This will then display the same share dialog as shown above. Unlike when sharing selected items, a Library share isn’t created automatically due to the potential large volume of items that can be shared all at once. Therefore, when you submit the share it won’t show up immediately in My Shared Items but will eventually. You can also click “Refresh” in the web app to check for when it has been added.
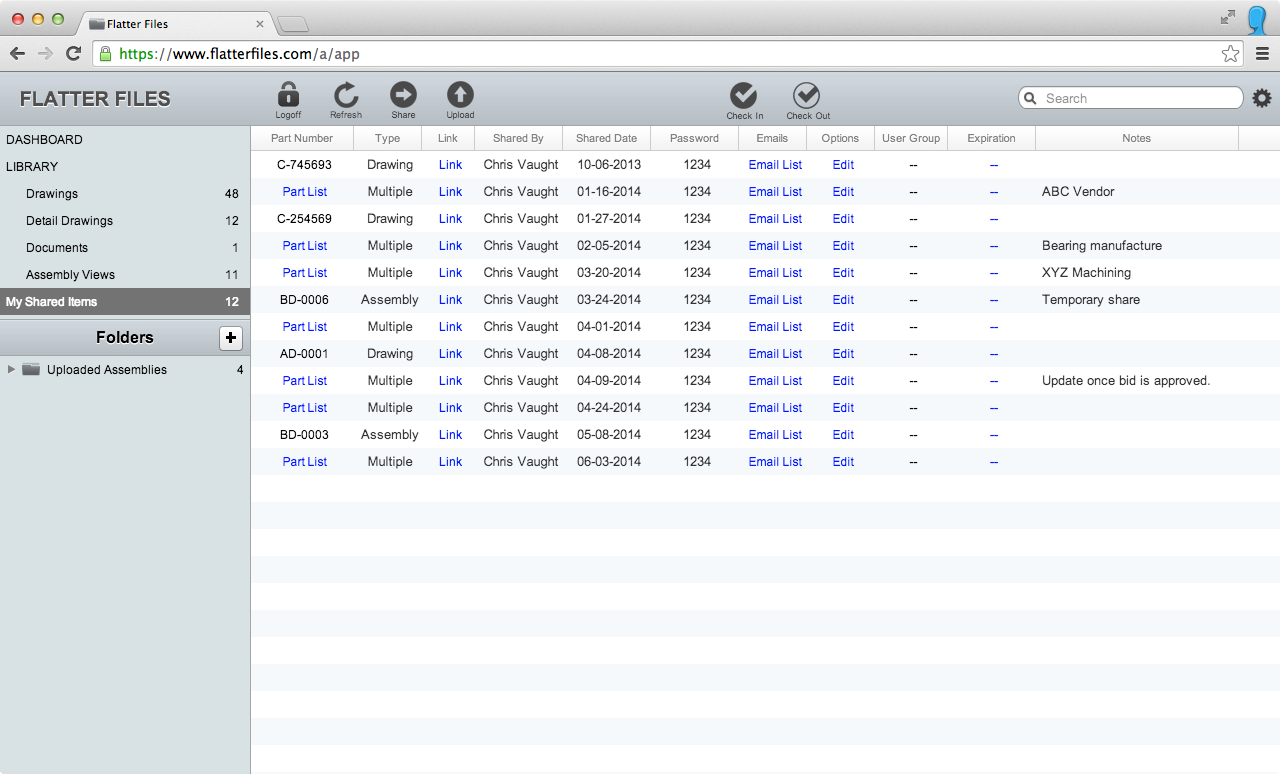
When you share an item an entry for the shared item is added to your “My Shared Items” library. Click on “My Shared Items” in the left-side bar to display all of the items that you have shared. From within this library you can manage the shared item, including the ability to delete it, edit settings, add people, remove people and all of the other options for shared items.
Shared items are intended to create a permanent link for someone outside your organization to be able to securely access specific drawings. For some, this might include quite a few drawings and over time the specific items they need access to might change. Instead of having to delete the link and create a new link, Flatter Files makes it quite simple to add and remove items to the shared link.
Search for and select an additional item or items that you would like to add to the link. Right-click after selecting the items and click the option “Add to Existing Share”. You will then be directed to your “My Shared Items” library and asked to select the shared link to add the new item to. Once you select the shared link, a window will appear asking if you would like to resend the shared link email to notify the recipient of the new items.
If the shared item is for a single item then you must delete the shared link by right-clicking and selecting delete. Otherwise, the part number column displays “Part List” as blue link text. Click on the link for the item that you would like to remove items from. This will display a list of the items contained in the link. To remove an item, simply right-click on it and select delete. Repeat this process for any additional items that you would like to remove.

By default, the shared link always will display the latest revision when accessing an item. Sometimes though it might be useful to share a specific revision. Once the item is set to a specific revision it will always display that specific revision unless you manually change it back to using the latest revision. Therefore, if the item is updated with a new revision it will not automatically be displayed from within the shared link since you have set it to a previous revision.
To set an item to a specific revision, right click on the item from within the Item List and select “Set to Specific Revision.” A dialog will appear that allows you to select the revision. Select the appropriate revision and then click Submit. This will change the Item List revision value from “Latest” to the revision that you selected.
When creating shared links, you must include at least one email address as the recipient of the link. Once created, you can easily add or remove additional recipients at any point. This allows you to control who can access the link at all times.
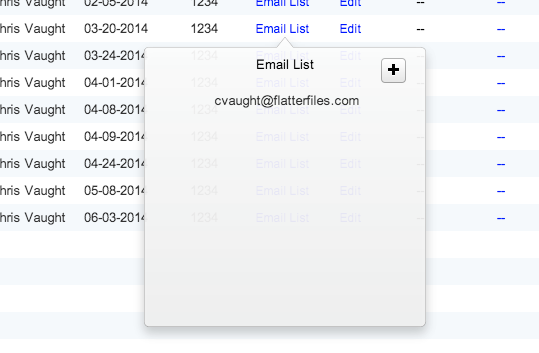
When viewing items in the “My Shared Items” library, there is a column called “Emails”. Click the “Email List” blue link text for the item that you would like to add a recipient to. Once clicked, a list of the current emails that can access this link are displayed. To add an item, click the plus button that is shown in the dialog. This will display a row of text that says “Double Click to Add Email.” Double click this text and then enter the desired email address and then press enter. Repeat this process as necessary to add additional recipients.
Display the list of emails as described in the Add Recipient section. While displaying the list of email recipients, right-click on the email and select “Delete”. This will automatically remove the recipient’s access to the link.
Shared links have many options that can be edited at any point. The next time the shared link is accessed it will reflect any changes that have been made.
The “My Shared Items” library contains a column called “Options” and the specific options for each item can be accessed by clicking the blue “Edit” link. Clicking this link displays a dialog with multiple options.
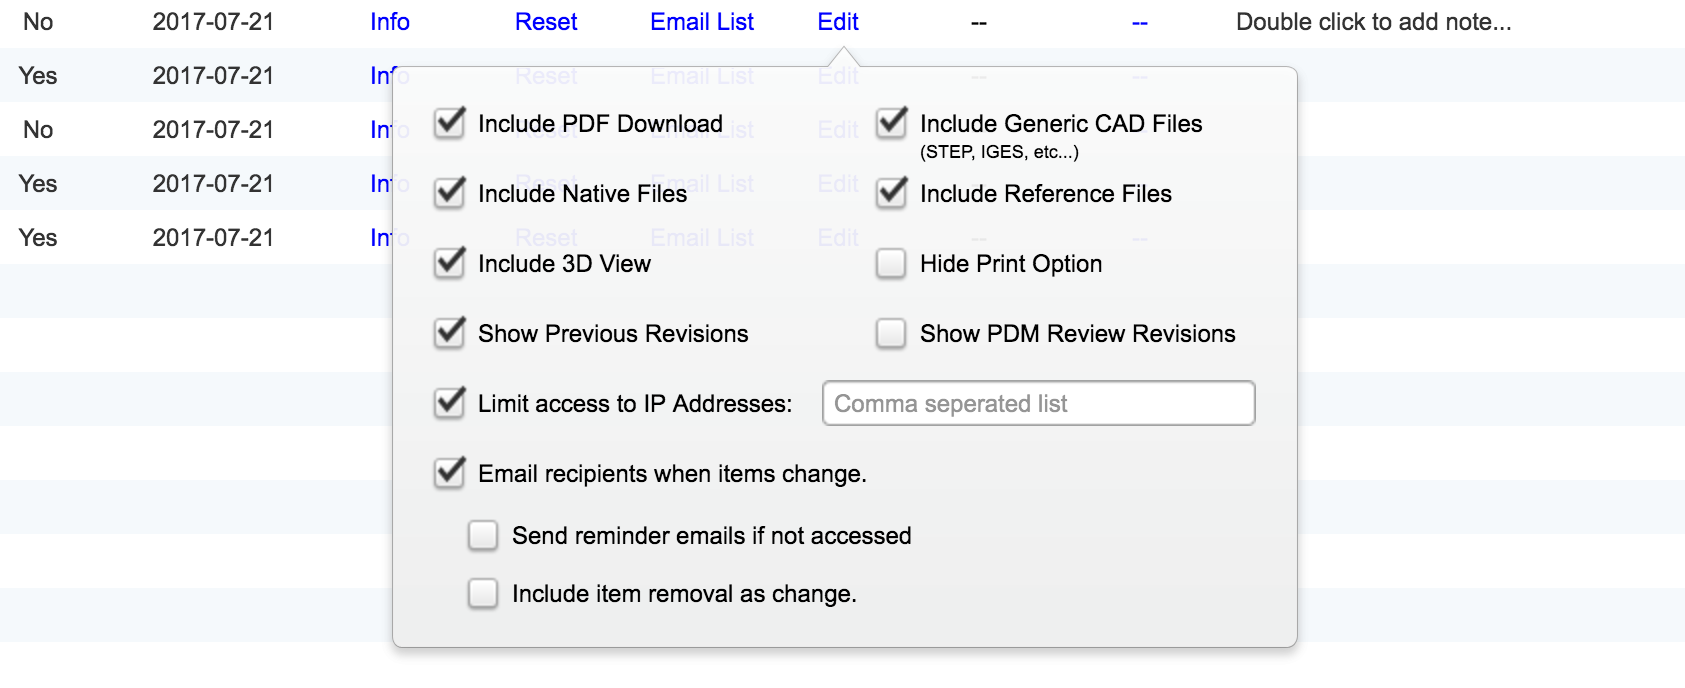
The first option in the left column allows you to determine whether the option to download the PDF files is available to the Viewer. The second option determines if they can download the corresponding native files. The first option in the right column determines if the Viewer can download the generic CAD files, which refers to the optional files that can be created such as STL, STEP, IGES, DXF, or DWG files. Reference files are other file types such as text files that have been added to the item. For native files, generic CAD files and reference files, the settings only apply if the item contains the appropriate files (must be uploaded using the Uploader app). The third option on the left controls whether the Viewer can access the 3D View option. This only applies if the item contains a 3D file format and you have enabled the 3D View creation option Company Settings.
The fourth option in the left column allows you to determine if previous revisions should be accessible via the shared link. This only applies if the item contains more than one revision. The fifth option allows you to limit the access of the shared item to specific IP addresses. If someone tries to access the shared item from an IP address that isn’t listed then access will be denied. To enter multiple IP addresses separate them using a comma. In addition, you can enter a range using a dash.
The sixth option on the left allows you to determine if the recipient should receive an email anytime the link is updated. This email will contain details regarding the change to the link. For example, if a new revision is created or a new drawing is added to the link they would receive an email. The option “Include item removal as change” if enabled will result in an email also being sent when an item is removed from the shared link. In addition, you can automatically send daily or weekly reminder emails if the recipient does not access the updated link.
The third option on the right, “Hide Print Option” will hide the ability to print the item from the Flatter Files viewer. The last option on the right only applies if you are integrating Flatter Files with a PDM system and are creating review revisions. By the enabling “Show PDM Review Revisions” your shared links will include the review revisions.
Share links can be set to expire. Once expired they aren’t deleted but no one can access the link. At any point, you can update the expiration date to make the link accessible again. Thus, expiration dates can be very useful when sending drawings out for bid. Just set the expiration date for when the bid is due. After the winning bid is selected, delete all of the recipients except the winning bid company and then remove the expiration date such that it is accessible again.
The “My Shared Items” library contains an expiration column that displays the status if there is an expiration date set. If there is no expiration date set, the column displays two blue dashes. To add an expiration date, click the two blue dashes and the expiration date dialog appears.
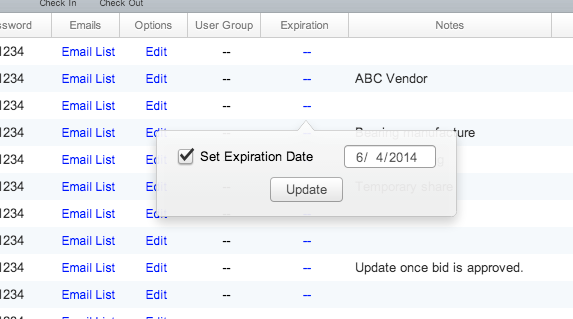
Check the “Set Expiration Date” option and then enter the date into the input that is displayed. Once complete, press the update button to save the changes. This value can be modified at any point. To remove the expiration date, uncheck the “Set Expiration Date” option.
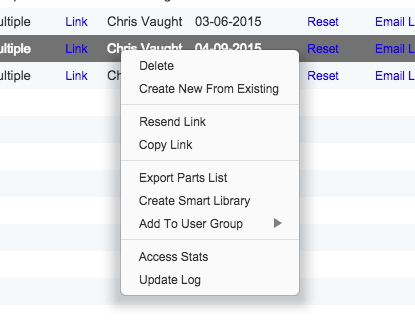
The shared link can be modified in multiple ways by right-clicking on the shared link in the “My Shared Items” library. To delete the link, select the “Delete” option on the menu. The drawings will no longer be accessible via the URL. If you would like to create a new shared link using the settings and parts list then click the “Create New from Existing” option. Select the “Resend Link” if you would like to resend the email for the shared link to all of the recipients. This link can also be copied by selecting the “Copy Link” option.
A CSV file containing the parts list for the shared link can be exported using the “Export Parts List” option. The CSV file will contain a listing for each part that includes all of the appropriate property data. You can also create a Smart Library that consists of the items contained within the shared item by selecting “Create Smart Library.” This Smart Library will automatically be updated anytime you add or remove items from the shared link. The Smart Library that is created will initially only be visible to users that have access to view the shared item based on the user group setting. The Create Smart Library option is only available to Admin accounts.
The last two options to modify the shared link will be discussed in the next section while the “Add to User Group” option will be discussed in the User Group section of the documentation.
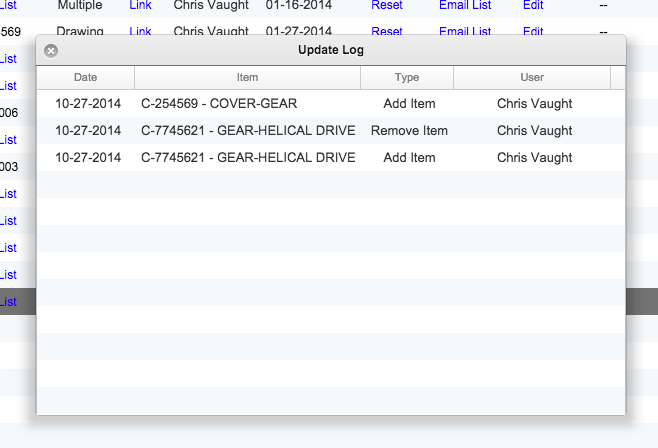
Another advantage to using a shared link instead of just emailing a PDF is that Flatter Files can provide you stats on when the item has been accessed. This allows you to verify that the recipient looked at the drawing. In addition to providing access stats, Flatter Files can also display an update log for each shared link that shows a log of any changes to the link. This includes things like add or removing an item, as well as if any new revisions are created for the drawings.
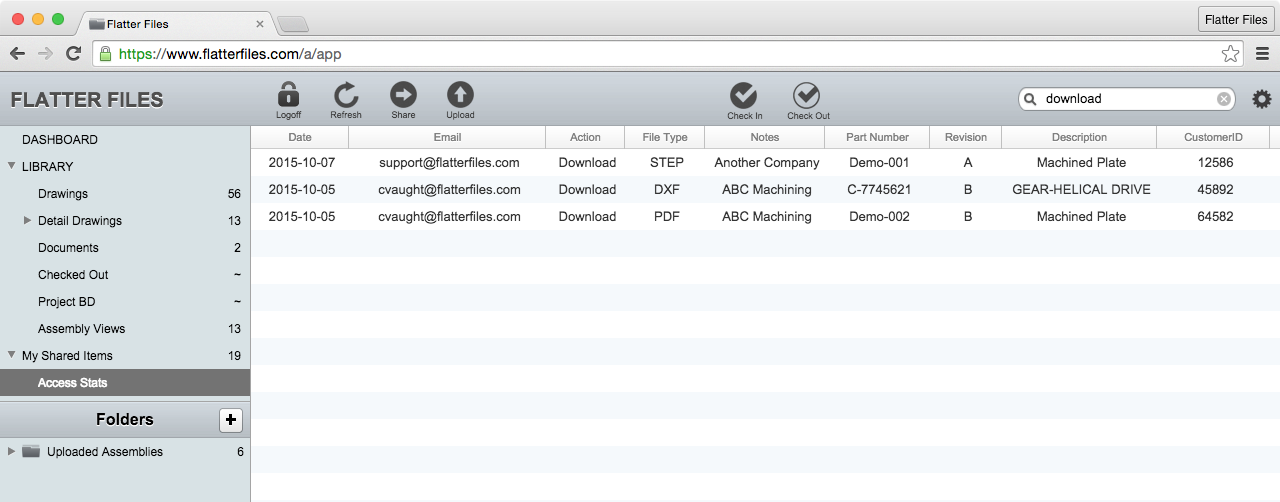
To view the access stats, click on the “Access Stats” options just below “My Shared Items” on the upper left view. This will display a table showing all stats related to Shared Items that you can manage. This is a comprehensive list making it very easy to manage all of your Shared Items. An example of this view is shown below. As you can see the items are listed in reverse chronological order such that the most recent stat is shown at the top. Click the Flatter Files refresh button at the top at any point to display any new stats.
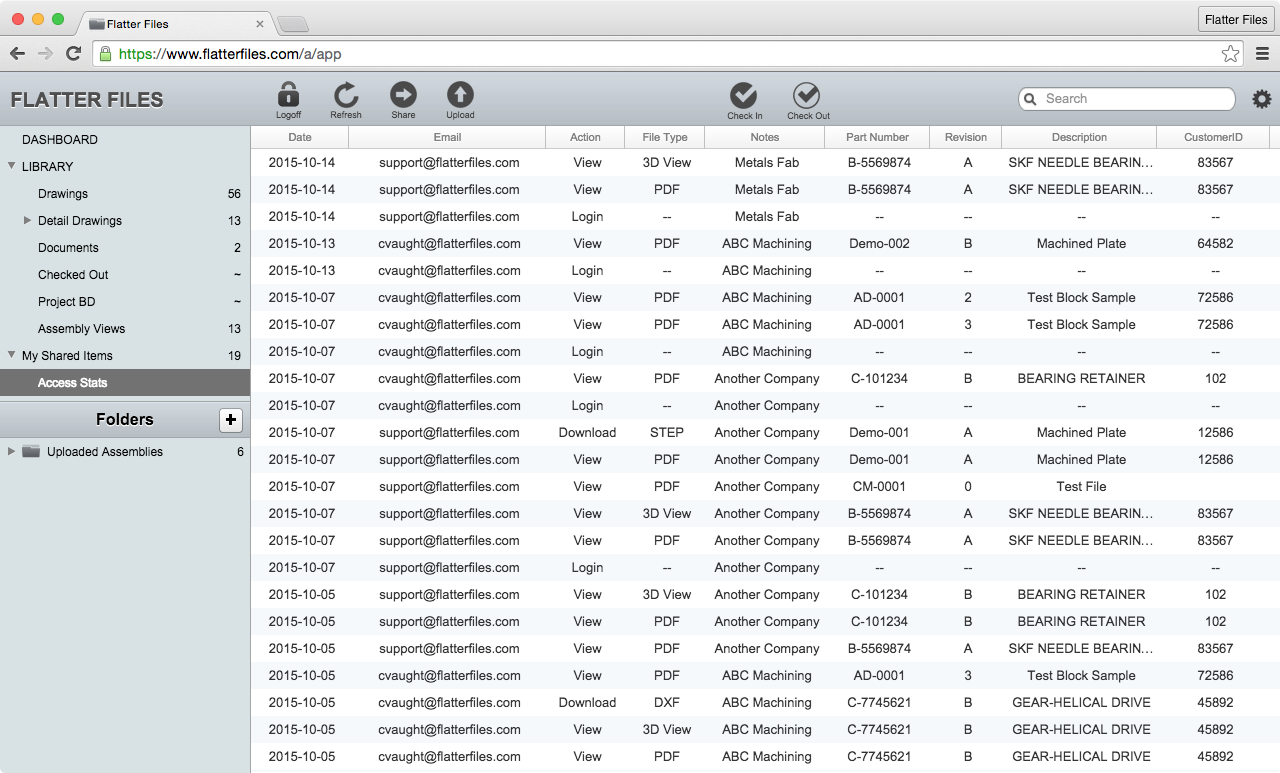
Each stat that is displayed contains multiple properties. This includes the action that occurred, the file type accessed, and the specific item properties. The possible Actions are Login, View, and Download. A Login only contains the email address and date since no item has been accessed yet. If a duplicate entry occurs the duplicate is not displayed. A duplicate entry is defined as having an identical Date, Email, Action, File Type, and Item.
The last property on the far right can be changed. By default, it is equal to the Custom 1 property. In the example shown it has been renamed to CustomerID. To make this a different property, go to Dashboard > Settings > Properties. Under Property Visibility change the type to “Shared Access Stats Extra Property” and then check the property that you would prefer to use. All of your existing stats will be updated with the new property. To view the update, return to the Access Stats and click the Flatter Files refresh button.
The list of access stats are fully searchable. Simply enter a value into the search box at the top right and click enter. All properties are searched and the results are displayed. To return to the full list click the x in the search box to clear the current search. The image below shows a sample search for all items that have a Download action.
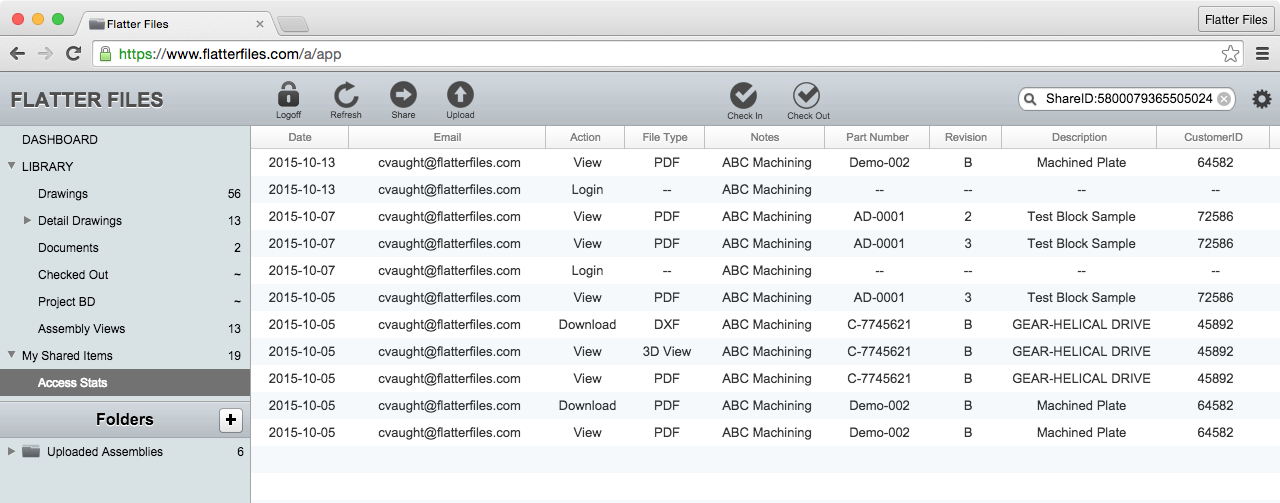
If you would like to view all of the Access Stats for a specific item, simply navigate to My Shared Items, right click the Shared Item and select “Access Stats.” This will automatically display the Access Stats page but instead of displaying all of the stats it will only show the stats for the right clicked Shared Item. An example of the stats for a specific Shared Item are shown in the image below.
Each shared link contains an update log which allows you to determine if this link has recently been updated. This is especially helpful when the link contains many items. To view the update log, right-click on the Shared Item and select “Update Log.” If the update consists of adding or removing an item from the link the user is also listed.