For years, Flatter Files has included native mobile applications for iOS and Android such that the best possible user experience could be provided on those devices. Each year, usage of those applications has grown as more and more of our customers have deployed tablets and other mobile devices. Now, it is very common for companies to use tablets on the shop floor and/or in the field.
Recently, sales of Windows 10 tablets have grown rapidly, especially Microsoft Surface devices. Thus, we decided to invest heavily into the Windows 10 platform by developing a Windows 10 native application for Flatter Files. This new application is designed specifically for using touch on either a convertible laptop or tablet device, such that the best possible experience can be provided on those devices.
This new application will also operate without issue on desktop and non-touch laptops. Viewers on non-touch devices may decide they prefer the native application over the web application due to performance or interface preferences. However, for the time being, the web application continues to be more feature complete, such that there are many things only supported in the web application. In addition, all Admin functionality continues to only exist in the web application. The native Windows 10 application is focused entirely on the viewer experience, just like our iOS and Android applications. Moving forward, we will continue to invest in this new application along with our existing iOS, Android and web applications, such that the absolute best user experience can be provided regardless of the device type.
Install the Application
To install the application, simply go to the Microsoft Store on your Windows 10 device and search for Flatter Files or go directly to the application by clicking this link. Simply click the blue “Get” button which will install the application. Moving forward, all application updates will be installed automatically.
Interface
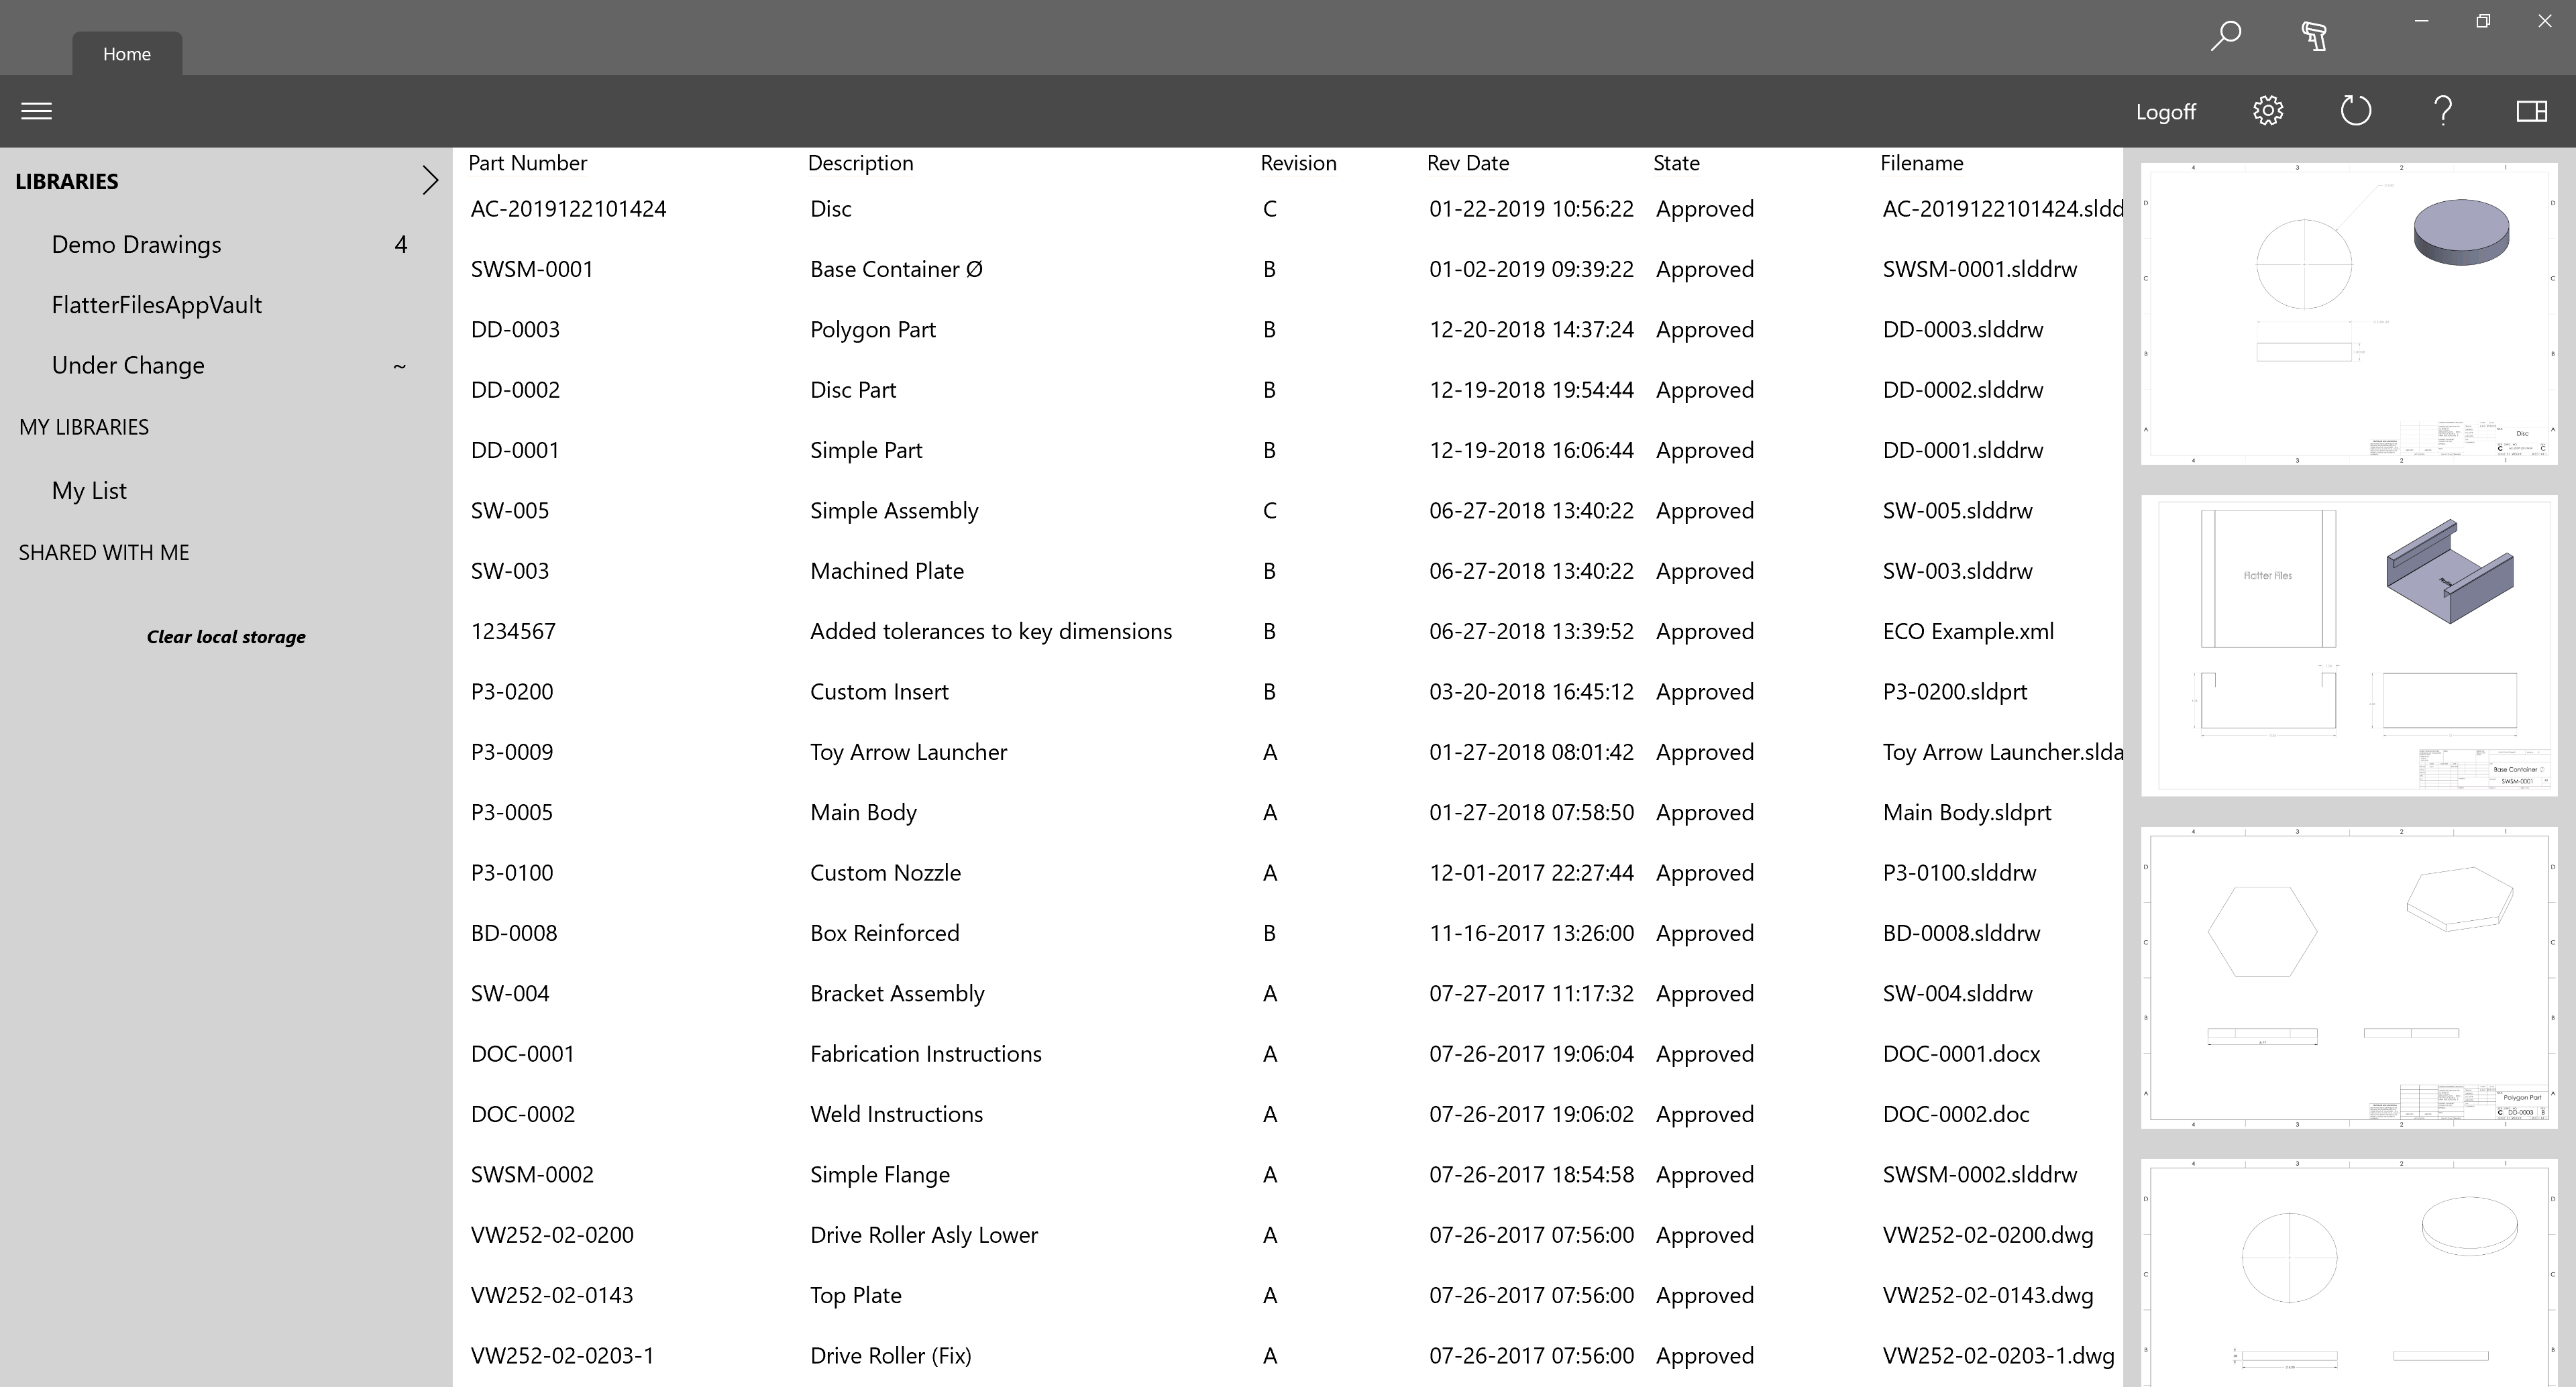
When you first open the application, you will be prompted to login with your user credentials. Once you login, the following screen is shown.
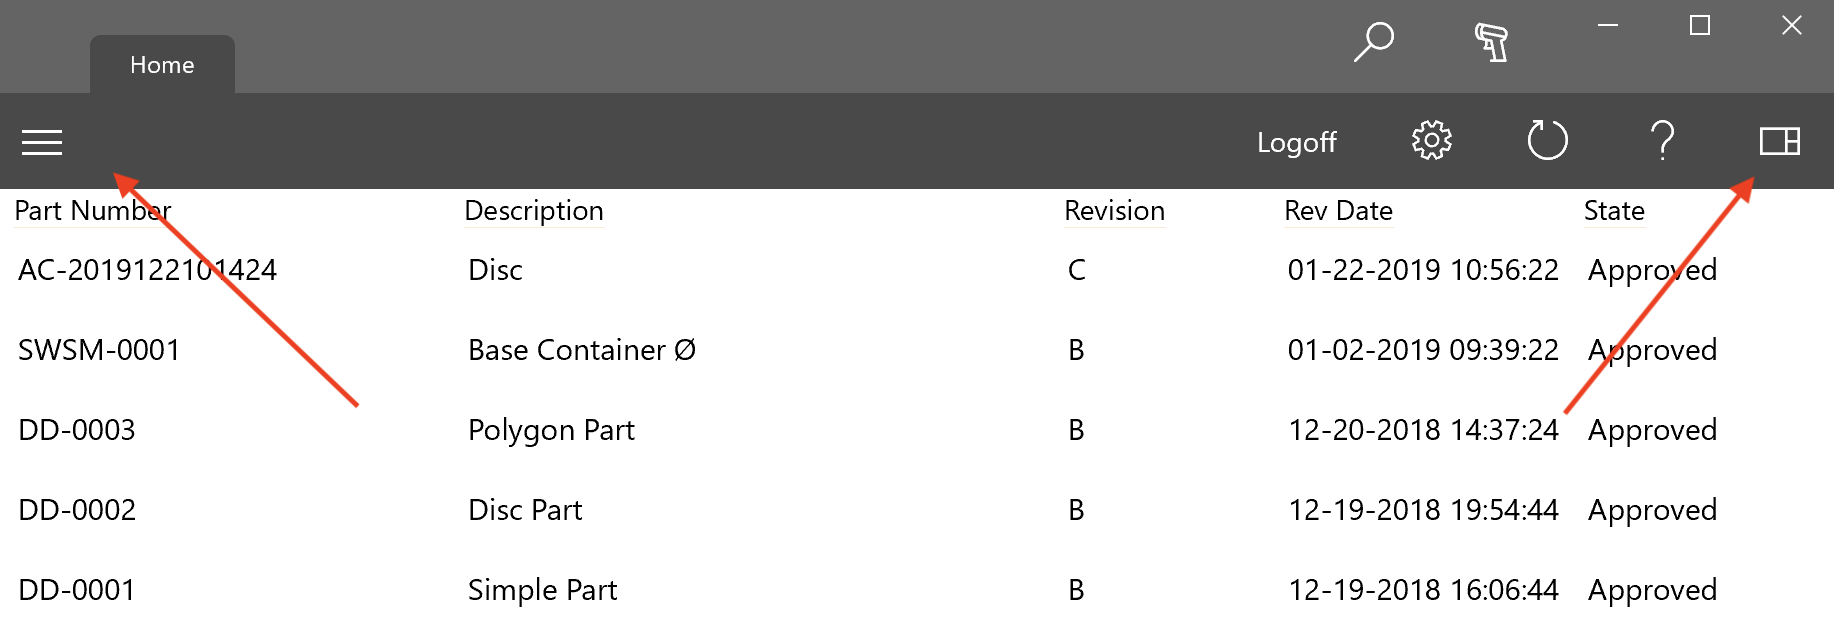
As you can see, the initial screen after login is very similar to the initial screen after logging into the web application. Unlike the web application though, this screen is responsive to the device window size. Thus, if you open the app on a small tablet or you make the app window small, the previews on the right side will be hidden. If the window of the app is even smaller, then the library listing on the left side will also be hidden. There is a corresponding button on the left side and on the right side to show or hide the library listing and preview images as shown below.
Selection
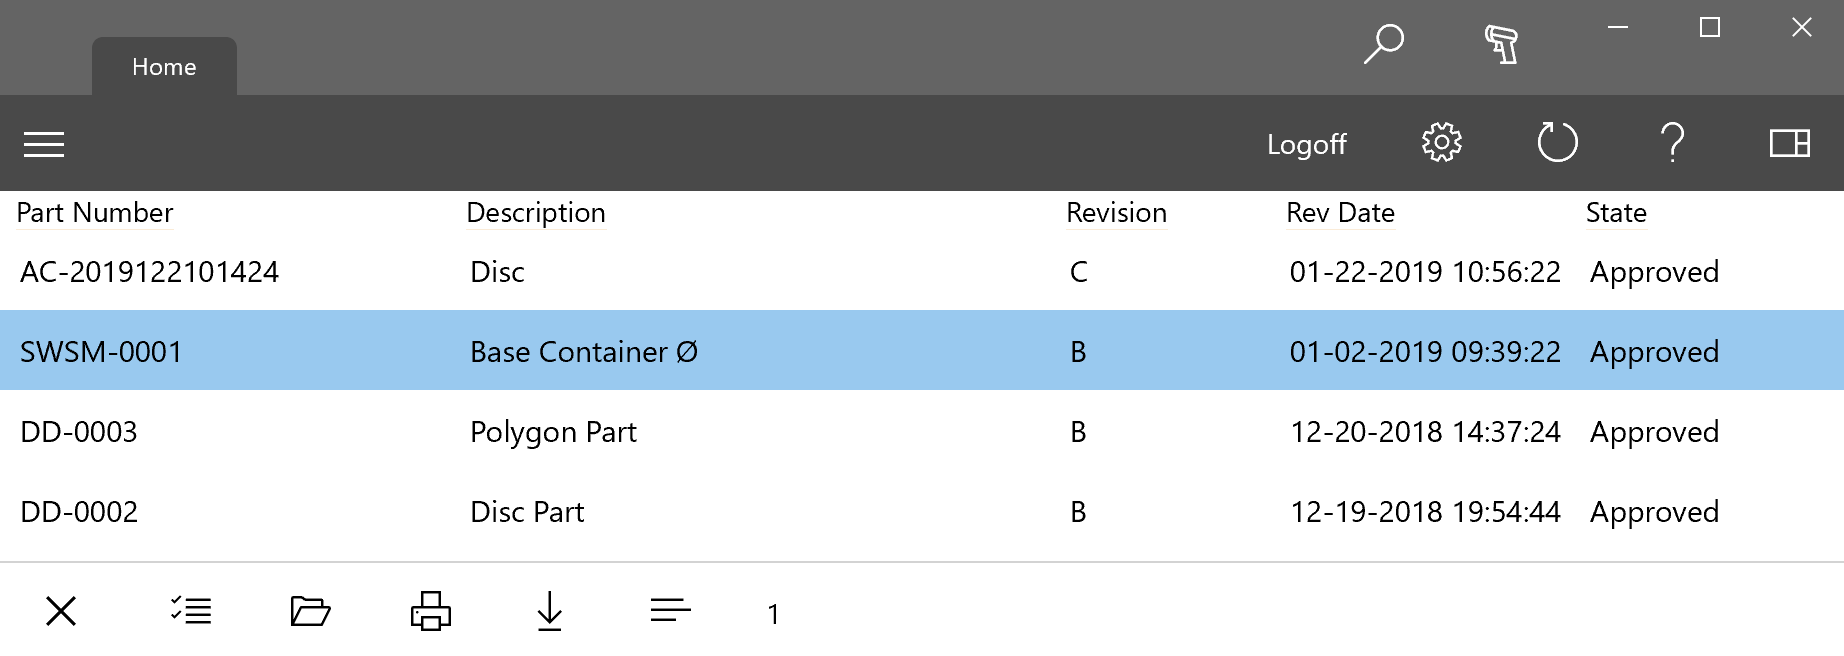
Just like in the web application, you can click or tap an item to select it and the corresponding preview image will be scrolled to if the previews are shown. Since the app is designed to work entirely with touch only, selecting an item also displays an action bar at the bottom of the application. The action bar allows you to perform various operations on the selected item or items and is shown below.
Starting on the left side, the first option allows you to close the action bar which will also clear the selection. The next option toggles the selection type. By default when you tap on an item, it is selected and the previously selected item is no longer selected. With a keyboard you can select multiple items by holding down Ctrl or Shift before tapping or clicking on another item but that isn’t possible without a keyboard. Thus, you can change the selection type, such that each subsequent item that is clicked or tapped is added to the current selection list, instead of replacing it.
The next three options in the action bar are straight forward. They allow you to open, print, or download the selection. If multiple items are selected, then multiple items will be opened, printed, or downloaded when using these commands. The next option in the action bar is the ability to view the current selection in a list that can be reordered. Simply drag and drop the item listing as need to change the order. The last item is the number of items currently selected.
Viewing an Item
The app uses a tab interface for item viewing. Each time you open an item, it is opened in a new tab and the tab contains full access to all related content for that item. There are multiple ways to open an item.
- Double click or double tap the item
- Press and hold the item
- Right click the item
- Select the item and click the Open icon shown in the bottom action bar.
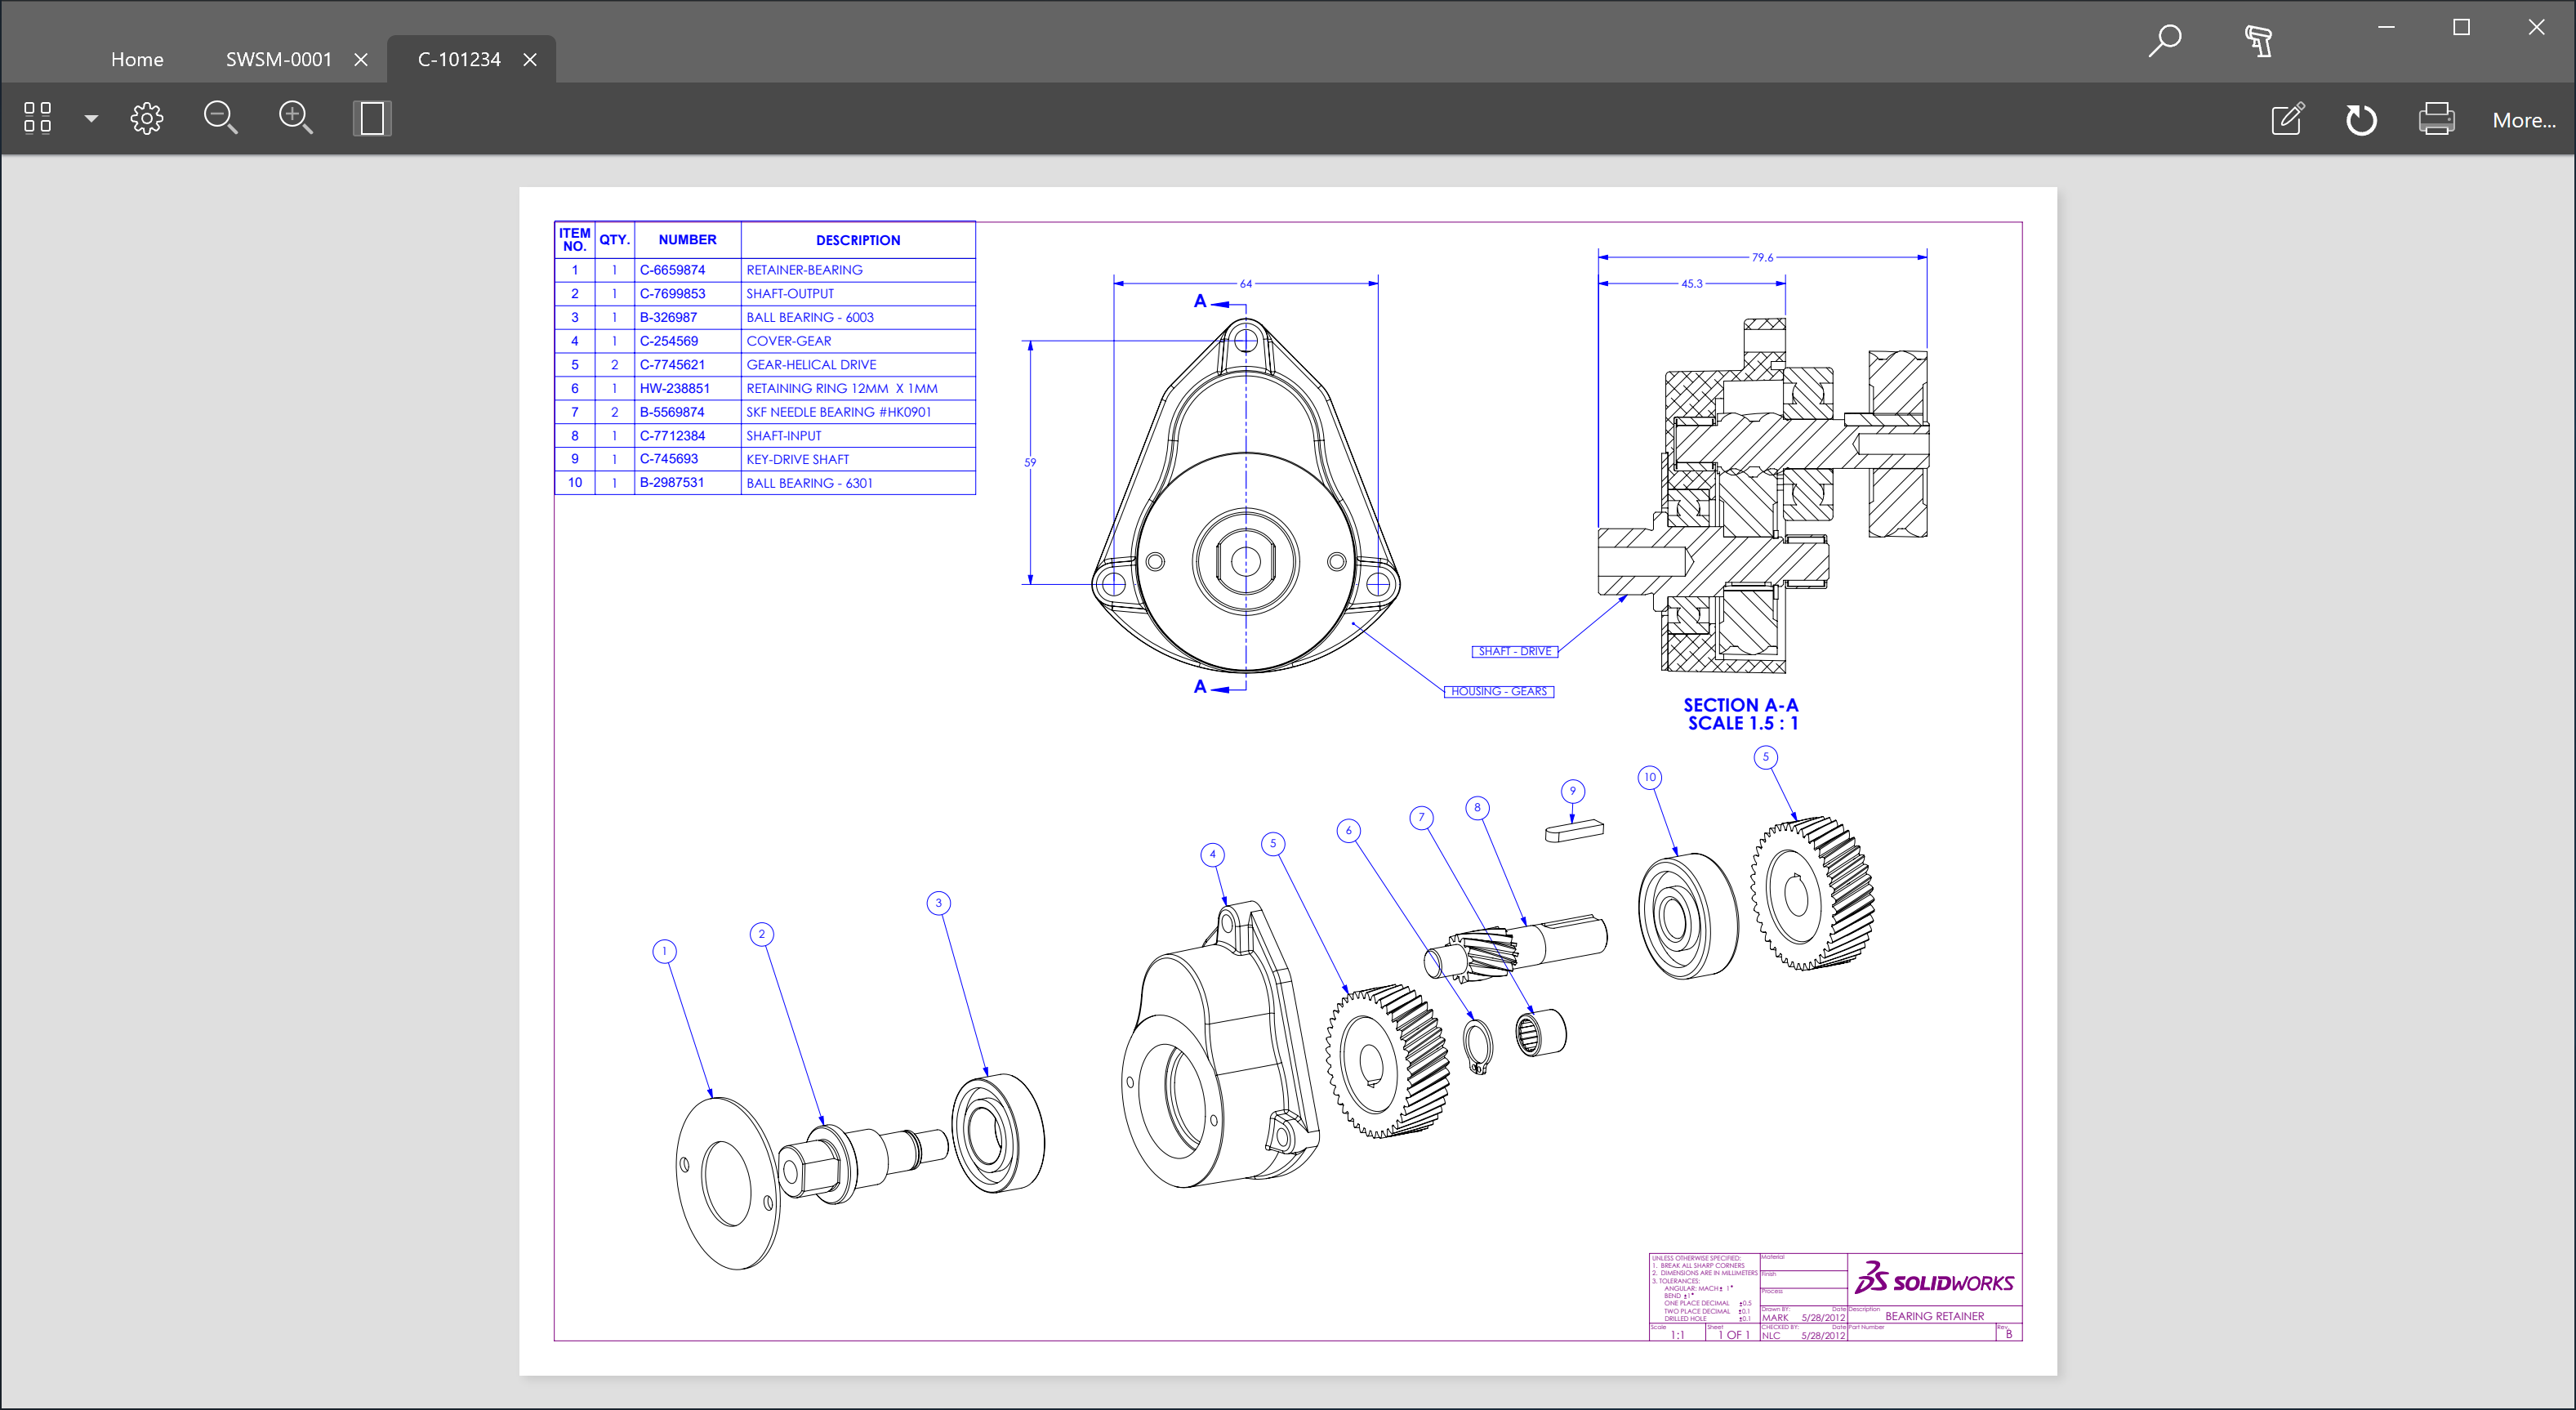
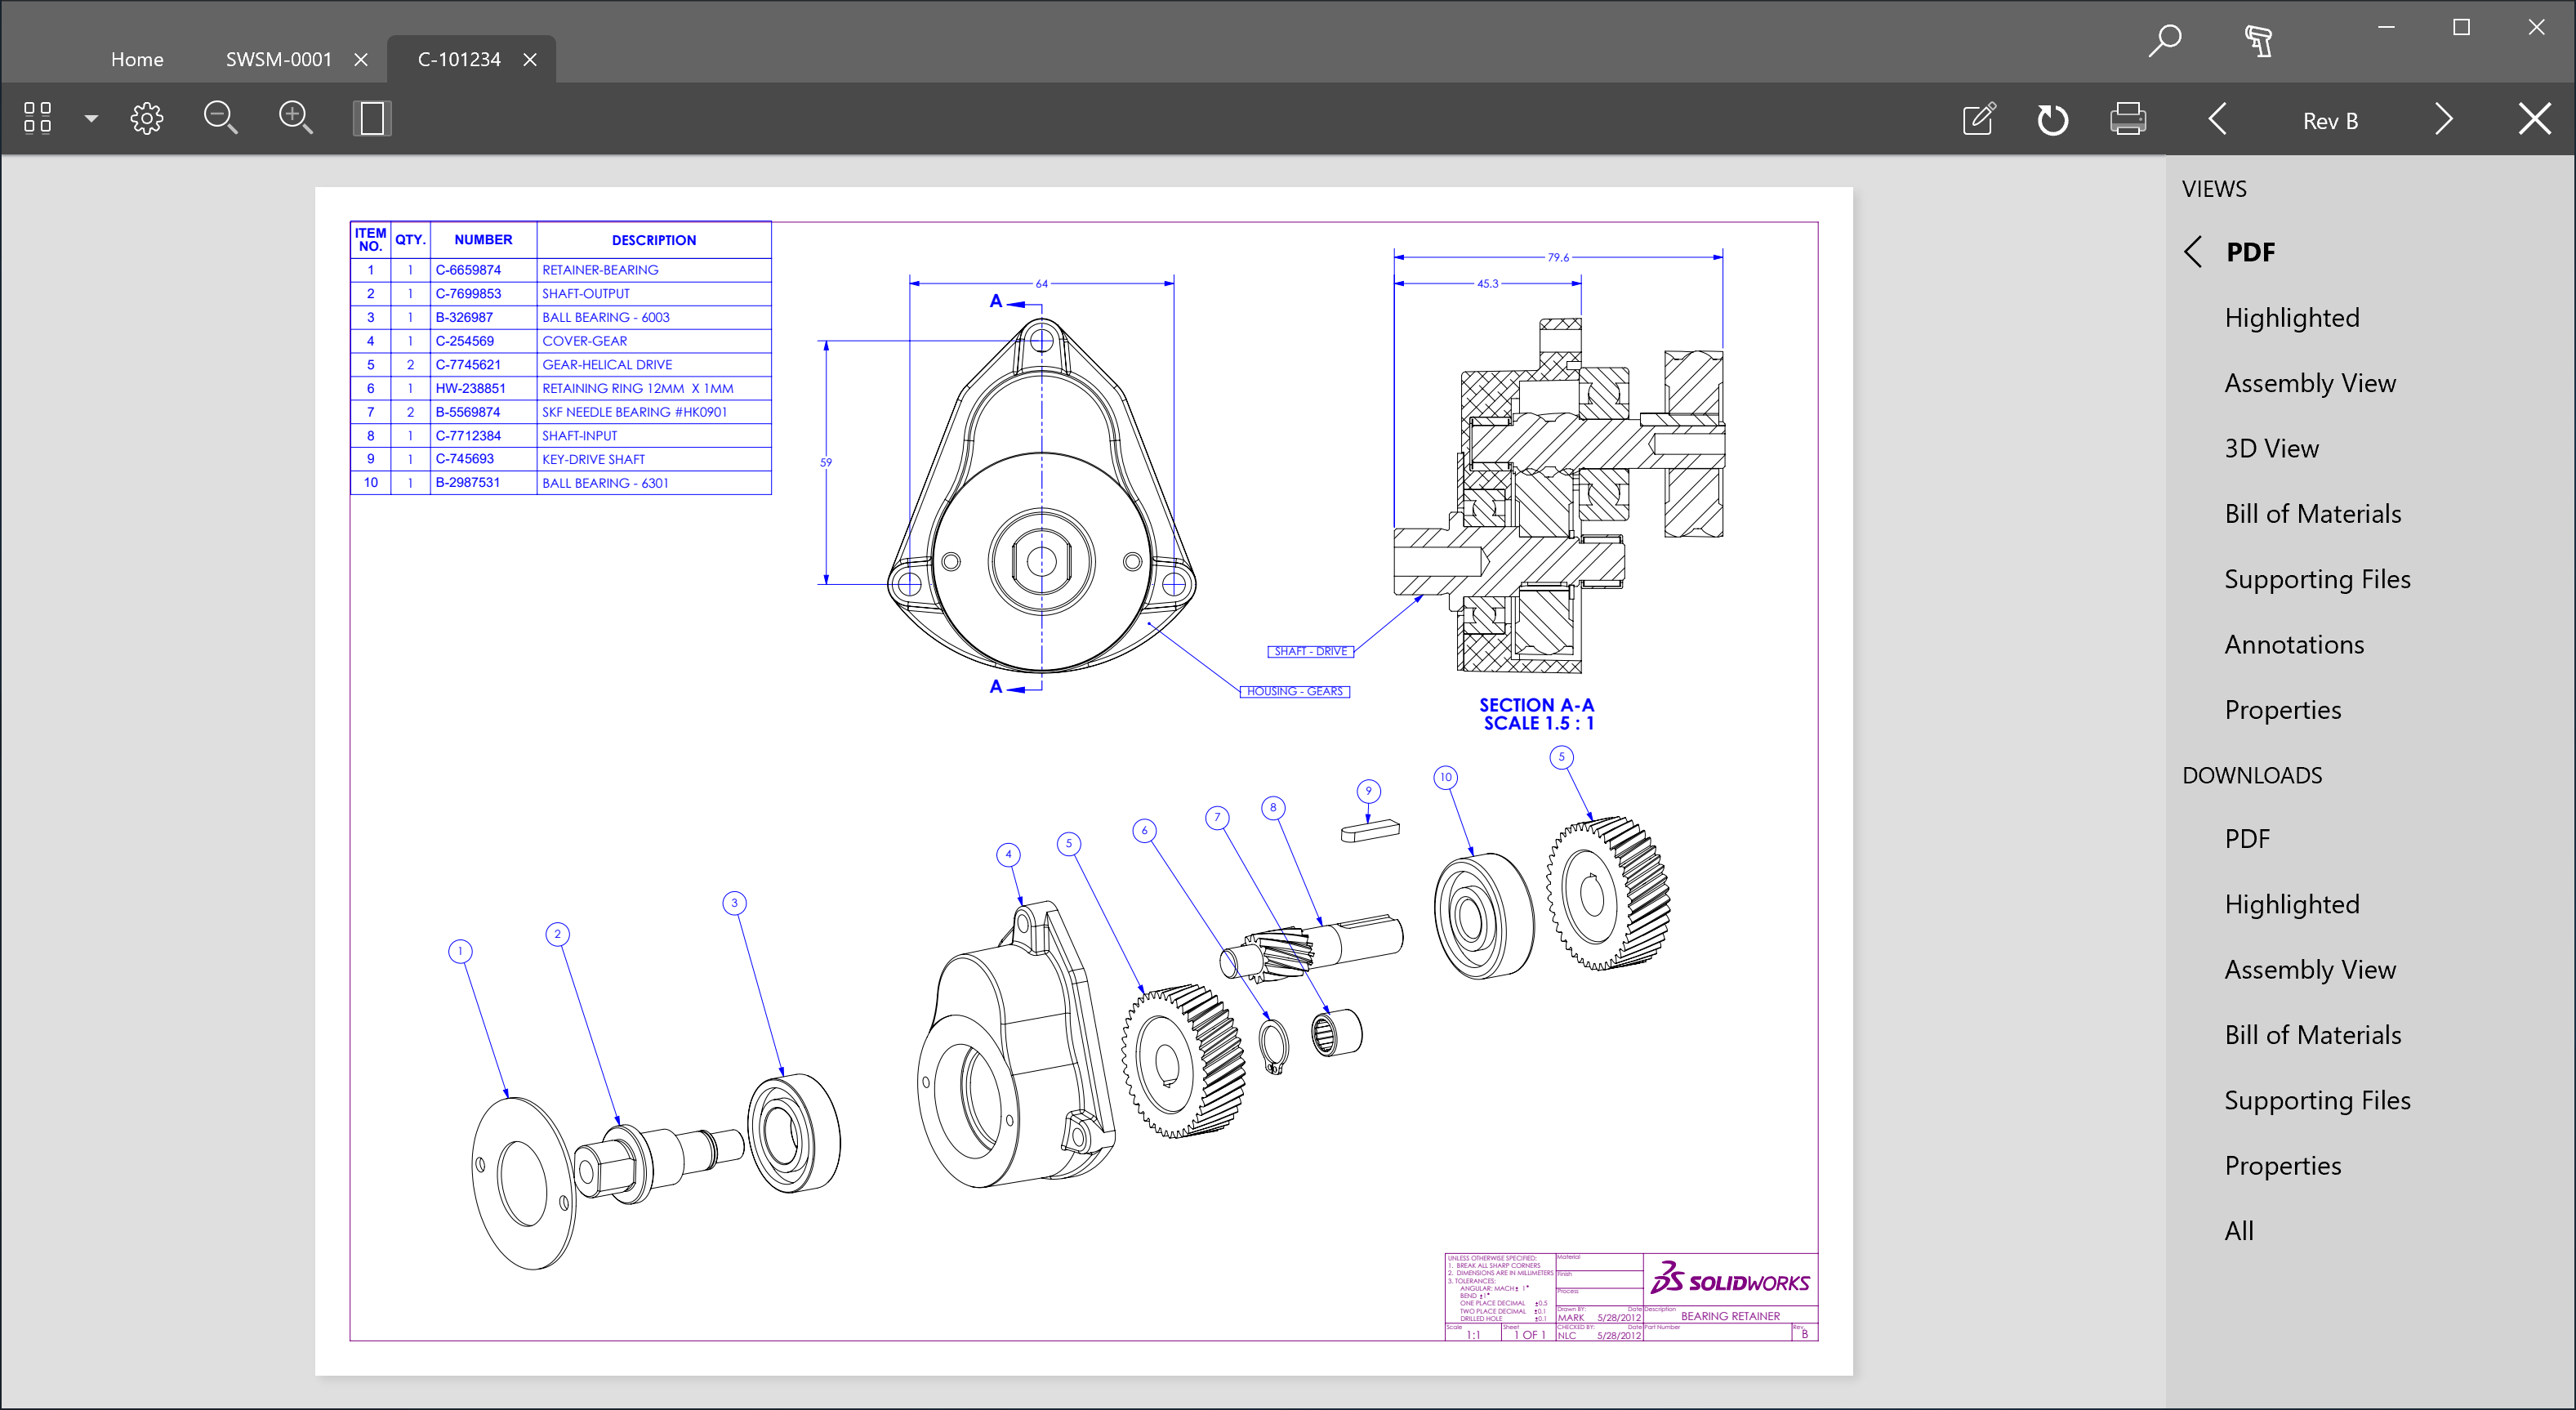
The image below shows an item opened. As you would expect, the latest revision of the item is immediately displayed.
When viewing an item, there are all the typical options available, such as zoom, mark up, print, etc. In addition, at the top right there is a “More…” button that can be clicked or tapped. This displays a panel along the right side with various view and and download options. The options listed depend on what the user can access and what content the item contains. The panel is shown in the image below.
The top bar of the panel also includes the ability to navigate the revision history if the user has access to previous revisions. The top right of the panel also includes a “X” button that allows you to close the panel.
Each item is displayed in a new tab. If you attempt to open an already opened item, then you are navigated to the tab that is already open. To return to the Home tab, you tap or click the Home tab or you can use Ctrl + H. Additional shortcuts for various functions are listed in the help page, which is accessible by clicking the question mark on the Home tab.
Search
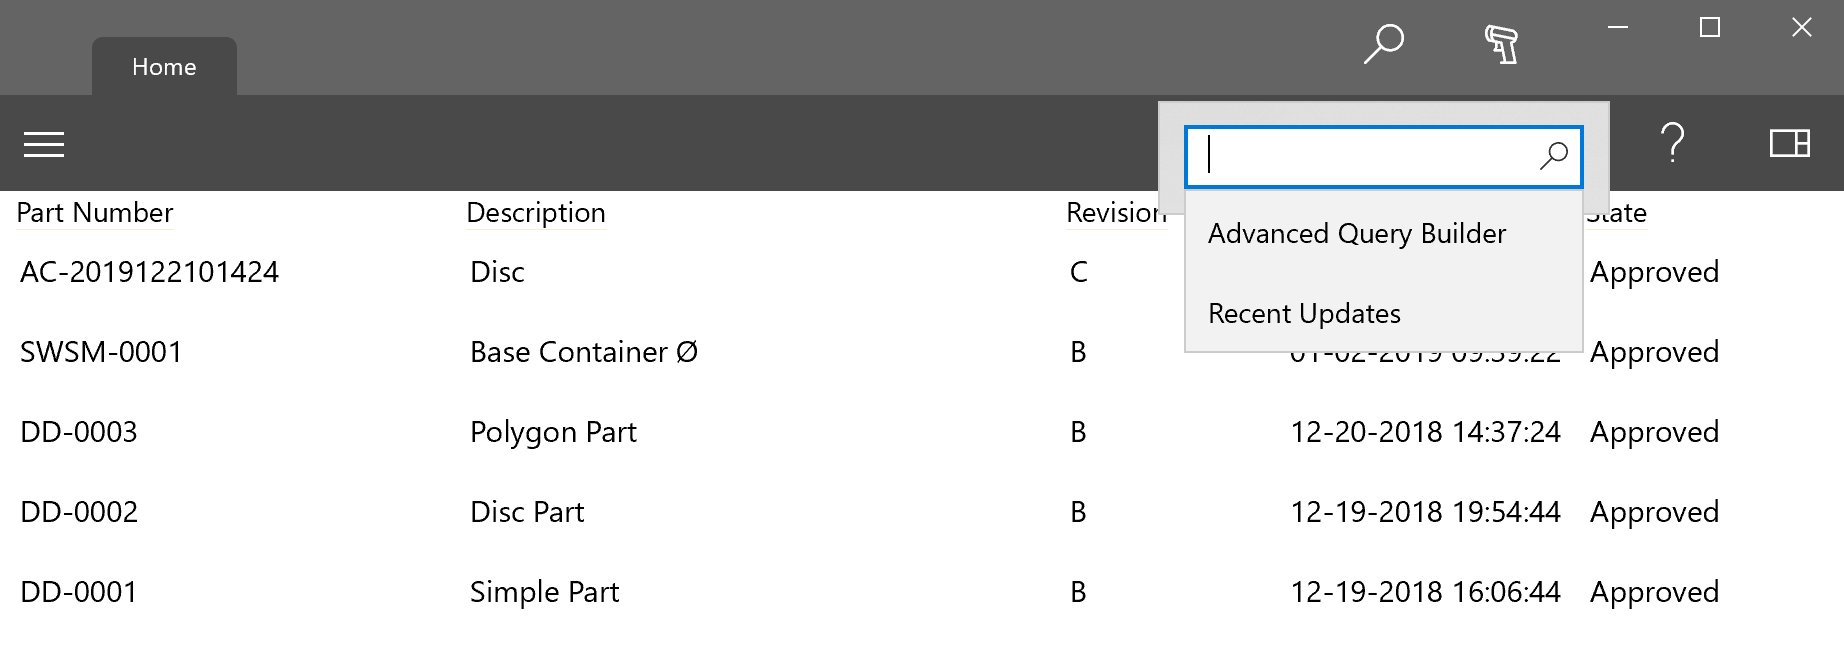
To initiate a search, simply click the search icon at the top right of the application or use Ctrl + F. A search can be initiated at anytime even if you aren’t currently viewing the Home tab. When you submit the query, however, you will be taken to the Home tab for a display of the search results. When entering a query, you also have two additional options, Advanced Query Builder or Recent Updates. If you click the Advanced Query Builder, then a fully featured query builder will be shown to create the query. Selecting Recent Updates will display the current list of Recent Updates from your account. This is the same list that is shown when you first log in.
When viewing search result, the column headers can be clicked or tapped for the purpose of sorting using that column. To change the direction of the sort, simply click or tap the column heading again.
Barcode Scanning
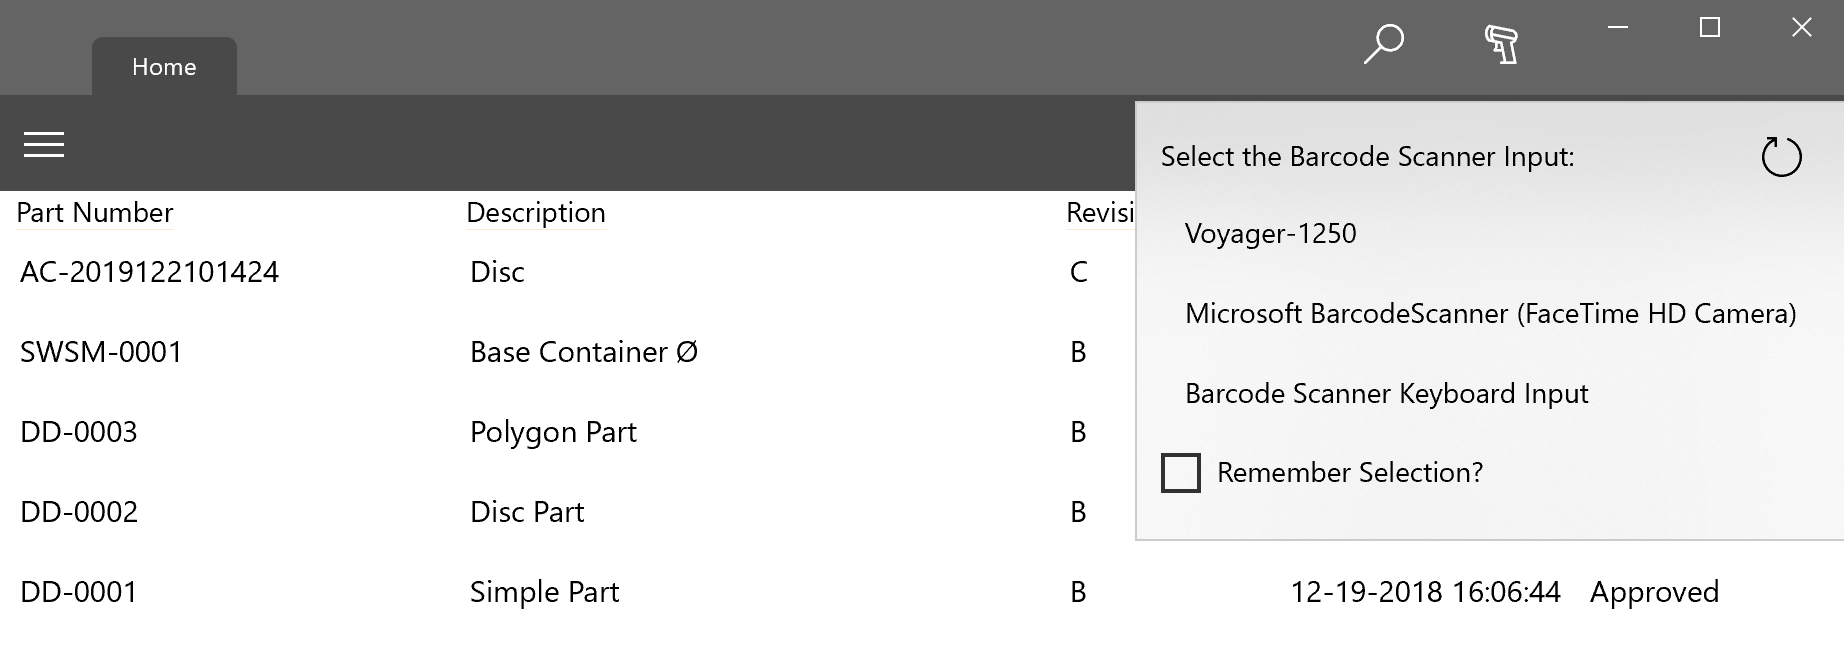
Multiple types of barcode scanning are supported within the application. Click the barcode scanning icon at the top right to see a list of the options available for your device. If you plug in a new barcode scanner or add a camera after the application has started, then you might need to click the refresh button at the top right of the list to retrieve the updated options. In addition, once you have decided on your barcode scanning method, you can use the “Remember Selection” input to not have to pick from the list each time. This selection can be cleared by going to the Home tab > Settings > Click or tap “Clear” next to the saved barcode scanner value.
If your device has a built in camera or an external camera selected, then you should see an option to use the camera to scan the barcode. The image below shows that option as the second item listed. Your list may be different and it is likely that the name of the camera option will be different since the name is dependent on the specific camera.
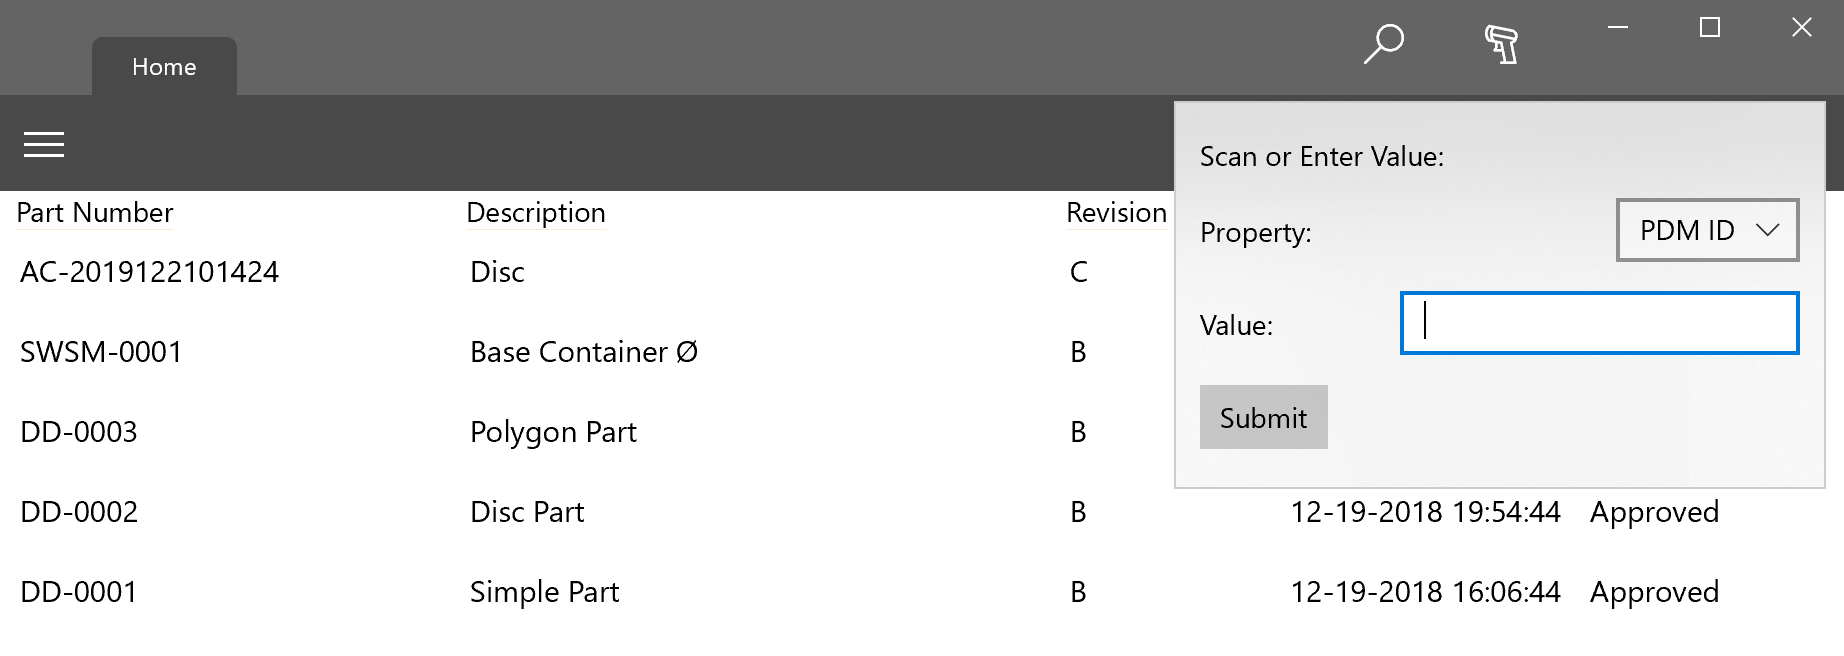
All devices will have the option called “Barcode Scanner Keyboard Input.” This is simply a way to easily use a generic USB barcode scanner that functions as a keyboard input. Clicking or tapping this option will result in the screen shown below. The input field will be selected, you can immediately scan a barcode with the scanner and it will fill in the value received and perform a search for the item. You can also quickly display this input method by using the shortcut Ctrl + I.
If you have a USB barcode scanner that is configured for HID Point of Service Mode, then additional functionality is possible and the scanner will show up in this list as a separate option. In the list shown previously, the option named “Voyager-1250” is this type of barcode scanner. Voyager-1250 is the actual name of the barcode scanner as it appears to Windows. Selecting this option will allow the application to directly connect to this type of barcode scanner and you don’t have the display inputs on the screen. Once connected, you simply scan items and they will be displayed automatically in the application. In addition, if you save this selection then the application will automatically connect to the barcode scanner when the application is opened and you can immediately start using it.
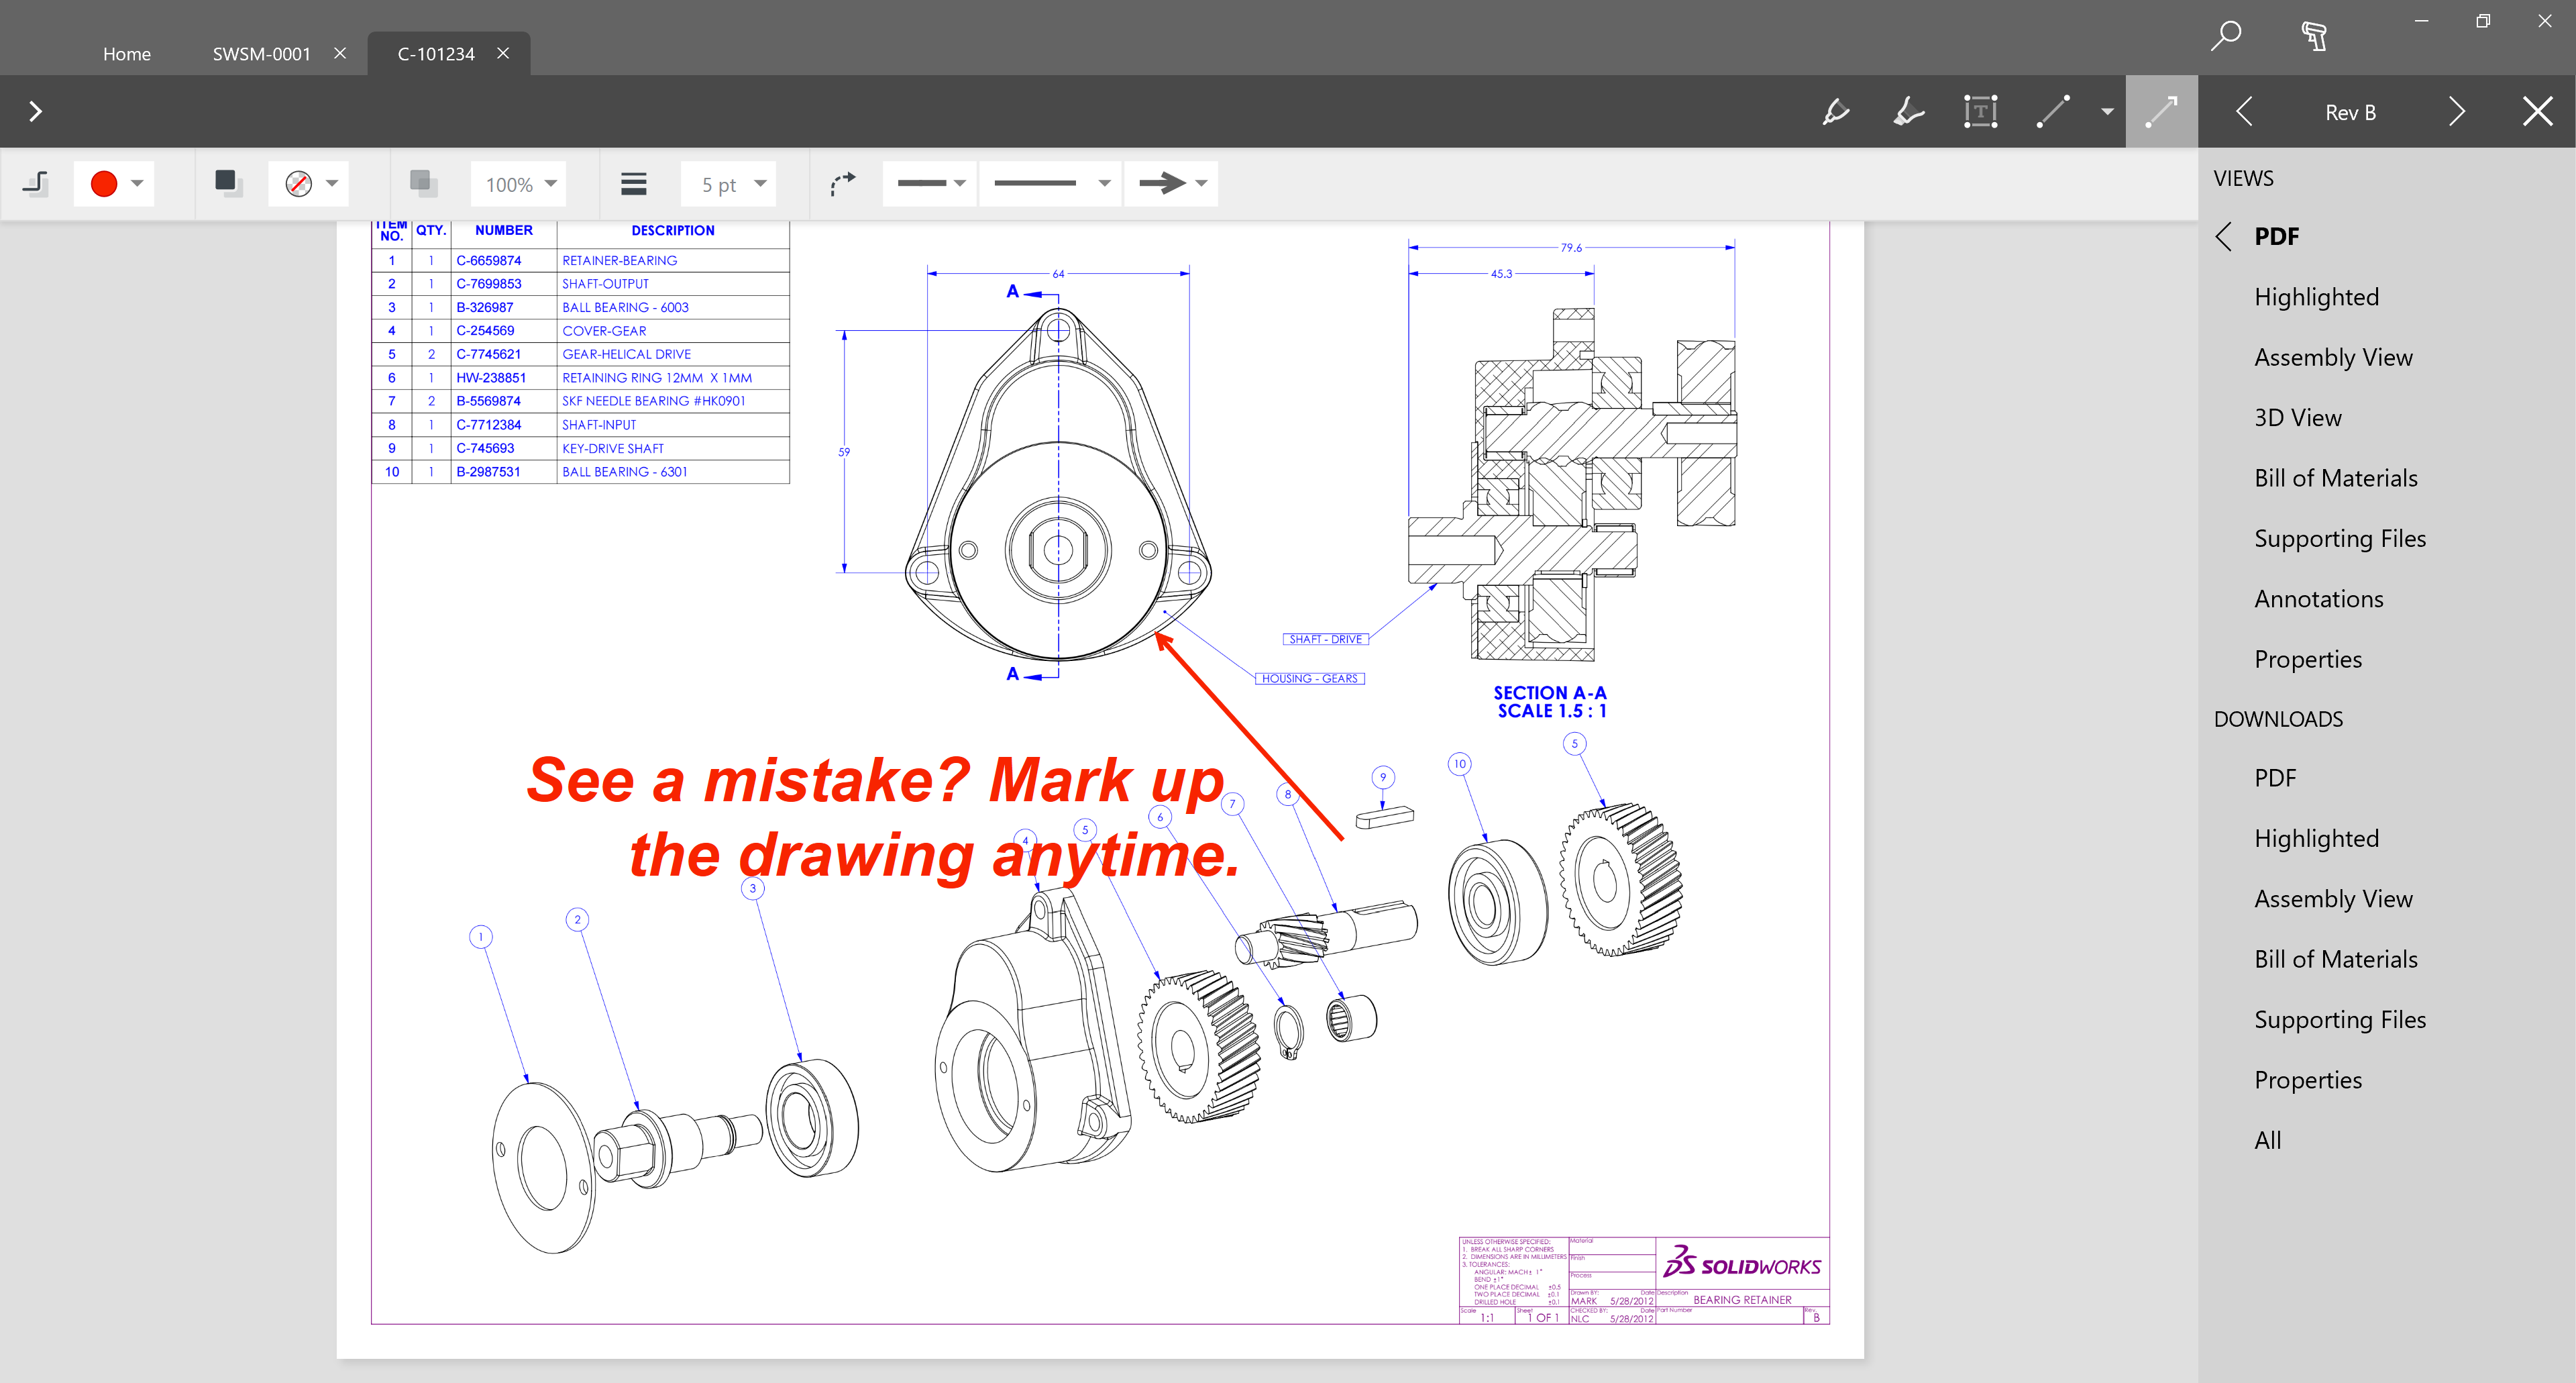
Annotations
Just like our other applications, the Windows 10 application includes a fully featured ability to create annotations. Users can easily use touch or a stylus to add the mark ups and then send the annotation to the appropriate personnel.
This new Flatter Files Windows 10 application is a powerful viewing application that should provide a best in class experience for Windows 10 tablets and convertible laptops. We are very excited to get this application into the hands of our customers and look forward to your feedback. If you have any questions or enhancement requests, please do not hesitate to contact us at [email protected].
A big part of the reason Flatter Files is successful is that our customers have the ability to access their content on any device in a seamless manner. For years Flatter Files has offered native applications for iPad, iPhone, and Android devices to go along with our fully featured web application. These native applications provide a level of features and capabilities on mobile devices not possible via a single web application.
Initially, when developing these mobile native applications the focus was on a simplified user experience. While that remains true, tablet devices are becoming more and more powerful and capable. Thus, after months of development we are very excited to announce a major update to our iPad application that brings capabilities to the application that previously weren’t possible. Today’s update is big but this is just the start. We hope to bring these capabilities to our Android application in the near future and we have many big plans that will continue to push forward the capabilities of the Flatter Files tablet user experience.
Multi-Item User Interface
By far the biggest change to the iPad application is that you can now open multiple items at the same time as shown in the animation below. This was easily the most requested feature for our iPad application and by far the most challenging to implement. Viewing multiple items happens automatically. You simply view an item and then view another item. Previously the second item would have replaced the previously opened item but now a new tab is added for each item that you view. This tab interface allows you to easily switch between the various items that have been opened. In addition, you can close an item at any point when you are finished viewing it.
When viewing an item in the tab, there is also now a new “More…” button. This button will display the additional data related to the item. For example, the 3D view, supporting files, annotations, property data, etc will all be shown under the “More…” button. If you click on an option that can be viewed such as the 3D view or an Annotation, then the item tab will be updated to display this different information. To return to the main item view, you can simply tap “Item” under the “More…” button.
Bottom Bar
The bottom bar is now hidden by default if the device is in landscape mode when initially viewing an item. Vertical space is limited when in landscape mode so we have decided it makes sense to hide the bottom bar unless it is needed. To display the bottom bar, simply tap the PDF view. The resulting bottom bar is shown below.
Due to the new iOS navigation bar at the bottom, we have moved access to previous revisions from the center to the far left of the bottom bar. Instead of having a revision label, forward button, and a back button for navigating the revisions, there is now a single revision button. This button displays the current revision and if you tap the button it will display an option to view the previous or next revision if applicable.
Bluetooth Barcode Scanning
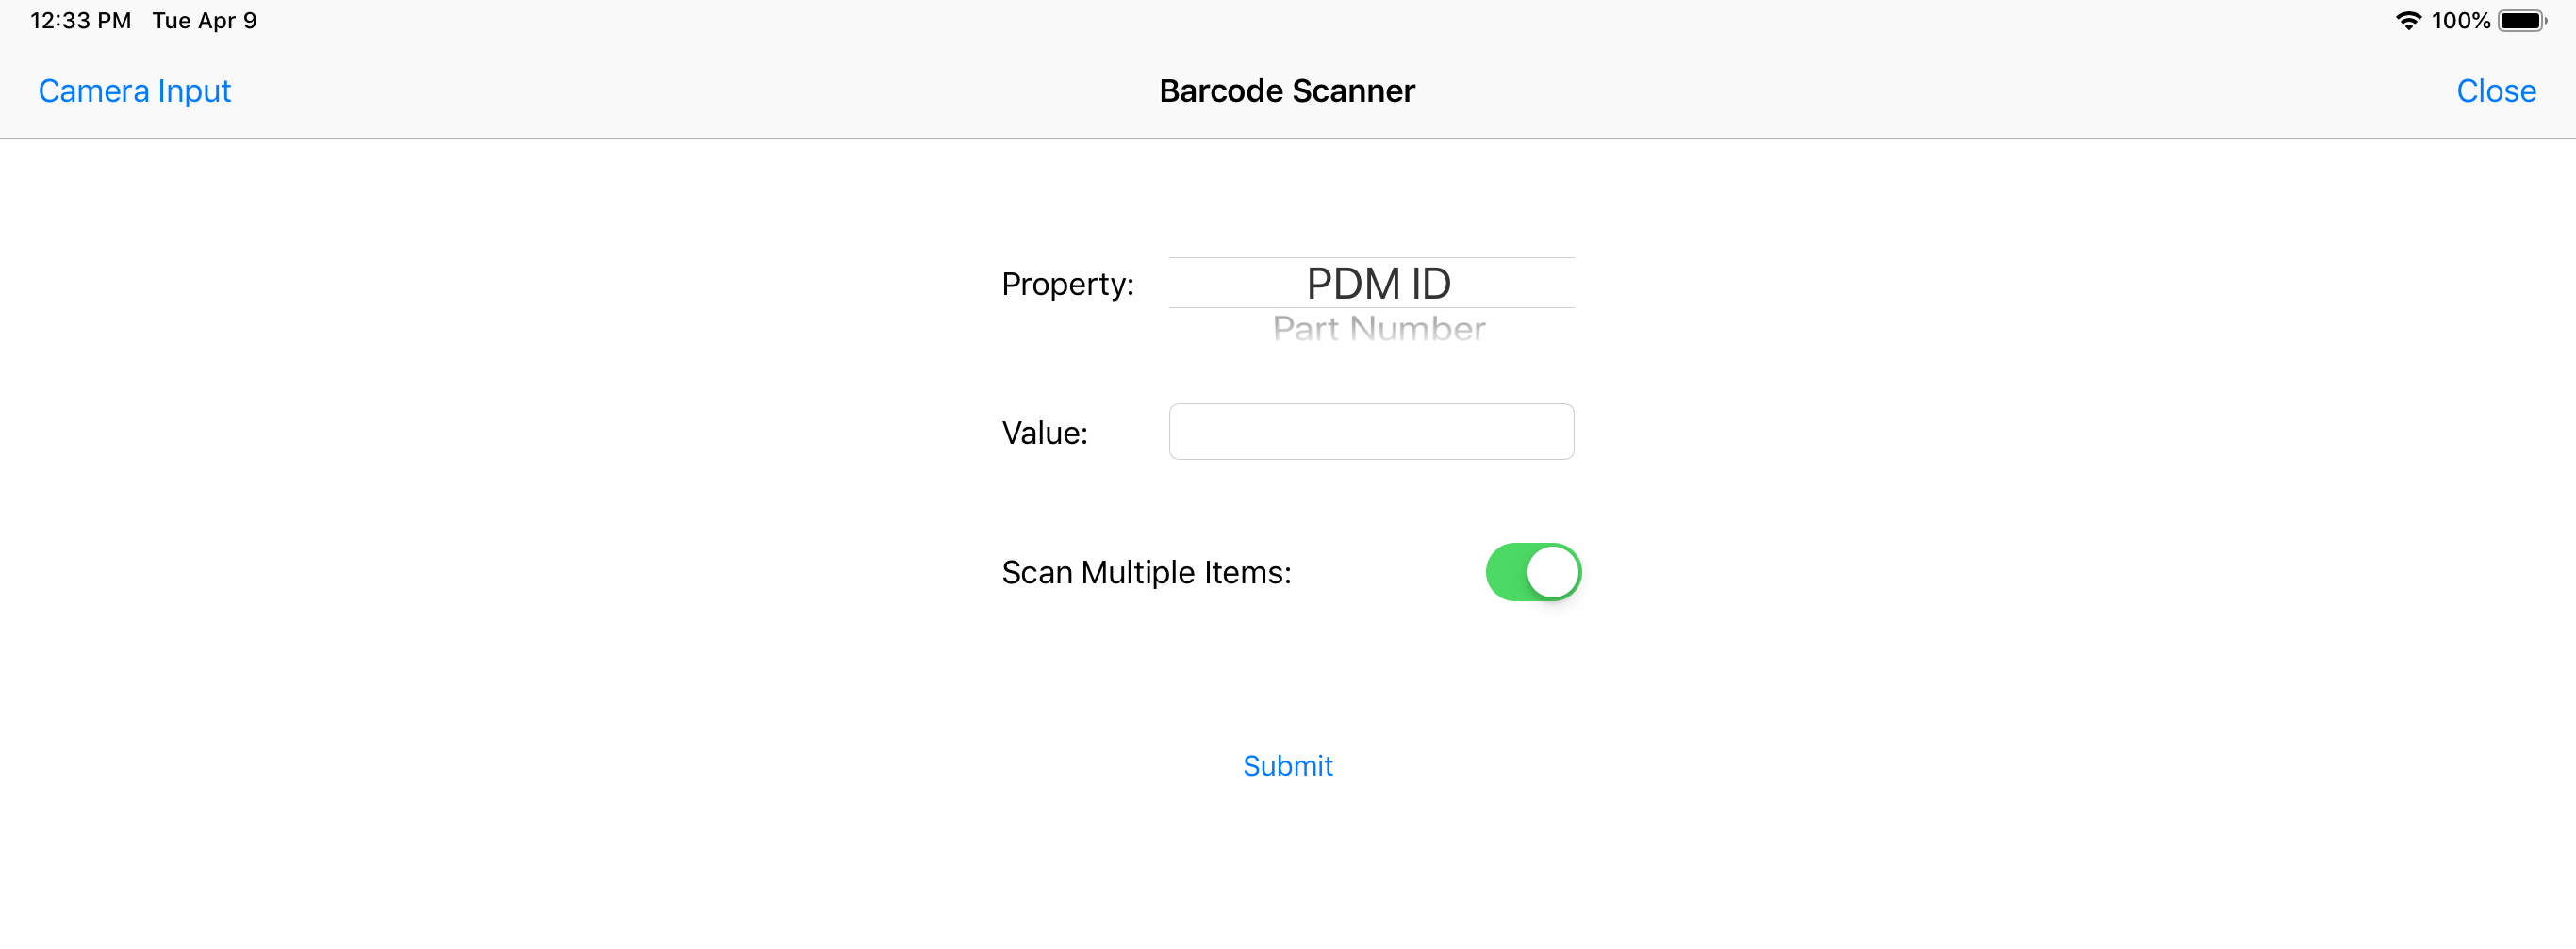
Ever since we added barcode scanning support to our mobile applications, it has quickly become one of our most used features. Customers find that being able to scan a barcode and see the resulting drawing is a great way to simplify the user experience. Although scanning a barcode with the device’s camera works great, sometimes you might want to be able to use a bluetooth barcode scanner with your iPad. Thus, we have added support for bluetooth barcode scanners that operate as a keyboard replacement. To support a keyboard replacement bluetooth barcode scanner, we have added a special input. To get to this input, click the barcode scanner icon and then click “Keyboard Input” at the top left. This will switch the view from the camera scanner to an input specifically designed for bluetooth barcode scanners as shown below.
Moving forward when you click the barcode scanner icon it will initially display the most recent input that was used. Thus, you will not have to change the input each time you click the barcode scanner icon.
Once you have connected your bluetooth barcode scanner to your iPad, you should be able to navigate to this keyboard input and easily scan an item to view it immediately. If you would like to scan multiple items at the same time then you can toggle on the option to “Scan Multiple Items.” When this is toggled on, the application will wait for the user to click “Submit” before displaying the scanned items.
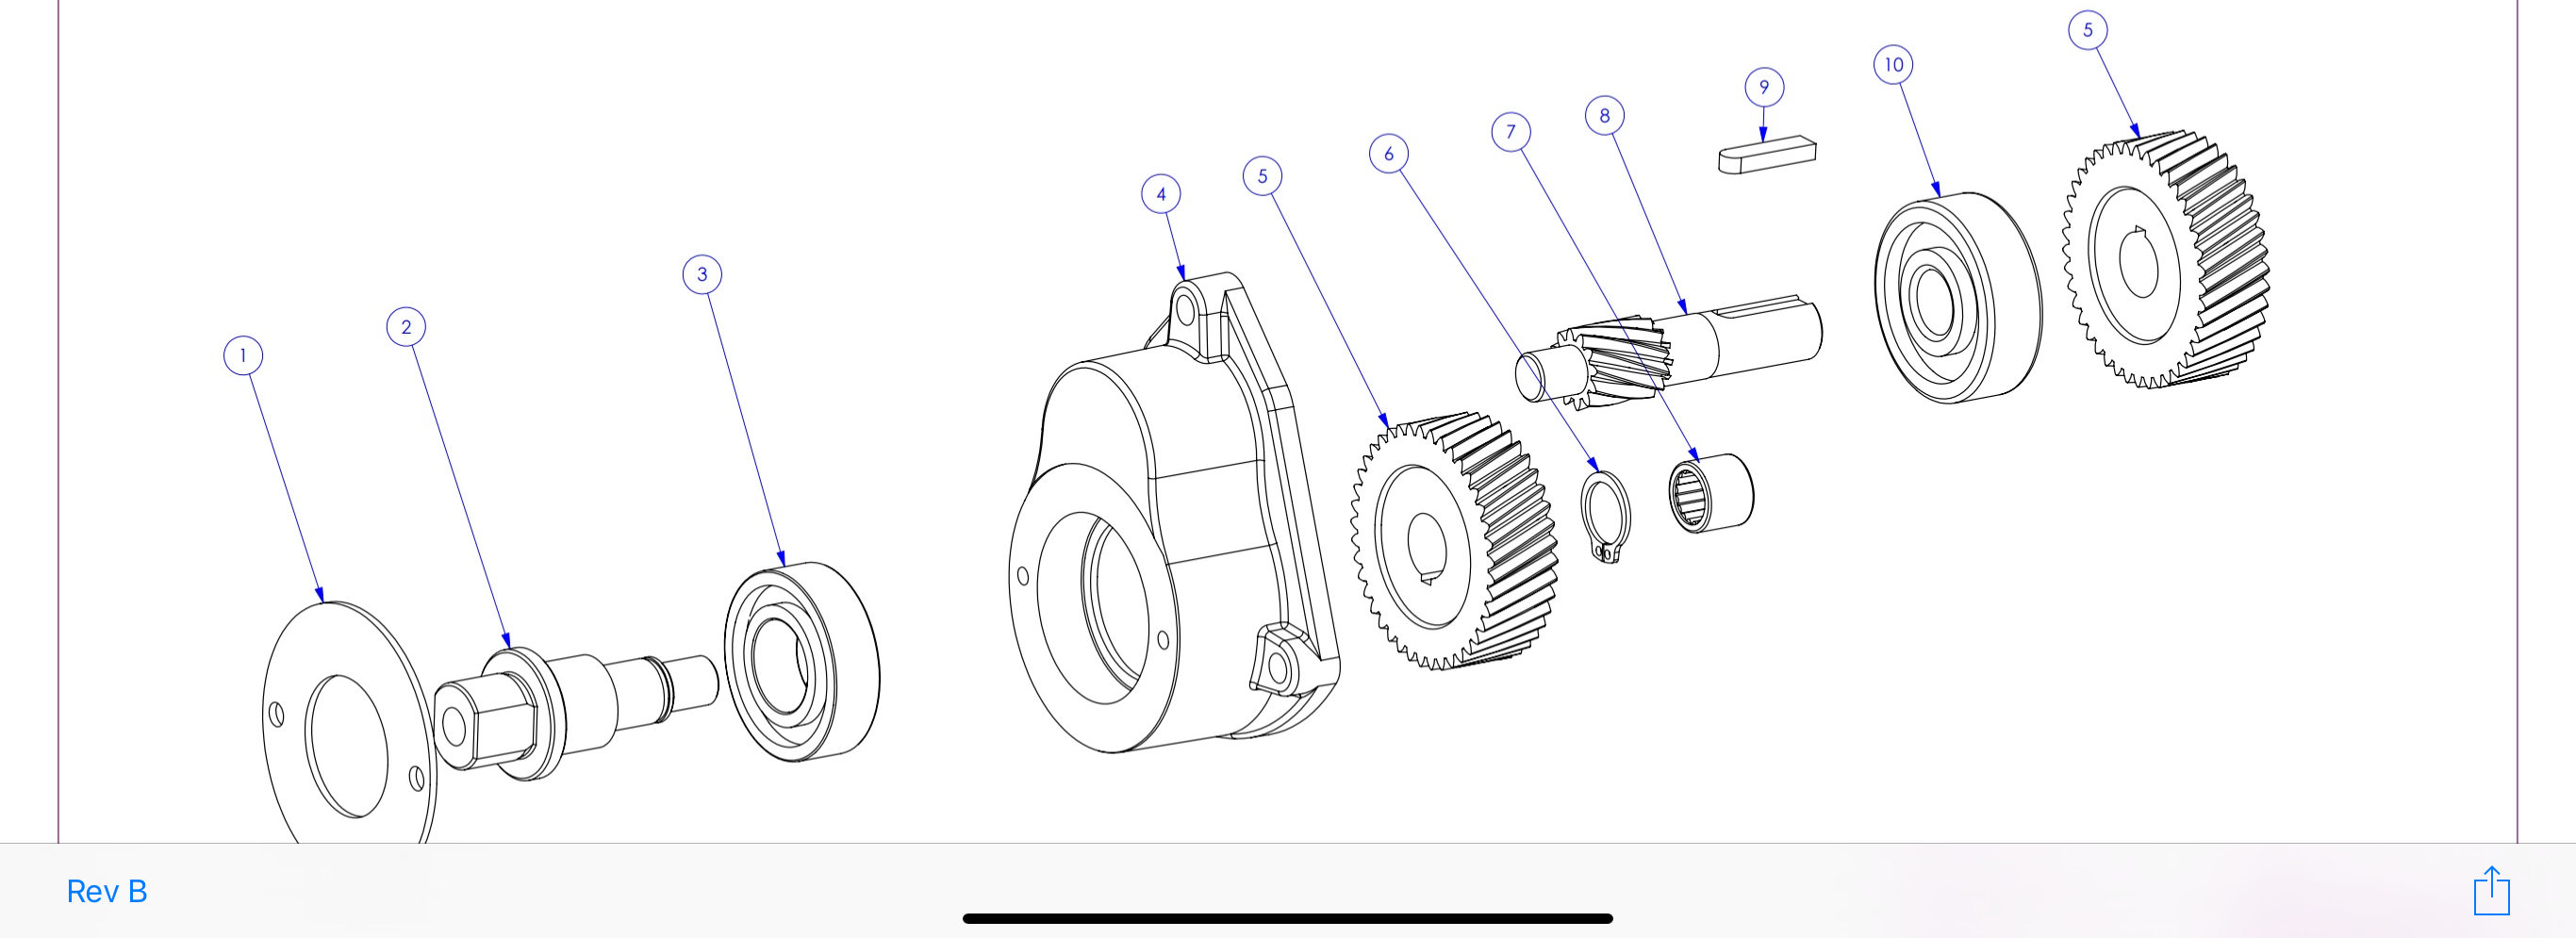
Assembly Views
When viewing an Item that has a corresponding Assembly View, the iPad application now includes the ability to view the “Assembly View” directly from the Item’s “More…” button list of options. This ability to quickly switch from the Item view to the Assembly View is shown below in the animation.
Magic Ink Annotation
The annotation toolbar now includes a magic ink option which will automatically convert your inking to to the closest shape. The currently supported shapes are arrows, lines, circles and squares. The animation below shows an example usage of the new magic ink tool.
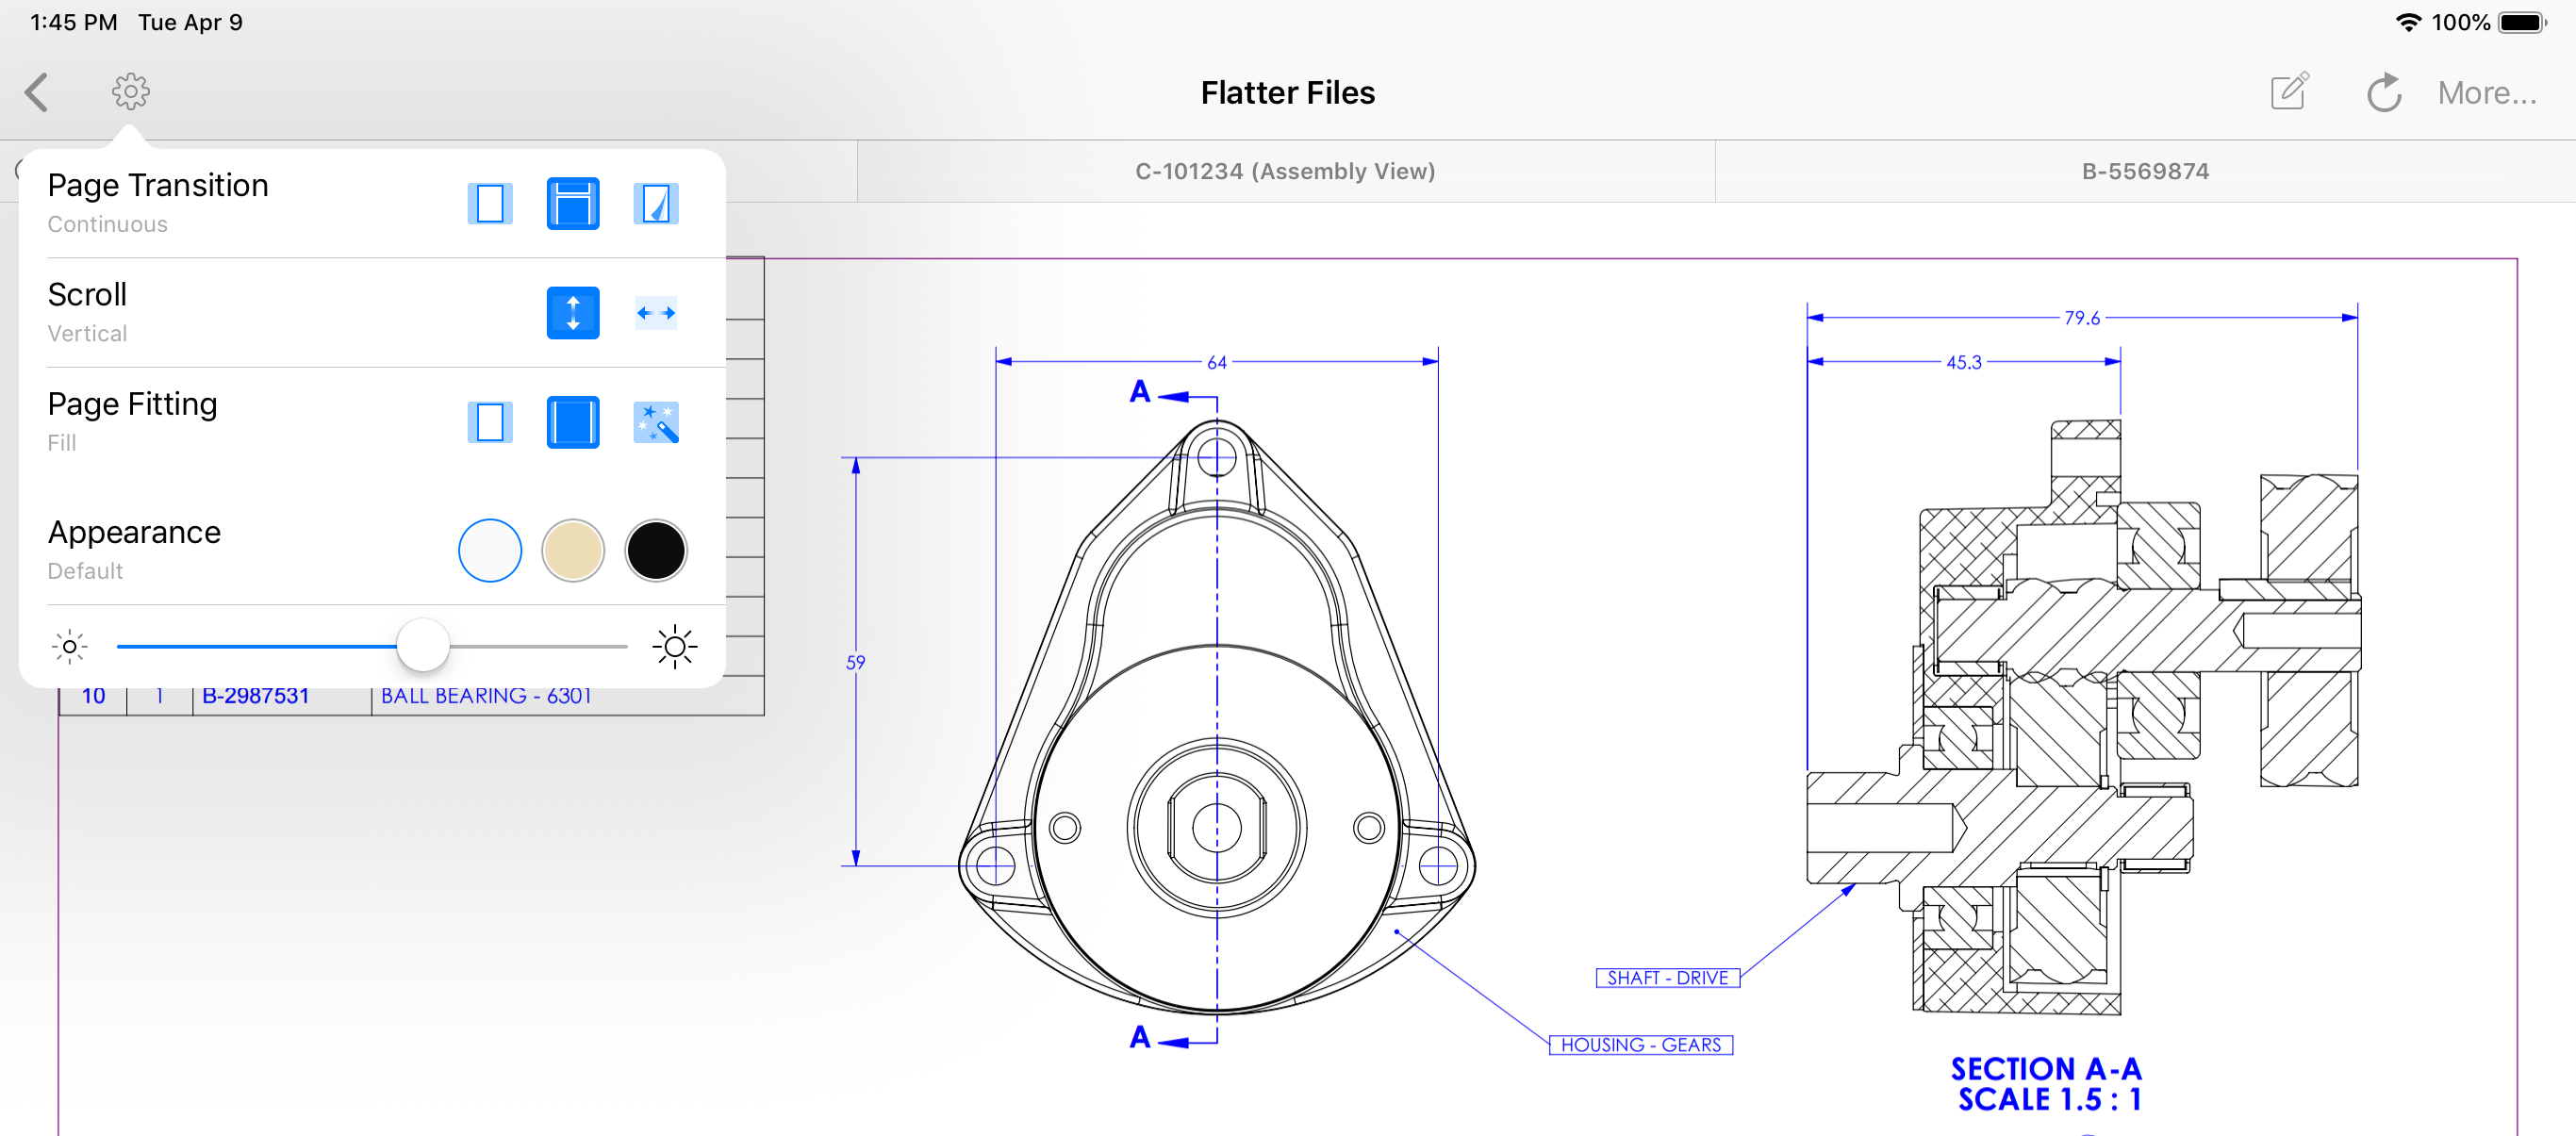
View Settings
The view can now be customized by clicking the settings icon at the top left of the application. This will display a set of specific options for how the PDFs are displayed in the viewer as shown in the image below.
As you can see, this is a major update to the Flatter Files iPad application. These updates with the exception of the multi-item user interface also apply to the iPhone application. If you have any questions or enhancement requests, please do not hesitate to contact us at [email protected].
Flatter Files is continuously being developed to add new capabilities, improve user experiences, and fix issues. Below is a summary of some of the new capabilities and improvements from the past few months that have been added to Flatter Files.
Alternate PDFs
Support has been added for creating an alternate PDF when processing SOLIDWORKS drawings. An alternate PDF is created and uploaded alongside the primary PDF of the drawing but has different content that is controlled via drawing layers. As shown in the image below, you specify specific layers in the Uploader that you want hidden or shown for the primary PDF. Then by checking a single box the opposite can be uploaded as the Alternate PDF.
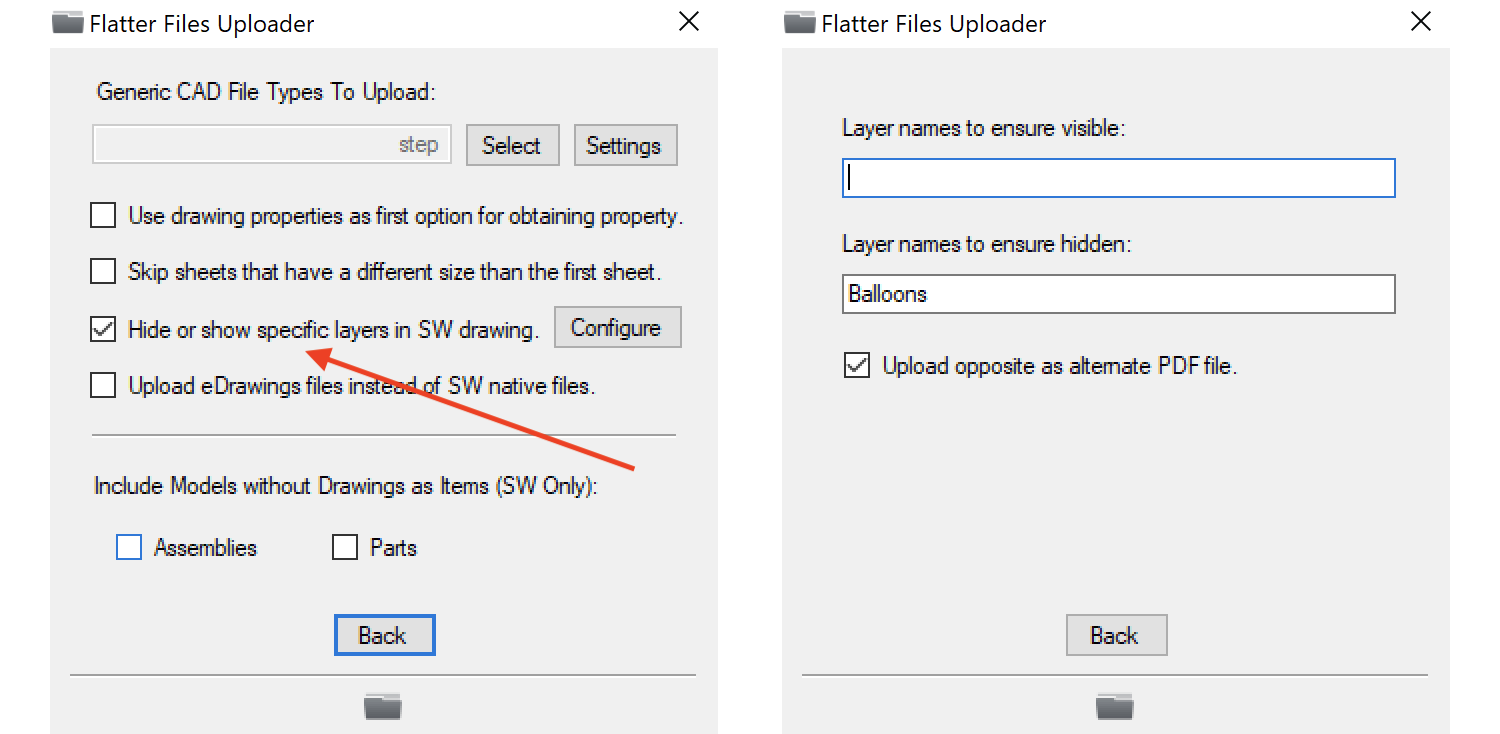
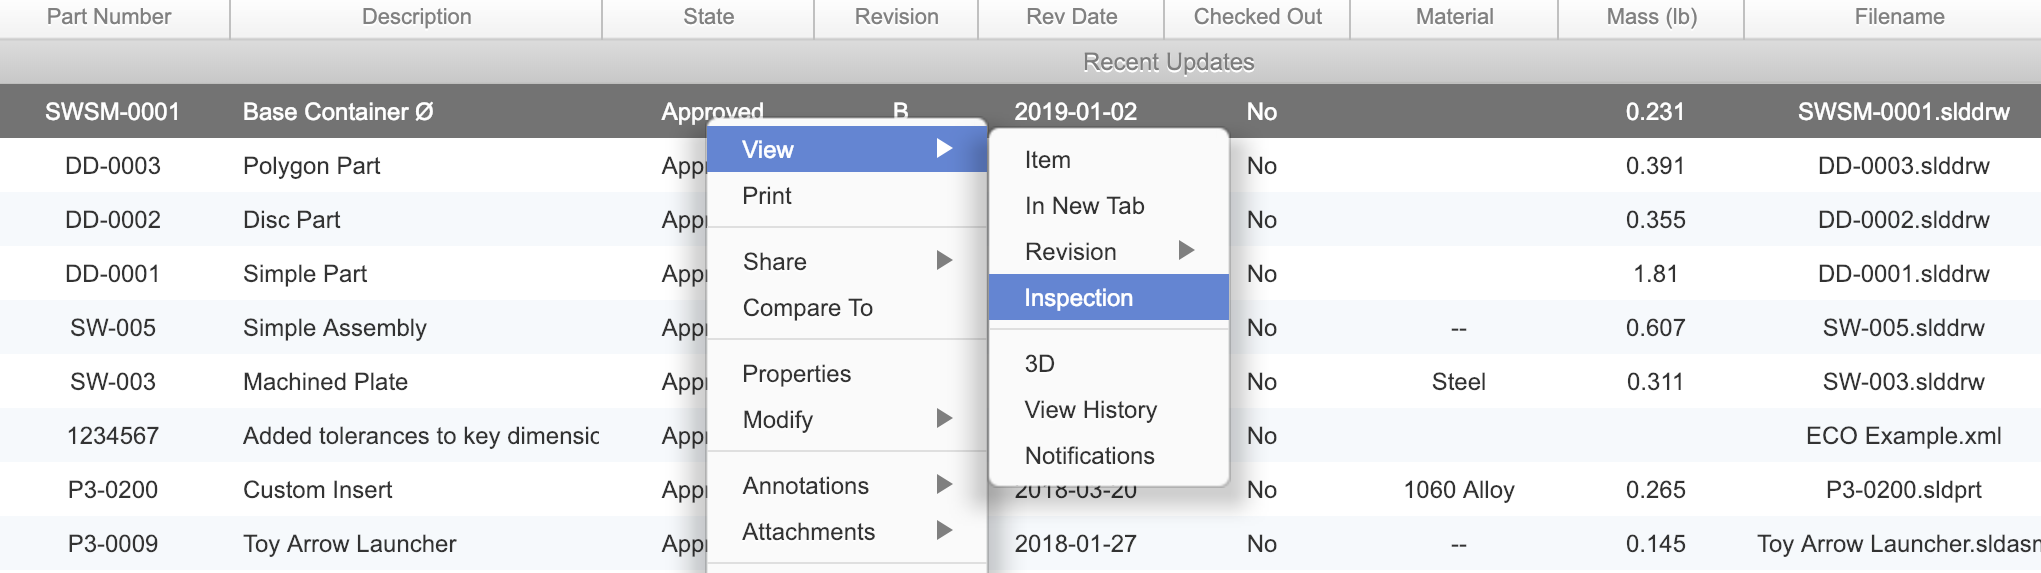
The result is that when viewing the item on Flatter Files the primary PDF is shown but with a single click the user can view this alternate PDF. For example, consider the scenario where you have a layer called Balloons and this layer contains inspection callouts. Flatter Files can now upload the PDF where it ensures the Balloons layer is hidden and then upload an Alternate PDF with the Balloons layer shown. You might then name the Alternate PDF something like “Inspection” to designate it as the view for when conducting the inspection. The resulting option in the view right click menu is shown below.
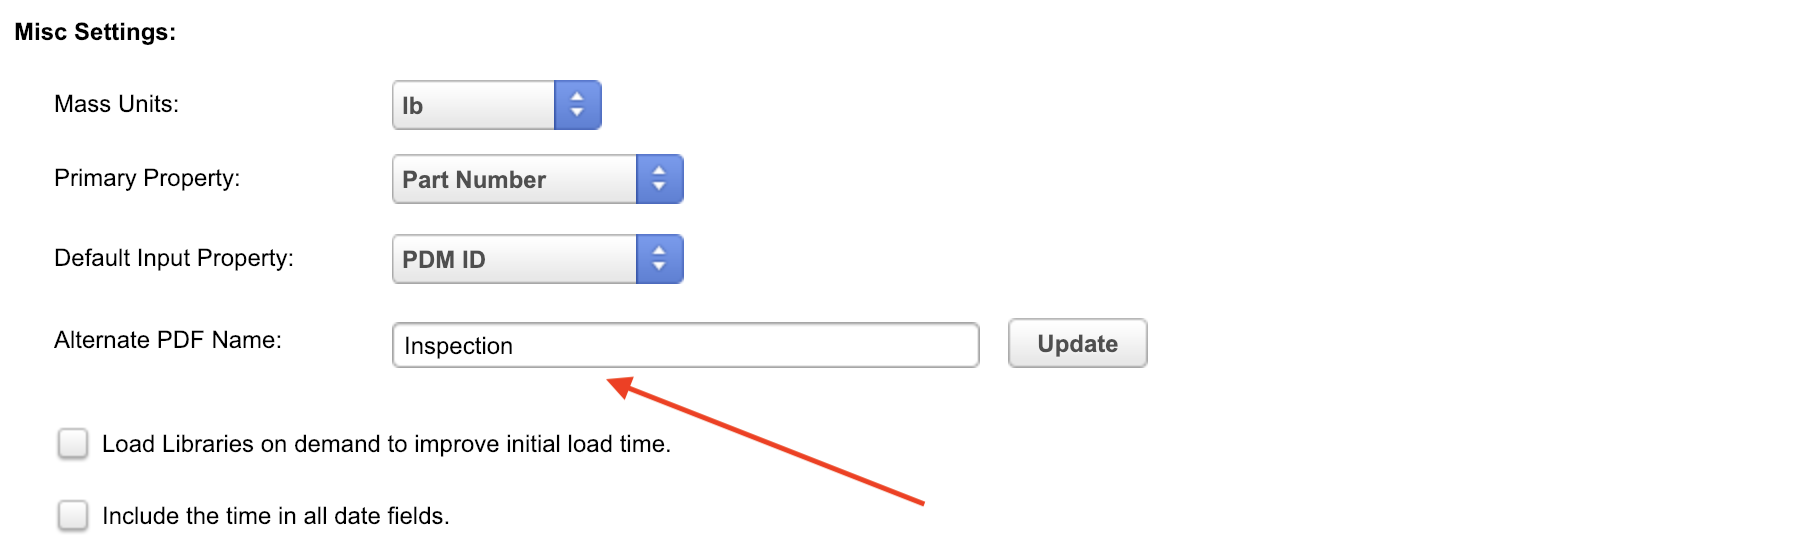
The name of the Alternate PDF can easily be changed to any value by going to Dashboard > Settings > Company > Misc Settings. The setting is shown in the image below.
The idea for adding support for Alternate PDFs came directly from a customer. We are very interested to see how other customers will use this new capability.
Stamp Property onto PDF
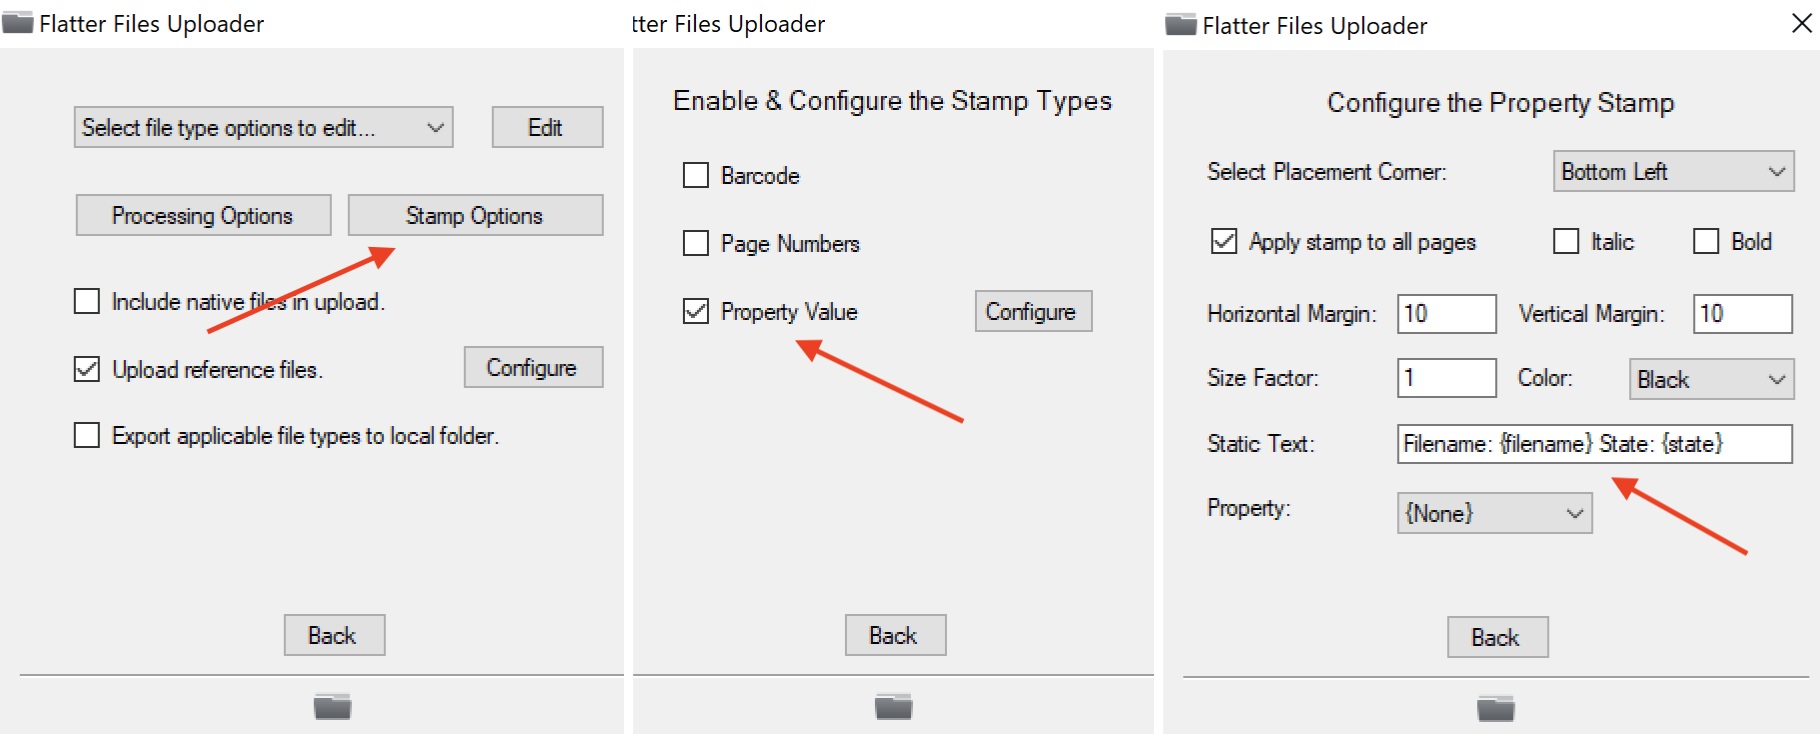
Flatter Files now supports stamping any property data onto the PDF when the Uploader creates and uploads the PDF. This allows you to stamp content that is dynamic such as the current PDM state of the item or other property data that isn’t shown on your drawing. The settings in the Uploader are located within the File Type Options page as shown below.
As shown in the screen on the far right of the image above there are two key settings. Static text and Property. If you want to stamp a single property then you can optionally enter additional text in the static text field and then select the property. For example if you wanted to stamp the filename you could enter “Filename: “ for the static text field and then select the filename property. If the filename for the item is 123456.slddrw, the result of the stamp would consist of the following:
Filename: 123456.slddrw
If you need to stamp multiple property values then you can use the method that is shown in the static text field in the image above. Basically you can stamp as many property values as needed by surrounding the property name with brackets. Assuming the item was in the Released state, the value for the text entered in the image would produce:
Filename: 123456.slddrw State: Released
Android App is now in Amazon App Store
We have published our Android Application to the Amazon App Store such that you can install and use it on your Kindle Fire tablet devices. The application can be found by searching for Flatter Files in the app store or by using this link. Please let us know if you find any questions or find any issues when using the application on your Kindle Fire tablets.
Specify Library based on Model
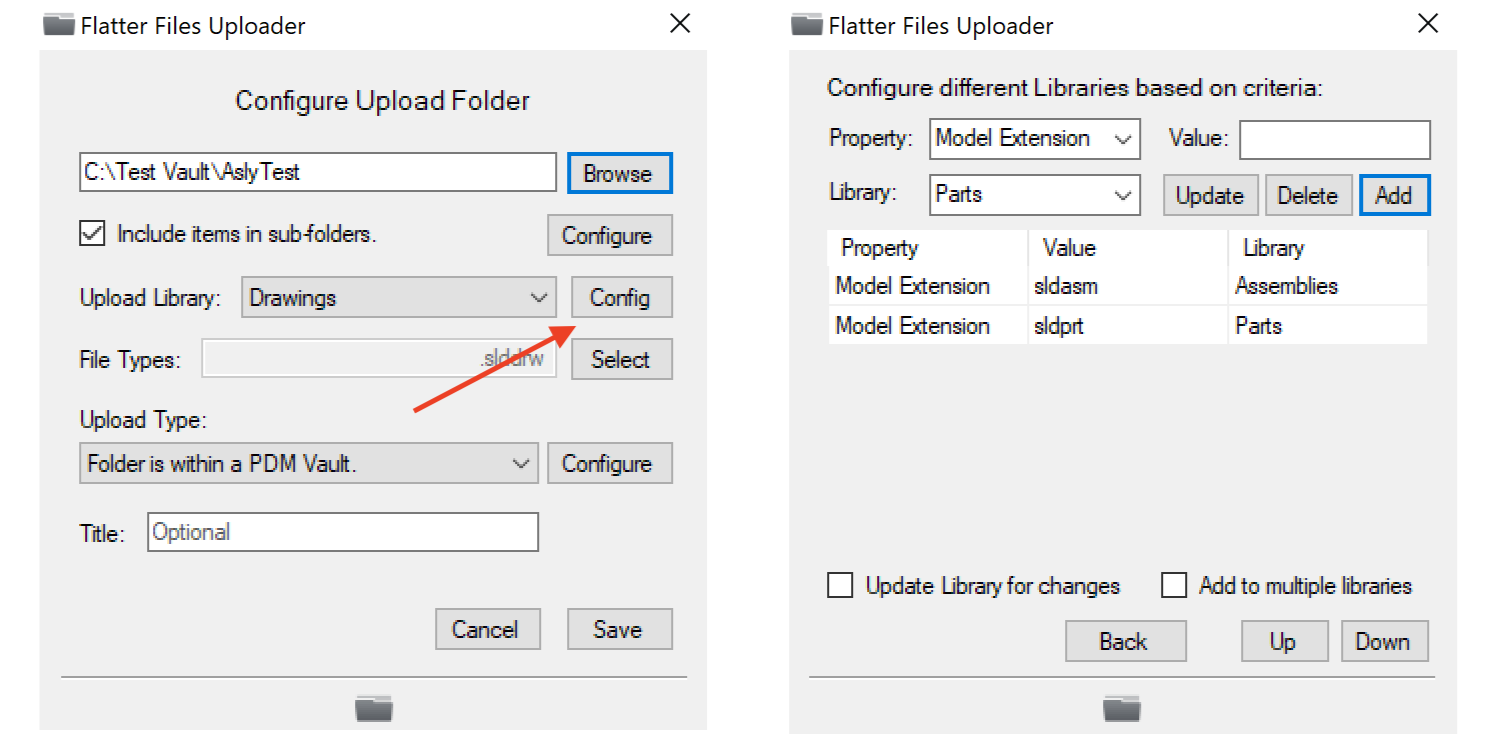
When uploading drawings from SOLIDWORKS or Inventor you can now specify the Library that the items should be placed in based on the model type. This allows you to have a Library that contains all of your Part Drawings and a different Library that contains all of your Assembly Drawings. To do this click the Config button next to where you select the Upload Library in your folder configuration as shown in the image below. Then enter two library specifications where the property is equal to Model Extension and you select a different library for the different extensions. The configuration is shown below for specifying that SOLIDWORKS parts should be placed in the Parts Library and the SOLIDWORKS assemblies should be placed in the Assemblies Library.
Keep in mind that for the above configuration to be possible, you must first create the two Libraries on Flatter Files by right clicking “Libraries” in the web application and selecting “Add Library.”
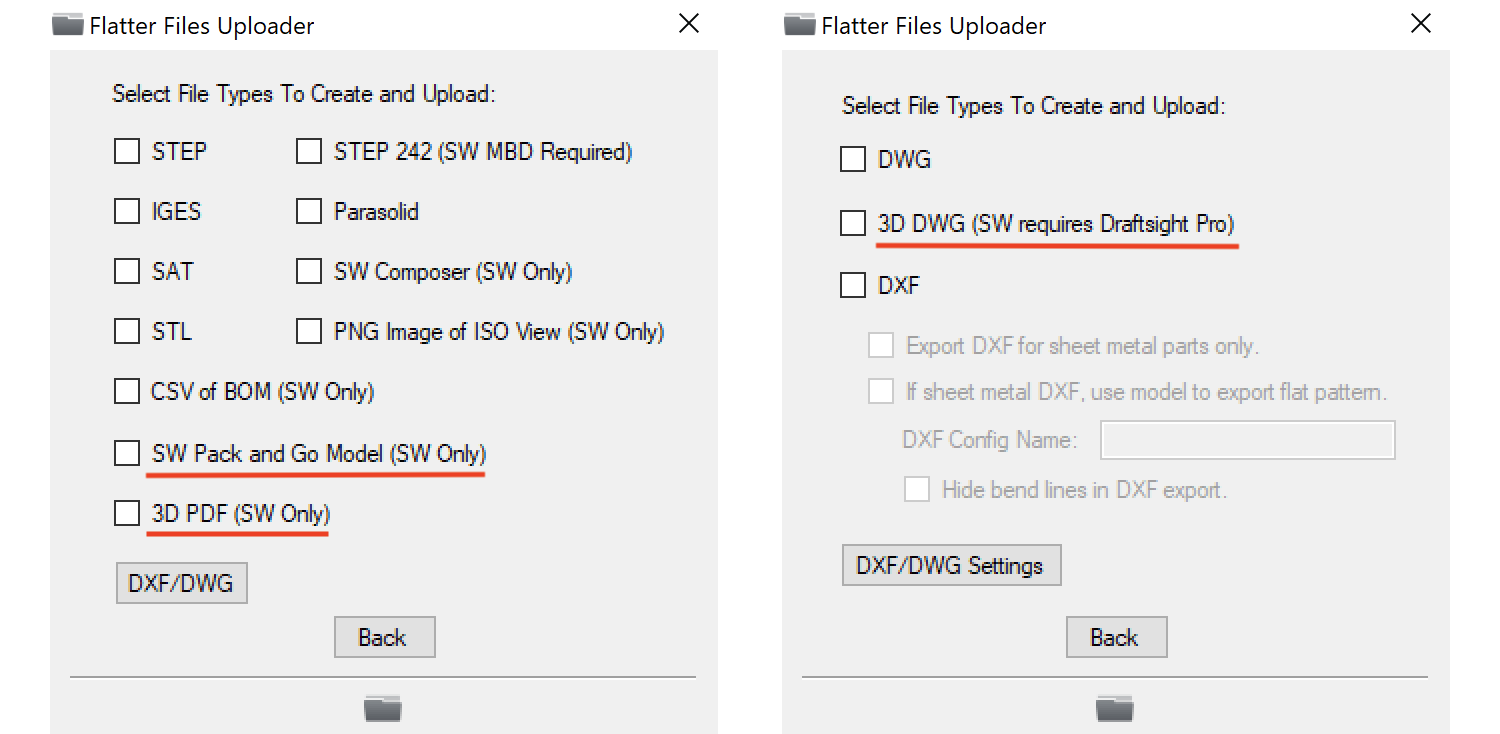
New Export Type
Support for three new export types have been added for SOLIDWORKS files. The three new types are SOLIDWORKS Pack and Go Model, 3D PDF, and 3D DWG. SOLIDWORKS does not support direct export to 3D DWG. Thus, you must have DraftSight Pro installed to generate this export. The Uploader will actually first convert the SOLIDWORKS model to a temporary SAT file, open that in DraftSight, and then export it to 3D DWG using DraftSight.
All three new export types can be accessed via the Flatter Files applications while viewing the item just like all of the existing export types.
Missing File Check
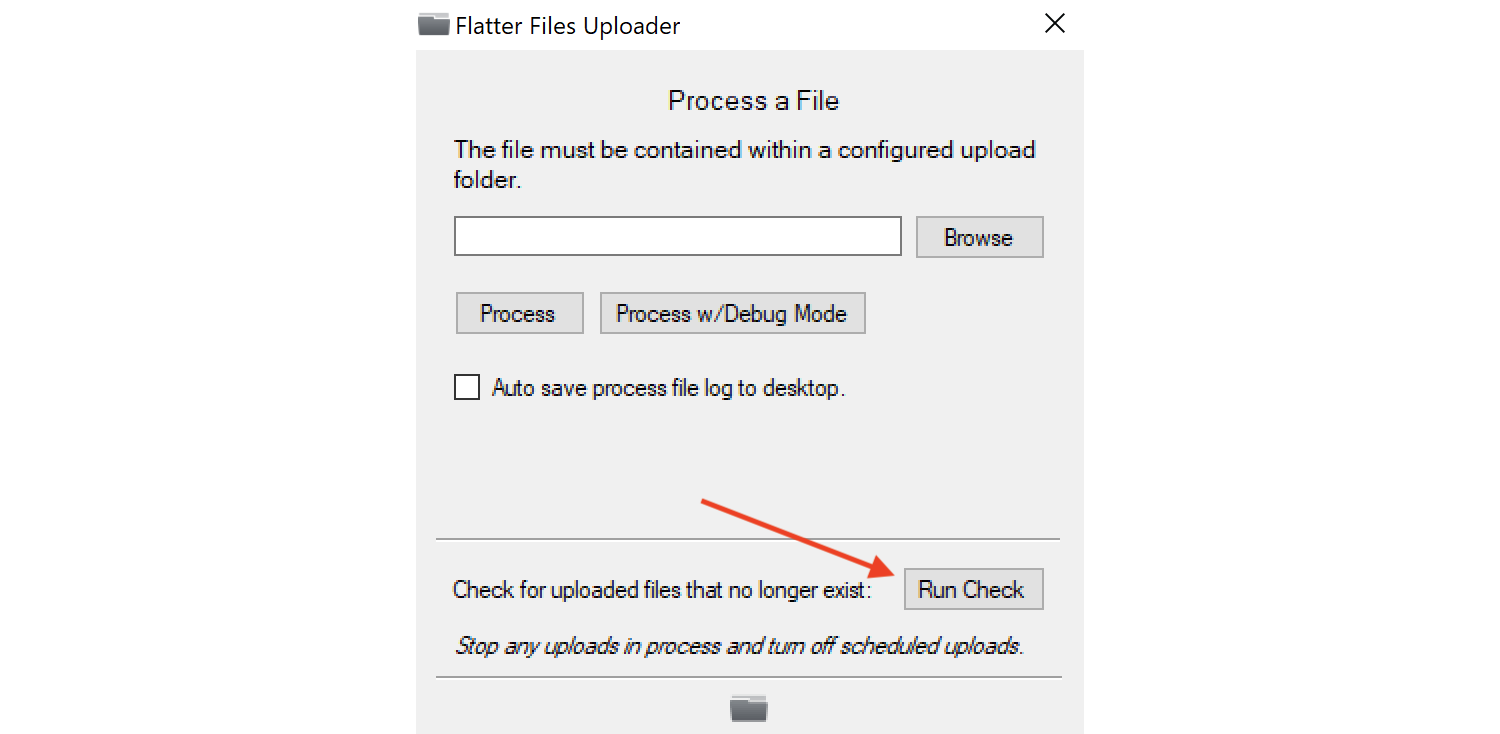
One of the major benefits of using Flatter Files for distributing your content is that the resulting content that is created (PDF, STEP, etc) remains connected back to the local source file. For SOLIDWORKS content the local source file is typically the SOLIDWORKS drawing and as new revisions of the SOLIDWORKS drawing are created the resulting content is also automatically updated. If for some reason the source file is deleted locally or no longer configured for upload by the Uploader then the Uploader will warn you that the previously uploaded file is missing. You are then given the option to either ignore or delete the item from Flatter Files. The Uploader now includes the ability to run this check on demand. Simply go to the Uploader menu > Process File and click the new “Run Check” button at the bottom as shown in the image below.
If files no longer exist locally or no longer are configured for upload then you will be shown a button to click to view the list of files. You can ignore or delete the files from Flatter Files as needed.
Process File Update
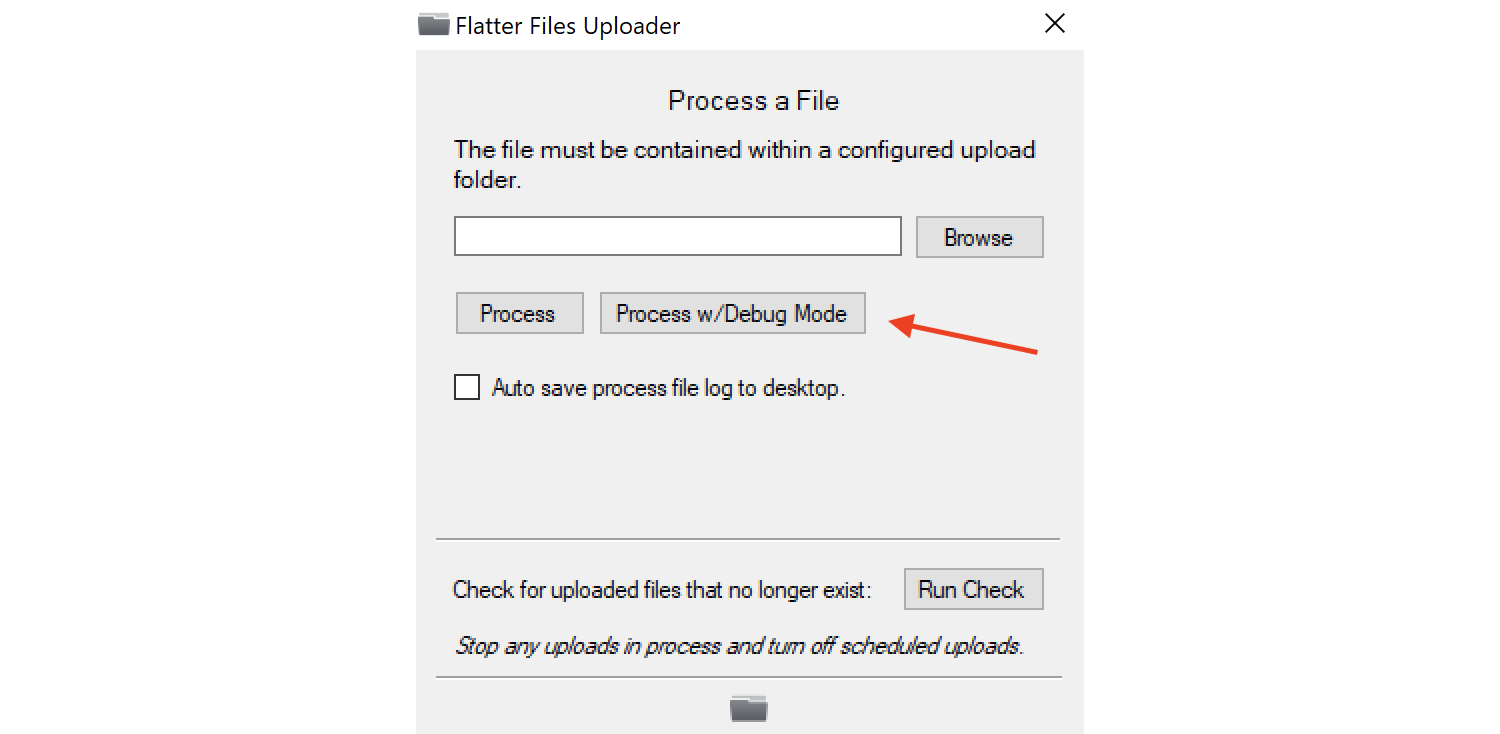
Using the Uploader’s Process File command is very common when debugging issues with a specific file. Sometimes you might need to send Flatter Files support additional information regarding the processing for help. In the past you would need to turn on debug mode, process the files, then turn debug mode off. There is now a new option in the Process File view that allows you to process the file in debug mode. This option will automatically turn debug mode on, process the file and then turn debug mode back off automatically. The new option is shown in the image below.
The Process File file location input field has also been updated. It now supports dragging and dropping a file such that the path is automatically added for the file dropped into the input field.
Install Beta Uploader
Often times, new capabilities and bug fixes are added to a beta version of the Uploader. The beta releases are not a separate installation just a newer version. The Uploader includes a setting that allows you to switch the update frequency to Beta such that you get releases early. It is recommended to always leave the update frequency set to Current but yet at times Flatter Files support may recommend that you install a Beta release to fix an issue or test new functionality. To make this easier we have added a button to simply install the beta version without having to change the update schedule. The button is located by going to the Uploader menu and clicking Settings. The resulting view and button is shown below.
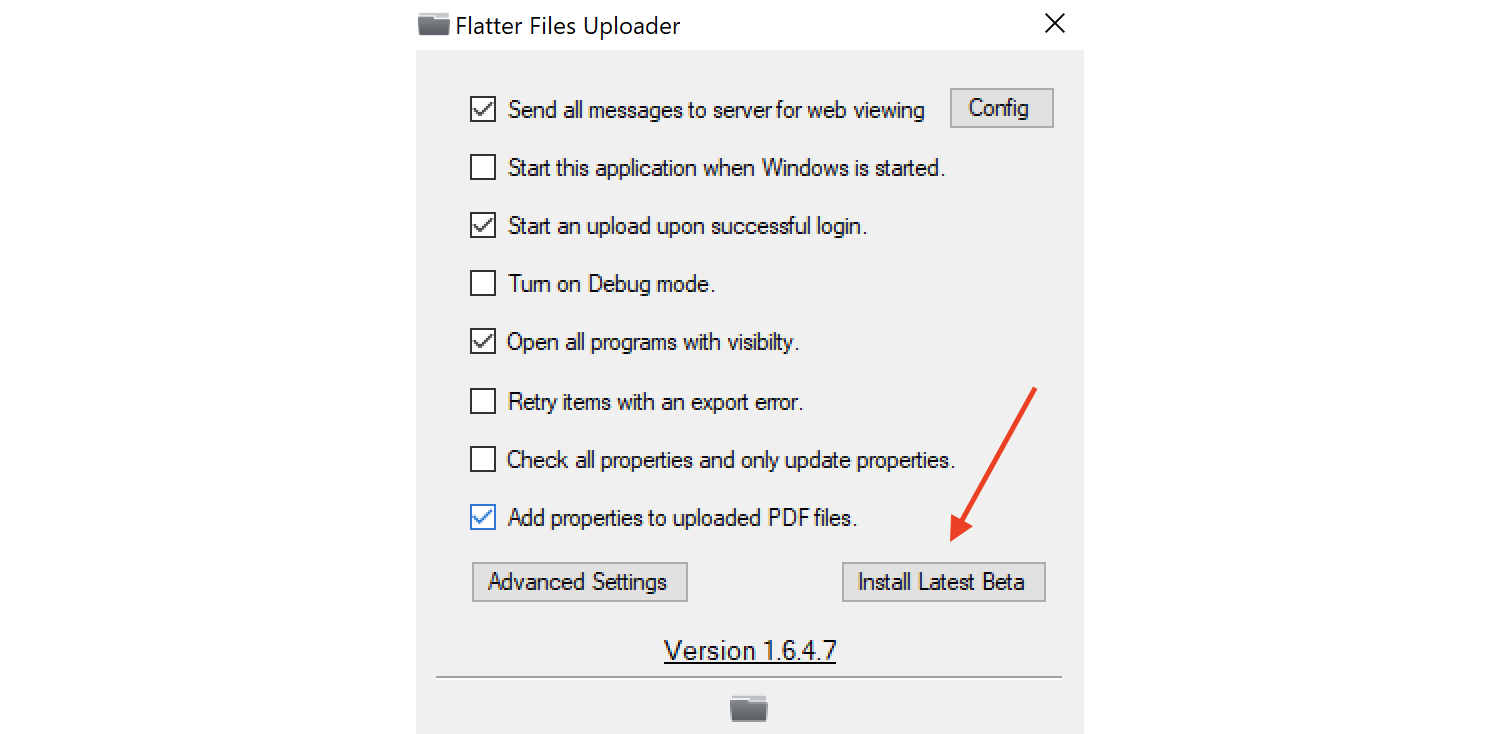
When you use this method to install the beta version you won’t get future beta updates but you will continue to get the new Uploader updates when the non-beta releases occur. Thus, you can click the button, install the current beta, and yet not have to worry about changing the update frequency.
As you can see, it has been a busy few months adding new features and capabilities to Flatter Files. If you have any questions or enhancement requests, please do not hesitate to contact us at [email protected].
Advanced queries have always been supported by Flatter Files. In the past, a user had to create and enter the advanced queries manually. This required knowledge of a query language that was often hard to remember. Flatter Files now includes a simple user interface for creating advanced queries. This new user interface makes it such that any user can now easily create advanced queries without having to have any understanding of the query language used by Flatter Files. This makes it much easier to quickly locate the specific item the user is looking for on Flatter Files.
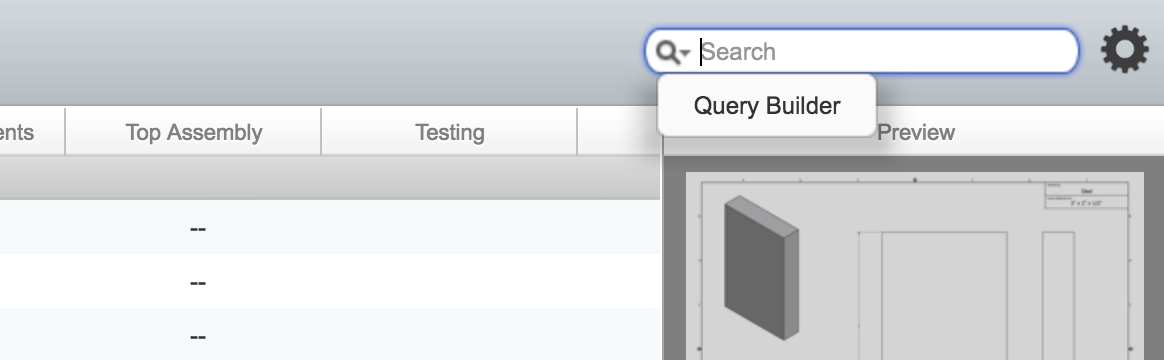
There are two ways to display the new user interface for building a query. The first option is to click the magnifying glass icon in the search box at the top right of the web application. This displays a menu with an option called Query Builder as shown below.
Click the Query Builder option and the new user interface for building queries will be displayed. The second option to display the query builder is to simply hit Enter while the cursor is in the search box and there is no text in the search box. If there is text entered into the search box then clicking Enter results in execution of that particular query. From now on if there is no text when you click Enter then the new query builder will be displayed. This makes it very fast and easy to get to the query builder. When you first load the web application, the cursor is automatically located in the search box. Thus, once the page loads if you simply click Enter the query builder will immediately be displayed.
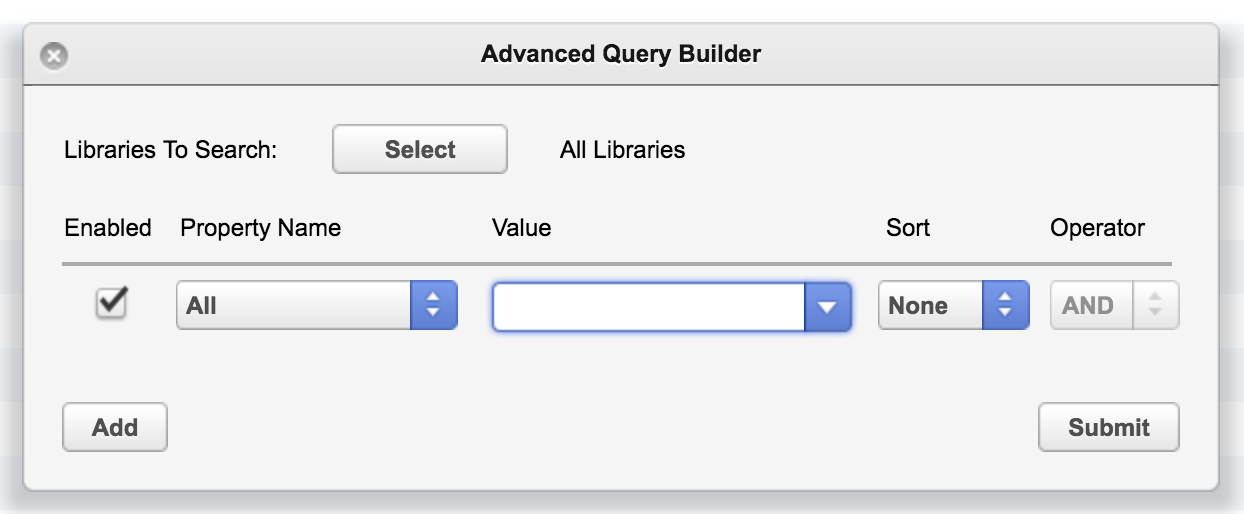
The new interface for building queries is shown below. The first option is to define which Libraries you would like to search. By default all Libraries will be searched but you can easily select a specific set of Libraries to search.
When the Query Builder is initially displayed, a single query component is defined for the Property Name “All.” This will result in all properties being searched for the value entered. If you would like to limit the properties searched, click the drop down menu that contains the “All” option which will display all of the specific properties that can be searched.
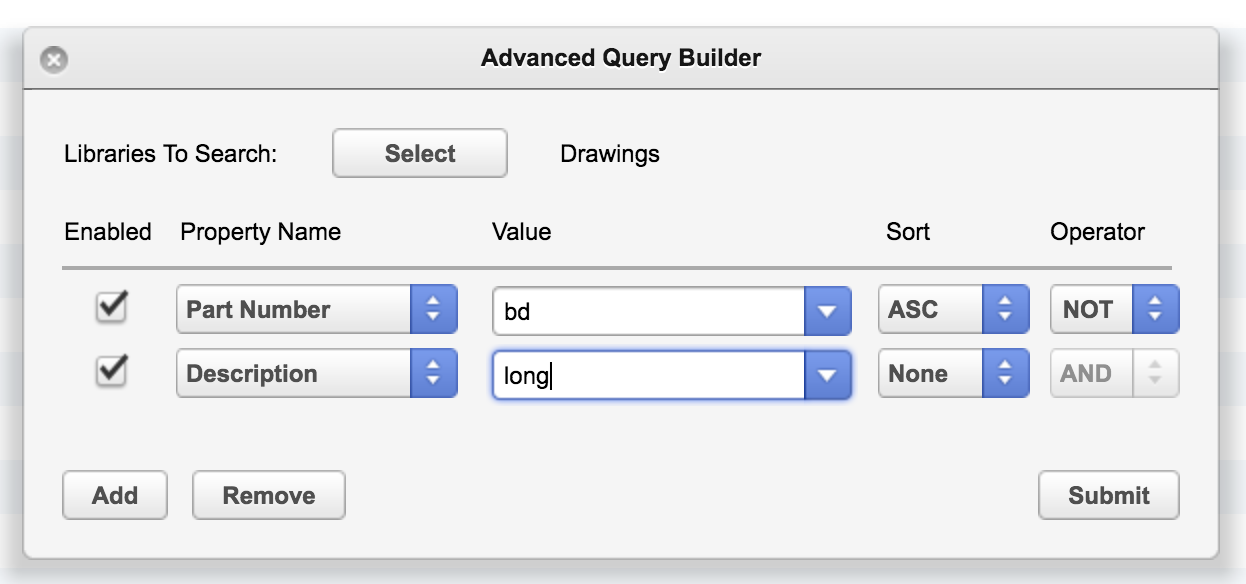
Multiple properties can be searched at the same time by clicking the “Add” button. In addition, there is a sort option and the operator option that can either be OR, NOT, or AND. An example is shown below where the Part Number must contain “bd” and the Description must NOT contain “long.” In addition, the results will be sorted in ascending order by the Part Number.
As you can see, this new query builder allows you to quickly create advanced queries without the need to understand the query language used by Flatter Files. If you have any questions please contact us at [email protected].
Flatter Files now includes the ability to include any file type as a reference file for each item. Once the reference files are uploaded they can easily be viewed or downloaded while viewing the item. Most customers already use Flatter Files to auto generate and upload lots of supporting content such as STEP, Parasolid, DXF, etc but the new reference file option allows you to include any additional existing files. This is great way to include as-built images, quality documentation, program files, or any other pertinent information.
Automatic Upload
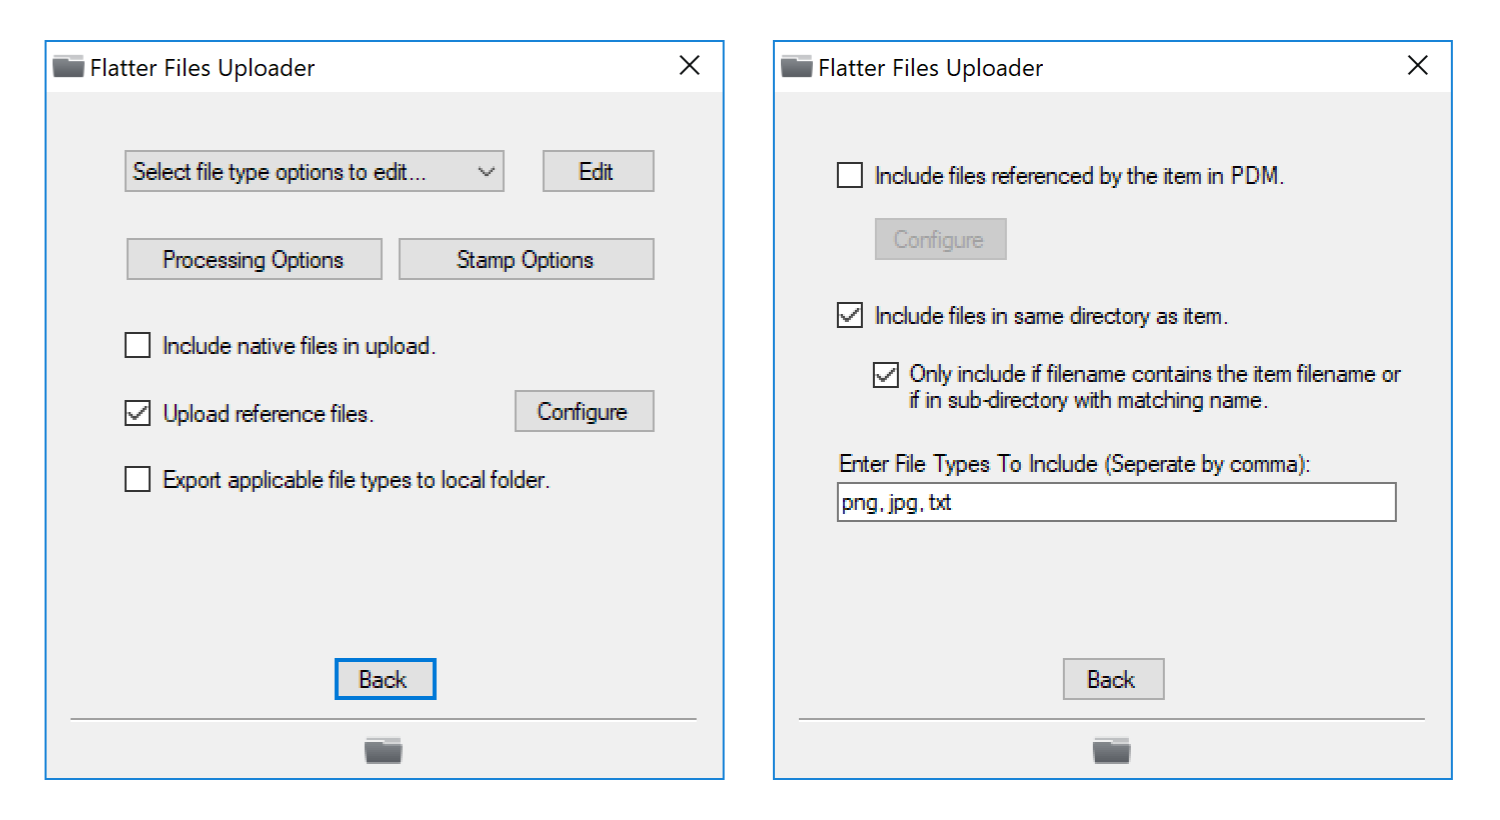
Reference files can automatically be uploaded by the Uploader for each item. Configuration is completed from within the main File Type Options page in the Upload Folder Configuration. As shown below, there is a new option to “Upload reference files.” Enable this option and then click the “Configure” button that will appear. This will display the configuration options as shown in the image below on the right. PDM references can be included and/or you can simply include items located in the same folder as the source file. If you include files in the same folder, then you will likely need to limit the included files to reference files that contain the source filename in the reference filename.
The last setting to configure for the reference file upload is to simply specify the file types that should be considered a reference file. Thus, if you need to upload text files, excel spreadsheets, and PNG image files as reference files then you would enter:
txt, xls, xlsx, png
Flatter Files does not re-upload the reference files each time a new version of the item is uploaded. However, when a new version of the item is being uploaded it checks each reference file and will re-upload any reference files where the PDM version of the reference file itself has increased. If the reference file isn’t located within PDM then it will be re-uploaded anytime the reference file has been modified locally.
Viewing
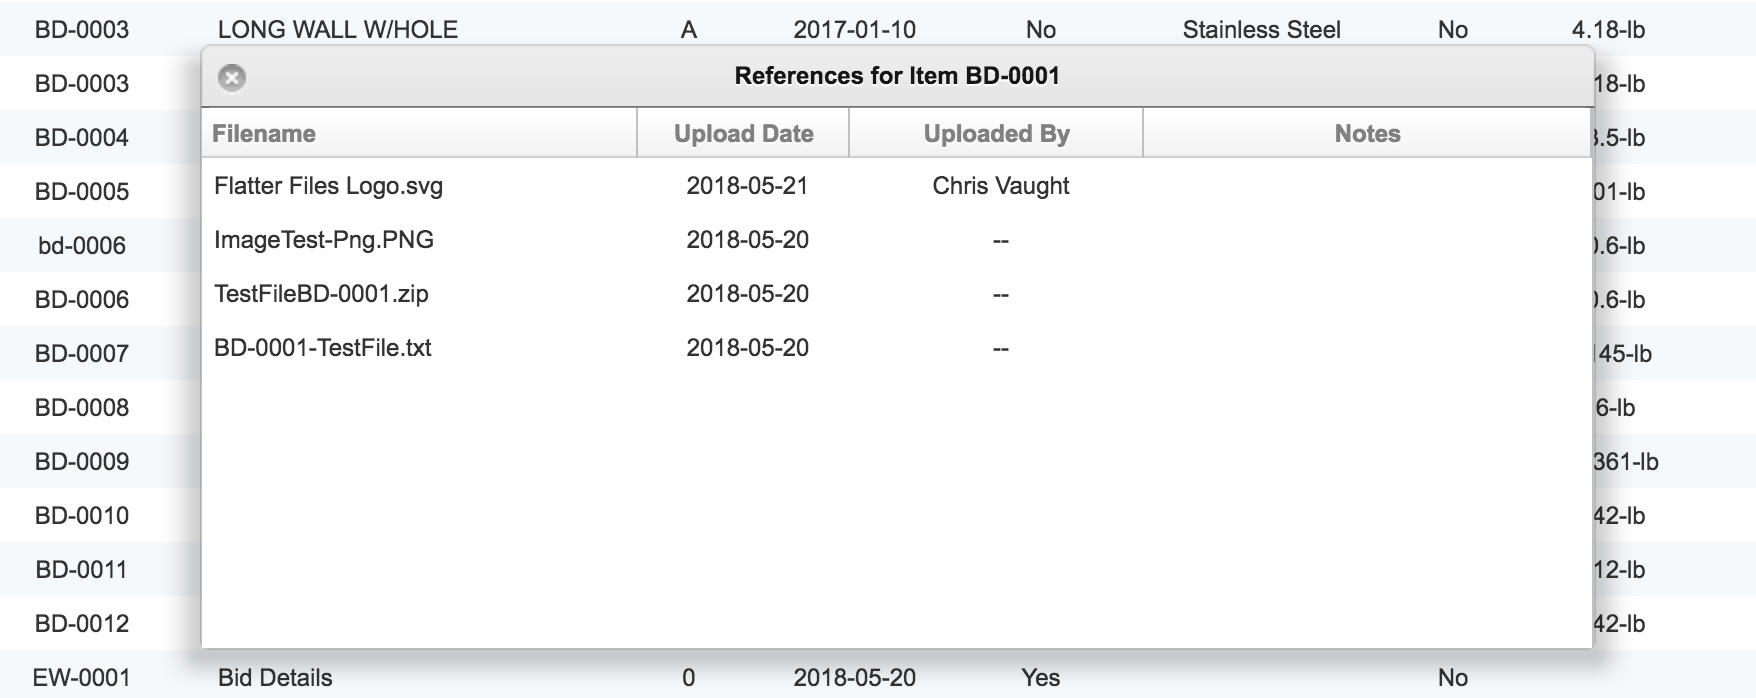
Once reference files have been uploaded, they are easily viewed and/or downloaded from within the Flatter Files web application. Simply right click the item, go to View > References. In addition, when viewing an item you can click the button with a down arrow and then go to View > References. This will display the list of references in a window as shown below:
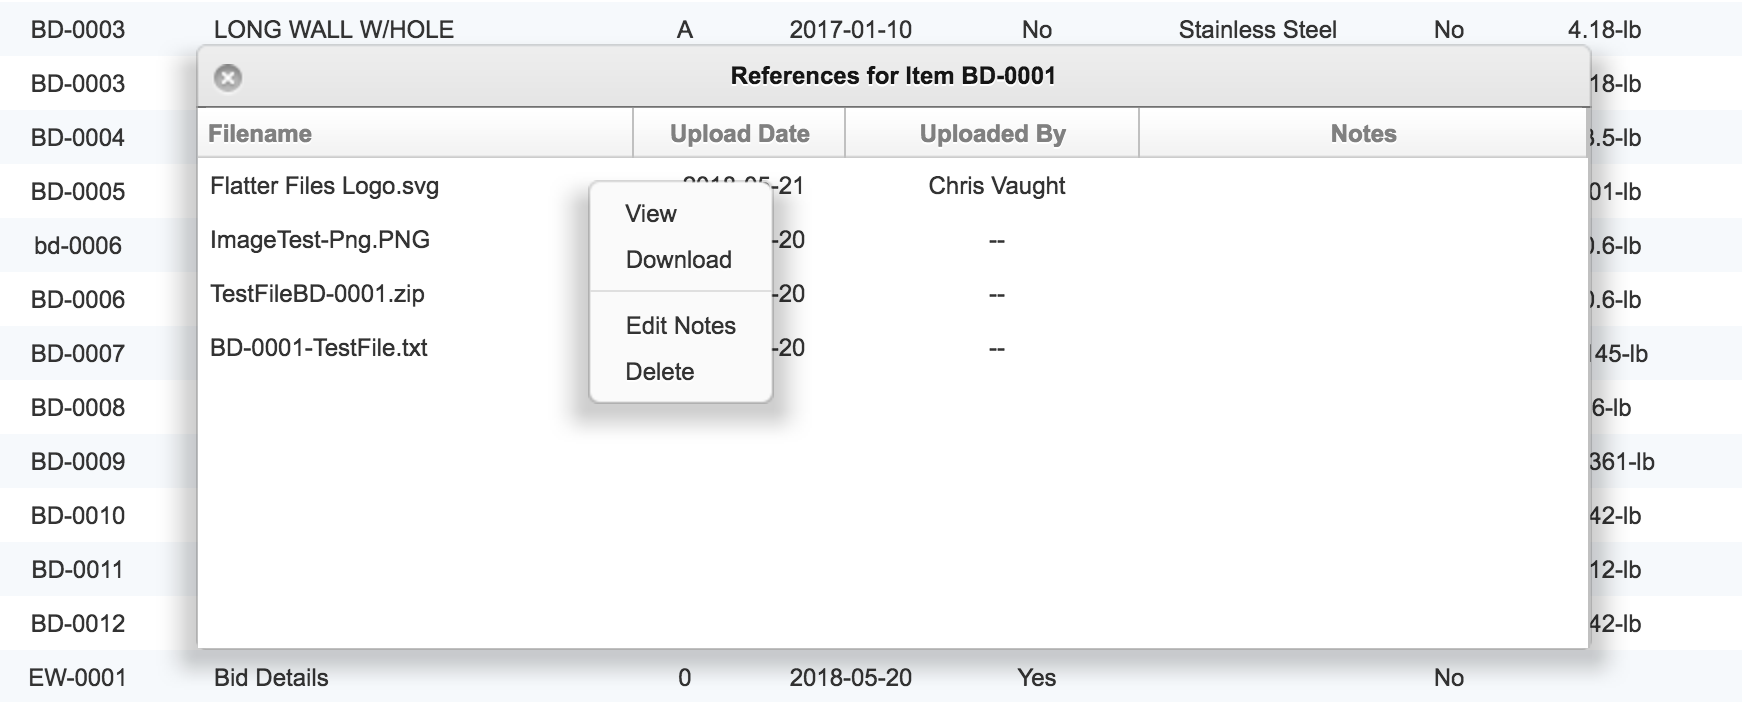
If the file type of the uploaded reference can be viewed from within a browser, then you can view it by simply double clicking on the reference file or by right clicking and selecting View. The full right click menu is shown in the image below:
As you can see, there are options to view and download the reference file. In addition, if you are an Admin or Creator then there is the option to add notes or delete the reference file.
Manual Upload
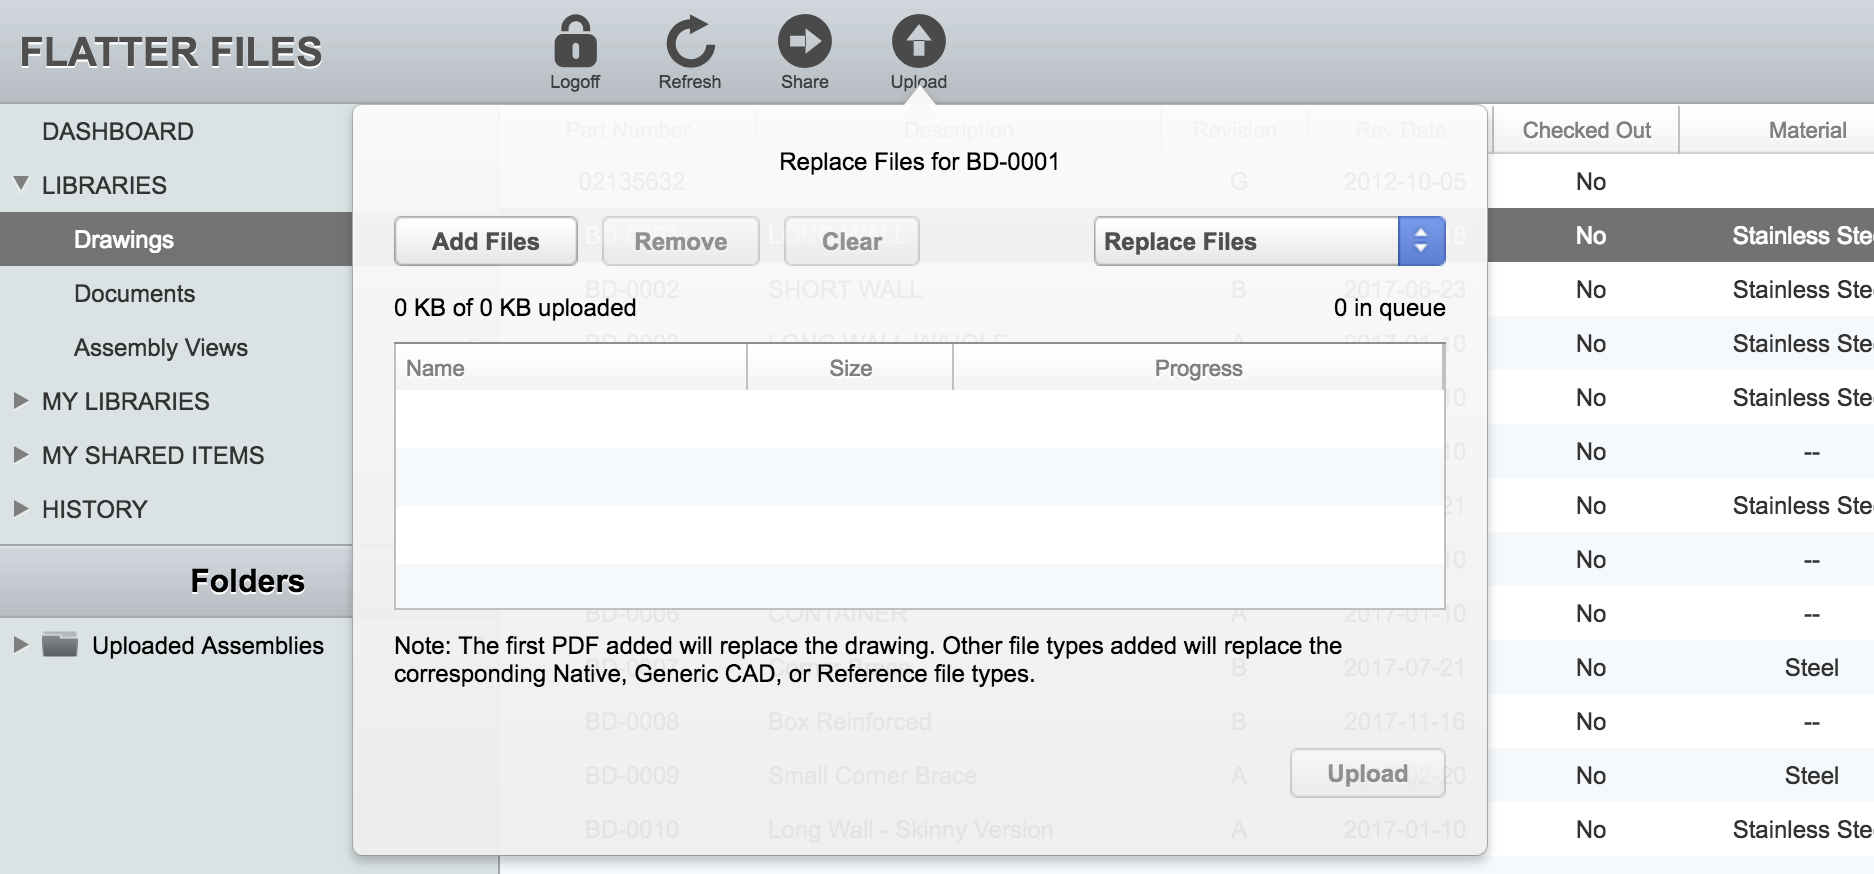
When Uploading a reference file automatically using the Uploader, the Uploaded By column shown above will be empty. However, reference files can also be uploaded manually by Admin and Creator accounts. If a user manually adds a reference file then their name will be listed under Uploaded By. Manually uploading a reference file for an item can be accomplished by selecting the item and then clicking Upload at the top of the web application. This will display the Upload dialog. Ensure that the “Replace Files” option is selected at the top right. Click Add Files to browse to the specific reference files you would like to upload and then click Upload.
It is highly recommended that you primarily use the Uploader for uploading reference files such that the reference file can be synced from a local location and kept up to date automatically if the reference file changes. However, as shown above manual upload is an option if needed.
If you have any questions please contact us at [email protected].