
Company Settings allow you to control many details on how your account works as well as specific functionality. Only Administrator Users can modify the company settings. Company settings are divided into three sections, General, Properties and Uploader. Each section is detailed below.
To access the General Settings, click on the Dashboard, then Settings and then Company. The 3 clicks required are shown in the image below. The settings are split into multiple categories. Each category is identified below along with an image showing the appropriate settings.
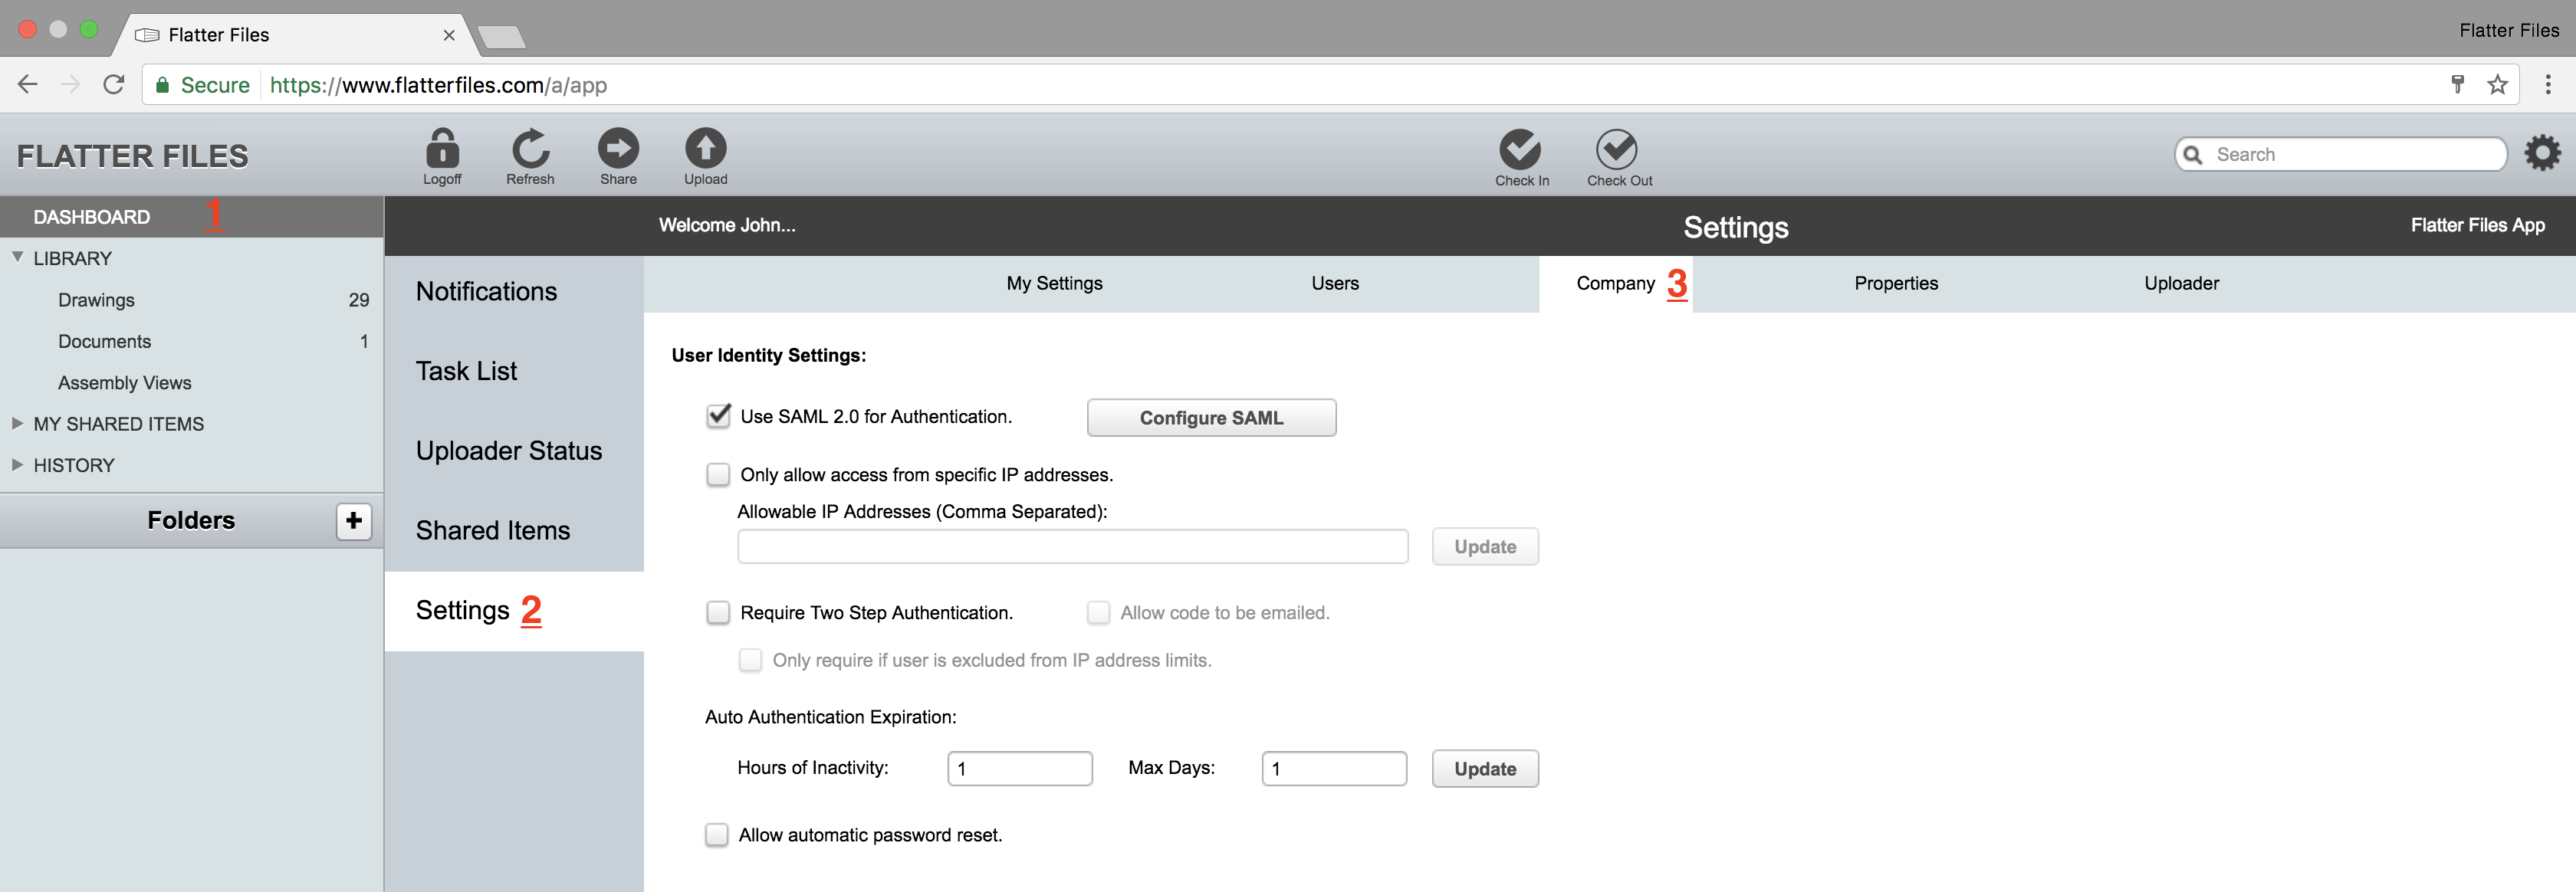
The first User Identity Setting allows you to use SAML 2.0 to authenticate your users using an online directory. Details regarding the SAML 2.0 settings can be found in the next section.
To ensure only authorized access to Flatter Files, you can elect to only allow access from specific IP addresses that your organization controls. This means that all other access to your account from IP addresses not listed will be blocked. To enable this setting, enable the option, enter the allowable IP addresses and then click Update. It is likely that some of your users might need to access Flatter Files from outside of your companies IP address. For these specific Users, you will need to exclude them from this IP address requirement. Please see the User Options documentation for the appropriate user option.

The next User Identity Setting allows you to require two step authentication for all of your Users. It is highly recommended that you enable two step authentication by checking this option. Two step authentication requires all devices to be authenticated the first time you login to each new device. Each existing device must also be authenticated every 30 days. Authenticating a device consists of entering a random code that is sent to you after you successfully enter your email address and password. You must enter this random code before you can access your account. Once two step authentication has been enabled, you then have the choice for the authentication code to be sent via email or text message. Email is less secure, but for some companies it is not practical to require personnel to have the ability to receive text messages.
If you have enabled IP Address limits and two step authentication, then you can also enable the option to only apply the two step authentication option to users that are excluded from the IP address limit. Essentially, if the user can only access Flatter Files via your IP address then it is likely unnecessary to also require two step authentication. Also, if a user is excluded from IP address limits they also won’t receive a two step code if accessing from an approved IP address.
Once you login to Flatter Files, you can navigate away from the page and return without having to login again until your authentication expires. The next User Identity settings allows you to specify two variables which will control the time to expiration. The first option is the number of hours of inactivity until expiration. The second variable will expire the authentication after a specific number of days regardless of the activity. Once either variable is met the login will automatically expire and you will need to login again.
Flatter Files supports the SAML 2.0 authentication protocol for logging in using your company credentials. This is generally known as providing Single Sign On (SSO) access. Before you enable the option to Use SAML 2.0 for Authentication you must contact us to discuss the configuration. Once enabled, click the Configure SAML button. This will display the window shown below that allows you to configure the required information to enable SAML authentication.
The first SAML setting allows you to specify your company domain. When a user tries to login, if their email domain matches this value then they will be redirected for the SAML authentication. This domain must be white listed on Flatter Files before it can be added here. If you have not discussed your SAML configuration with us then an error will occur when you try to submit the SAML settings with the unapproved domain.
The Identity Provider URL is also known as the SAML 2.0 Endpoint. Both the Identity Provider URL and Certificate are specific to your account at your Identity Provider. For the certificate, please only paste in the actual certificate text, don’t include the typical Begin Certificate or End Certificate text.
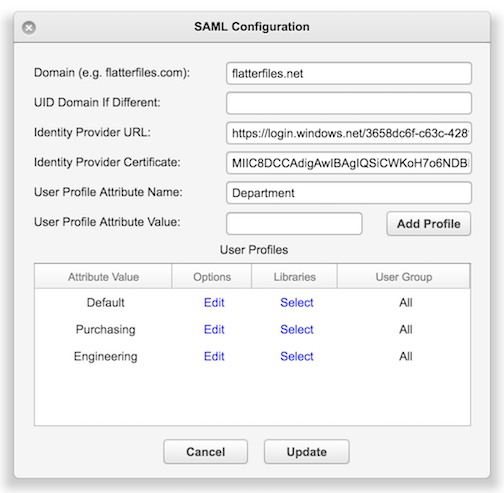
One of the major benefits of SAML 2.0 authentication is that you are not required to manually create each user account. All users in your company can be given access by simply adding the Flatter Files application to their profile within your Identity Provider. When they first login to Flatter Files, an appropriate user settings must be applied. Thus, you can configure a default user profile that contains all of the settings as well as set up specific user profiles that will be used based on an attribute value.
Each user profile is listed in the SAML configuration window. Initially, only the default user profile exists. Click the blue Edit to change the user settings for the profile or click the blue Select to change which libraries the profile can access. If you would like to configure additional profiles based on an attribute value, enter the attribute name that you want to match based on. For example, a common attribute is Department. Then enter a value such as Purchasing and click Add Profile. This will add the entry to the user profile list and you can configure the settings. Repeat this process for other attribute values such as Engineering as needed.
For user profile matching based on an attribute value to work, you must configure your Identity Provider account to send Flatter Files the attribute when the user logs in. In addition, your user profiles stored at your Identity Provider must contain the attribute values for the users. Note that these settings only apply when a new user logs in for the first time to Flatter Files. Once they have logged in, their user account will be listed in Flatter Files and you will be able to modify their settings on a per user basis. When new users log in for the first time using this method, all account administrators will receive an email indicating that the new user was automatically added to the account.
When you configure SAML 2.0 authentication it is likely that you already have some user accounts within your account. These users will automatically be transitioned once this is enabled. The next time the user tries to login the user will be required to authenticate using SSO instead of the direct Flatter Files login. There user settings however will not be modified since they are an existing user.
To hide previous revisions from all Viewer accounts, enable the option “Hide previous revisions from Viewers”. Typically, it is not necessary for Viewer accounts to have access to the Dashboard unless they are a reviewer. To block the Dashboard from Viewers, enable the option “Hide Dashboard from Viewers that are also not Reviewers”. When Viewing an item in the PDF Viewer, there is a button that allows users to create a revision request. A revision request creates a notification and sends an email to the Creator and Administrator accounts with the text that the viewer enters. To block the ability to create a revision request enable the option “Hide Revision Request from Viewers”.
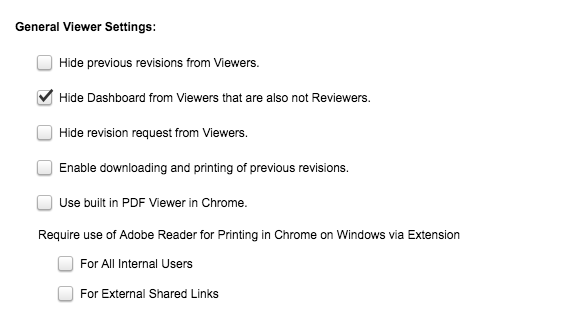
The next General Viewer setting allows you to enable the ability to print and download previous revisions. By default even if a user has access to the previous revisions they cannot download or print them unless you enable this option. The next setting allows you to enable the built in Chrome PDF Viewer instead of using the default Flatter Files PDF Viewer. Some companies find that their PDFs are displayed faster and more reliably in Chrome if they use the built in PDF Viewer.
The last two settings under General Viewer Settings allow you to force the usage of Adobe Reader for printing in Chrome for Windows. The first setting applies to your internal viewers and the second setting applies to external shared links. These settings will result in the user not having the choice dialog appear on whether or not they want to use Adobe Reader. Instead they will always have to use Adobe Reader for printing. To learn more regarding this feature please view the documentation.
If you are using Flatter Files to conduct a review of your released drawings then you can enable the ability for your reviewers to stamp the reviewed drawing with an acceptance mark. The acceptance mark can be required for viewers such that anytime they accept a new revision the mark will be added by enabling the “Require Stamp for Viewers” option. If this is not enabled then the reviewer will be able to choose whether the mark should be included. In addition, you can enter an acceptance agreement that they will be shown each time that they accept a revision. Enter the agreement in the field provided and then click the Update button to save the changes.
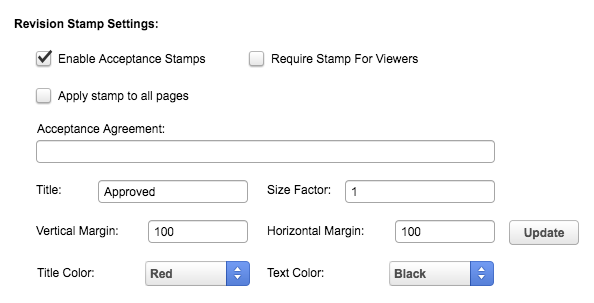
There are also multiple options for formatting the resulting stamp as shown in the image above. You can set the size, color, stamp title and more.
Click here for details on how to stamp an item during the review process. In addition, an Admin or Creator can also stamp any approved item manually if stamps are enabled. Simply right click the item, navigate to Modify, and then select the option “Add Stamp.”
Checked out items are drawings or documents that are currently being modified. The default behavior in Flatter Files is to show the current revision, but display a notification to the Viewer indicating that the item is checked out and thus a newer version may be available in the near future. If you would prefer to completely block access to items that are checked out, enable the “Prevent access to checked out items” option. Once this is enabled, you can then customize the message that is displayed when a user tries to view the checked out item. Enter the desired text and then click the Update button. Note that you can block access for everyone and then override this for specific users. See the User Options documentation for how to enable access for specific users.
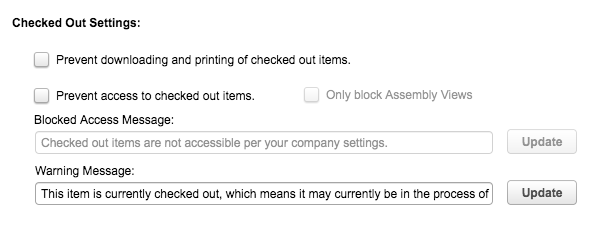
If you decide not to block access to checked out items. You can also customize the warning message that is displayed when someone is viewing a checked out item. Typically, it might be a good idea to provide contact information in the message such that the viewer knows who to contact if they have questions about the status.
Flatter Files also allows you to prevent downloading and printing of checked out items even if the user has access to the item. This is accomplished by enabling the first option “Prevent downloading and printing of checked out items.”
The next setting allows you to define a list of email addresses that will receive a monthly report with the share stats shown. This email is sent on the 1st of each month and contains the previous month’s stats. The report contains the items that have been externally shared with a link along with the access stats for each email that has access to each shared link. To set up the monthly report, enable the “Send monthly share stats” option. Once enabled, enter one or more email addresses into the input box. Separate multiple email addresses with a comma. Once you have entered the email addresses click Update.
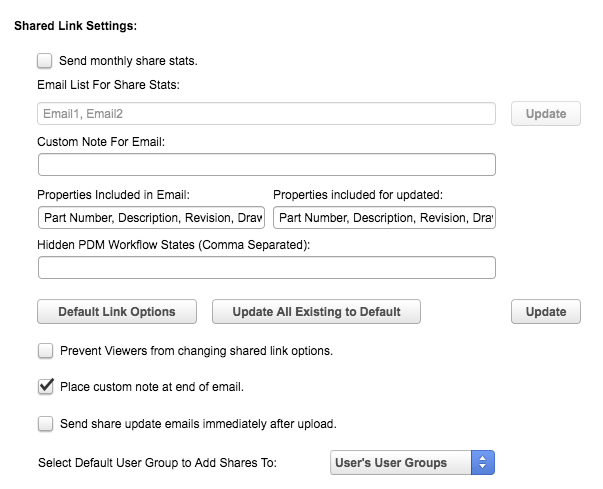
Whenever you create a shared link for vendors and other external partners to access drawings an email is sent to them contain the shared link and password. In addition, anytime a drawing contained within the shared link is modified an email is sent to notify the external user. These emails can be customized using the company settings shown above. The first option allows you to enter a custom message that is included in both types of emails. This message is added to the top of every email that is sent. If you do not need a custom message then leave this field blank. The next two options allows you to specify which properties are displayed for the listing of the items. For the regular shared link email that isn’t specific to an update the property list can be left blank. If it is left blank then the parts list will not be included in the email. For the update email, a parts list of the items that have been modified is always included. Thus, at least one property must be included. If it is left blank, then the value of this field is automatically reset to the default properties of Part Number and Description.
For both property fields, the Flatter Files default names should be used and the properties should be separated by a comma. The order the properties are entered will be the order of the property columns displayed in the email. Once the properties and custom note have been entered, click the Update button to save.
When users share items externally, there are a handful of options for each shared link that controls what the external users can access for the items as well as a few other options. The default options for new shared items can be set by clicking the Default Link Options button. Once the options are set appropriately, you must click the Update button to the right for them to be saved. If you would then like to apply the default options to all existing shared links then click the Update All Existing to Default button.
The next option for Shared Link Settings allows you to block viewers from being able to make any changes to the link options. This applies to both new items as well as editing existing items. All shared links created by Viewers will always contain the default link options if you enable this option. The next option allows you to place the custom note defined in the previous setting at the bottom of the email instead of at the beginning.
If you enabled automatic emails when a share item is updated with a new revision, the email is normally sent at midnight Central Daylight Time. This is done such that the supplier only receives a summary email at the end of each day that contains all of the updates throughout the day. If you instead would prefer to send the update email as soon as any update occurs then enable the option “Send share updates immediately after upload.”
When a share is created, only the person that creates the share can manage it under My Shared Items. Often times though you will want to add the share to a user group such that your colleagues can also manage the shared link. To automate this process, you can desinate that the share be added to a specific user group. The options include the ability to add it to the User Groups for the User that is creating the shared item.
Flatter Files includes the ability to upload PDM revisions from different states. For example, you might upload a revision created in Approved-Prototype and then another revision created in Approved-Production. The problem with this is that if you upload Prototype revisions, you would not want to provide access to those specific revisions to your external vendors. But if that same item contains Production revisions, those revisions should still be accessible. Flatter Files supports the ability to do this by allowing you to hide specific PDM state revisions from your shared links.
To hide PDM states from your external shared links enter the appropriate hidden workflow states you would like to hide and then click Update.
Companies can authenticate external users via a centralized identity service that the company controls instead of having a unique password for each external link. The appropriate settings are shown in the image below.
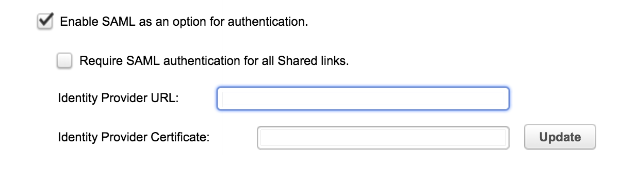
As you can see, you simply enable the option and then enter your IdP URL and certificate. In addition, you can optionally require that all new links use the SAML option. If SAML is not required then when creating the share the user can elect whether they want to use a unique link based password or SAML for authentication. Once configured an external link that uses SAML will automatically be redirected to sign in using the IdP instead of the normal FF external link sign in. This means that the same login will allow them to access any shared link that they have been given access to and it will be unique to the user instead of unique to the link.
To implement this you will need an identity service that is capable of adding external users seamlessly. This could either be done internally or via a 3rd party IdP. The key though is making it easy for those external users to be added to the IdP either manually or using some type of self service registration the first time a link is shared with them. If you go with a self service solution then you could easily add a footer to all external emails that Flatter Files sends that includes the link to register if they don’t already have an account.
Just because the user is contained in the IdP doesn’t mean they have access to all shared links. Their email must be listed on the external share that they are attempting to login to. Thus, there is no option for IdP initiated login. You must click the external link sent from FF and then authenticate if needed.
For additional details and to obtain the sign-in and audience URL, please contact us at [email protected].
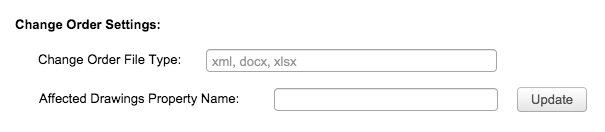
If you are uploading Change Orders to Flatter Files, then with just the two settings below you can connect the Change Orders to the Drawings. This will result in searches for a Change Order number returning both the Change Order and the Drawings referenced by the Change Order. In addition, searches for the Drawing number will result in both the Drawing and the related Change Order.
To configure, simply enter the file type that is used for your Change Orders. This would typically be some type of document file type such as xml, docx, or xlsx. Then enter the corresponding custom property within the document that contains the list of drawings affected by the Change Order. The custom property must either be located in the Change Order document or if you are using a PDM System a property contained within the PDM System for the document. Once the values are entered, click Update to save the changes.
If you are updating an existing account with Drawings and Change Orders already uploaded, then only new Change Orders will be properly linked unless you increment the revision of the existing Change Orders or delete the existing Change Order such that the Flatter Files Uploader re-uploads the Change Order.
You can declare a PDM state as being the Obsolete state. Once an item is in the Obsolete state, you can automatically have it removed from Shared Links that contain it as well as have the item automatically moved to a new Library.
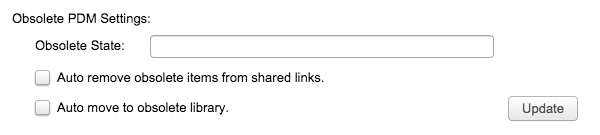
The first obsolete setting allows you to enter the PDM state that you want to designate as the Obsolete state. Typically this state is also named Obsolete but it can actually be named anything. The next setting allows you to designate if you want the items that are in the Obsolete state to automatically be removed from the shared links. The third and final setting allows you to designate if you would like the Obsolete items to be removed from all existing Libraries and moved into a new Library. Once you enable the option to move the items to a new Library, you must then select the Library it should be moved to. After updating the Obsolete settings, click Update to save the changes.
In the Uploader Application settings, there is the option to enable the uploading of status messages. If this is enabled, then you can view those messages from within the web application and send various notifications. By default, anytime an error occurs the logged in user to the Uploader will receive a notification email. The first option shown in the image below allows you to also send that email to all users that have the user setting enabled to view the Uploader status messages.
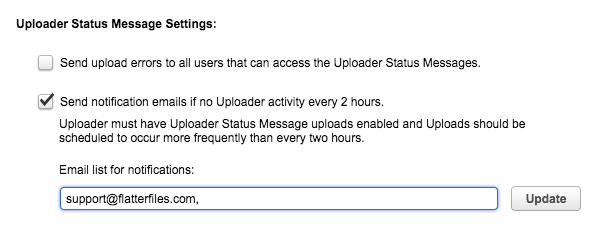
The second Uploader Status option allows you send an email to any specified email address if the Uploader stops performing uploads for some reason. This could be caused due to a computer issue, application issue, or many other reason. If no upload activity occurs for 2 hours an automatic email will be sent.
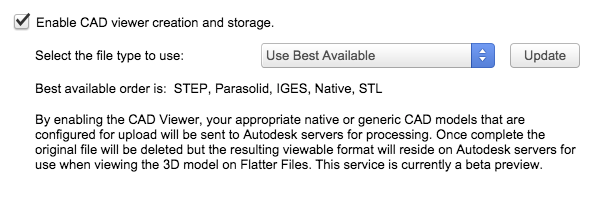
Flatter Files includes the ability to view CAD files within the browser. Currently this option is in beta preview and it is not recommended that the option be enabled at this point. If the option is enabled, then whenever a new revision is added to Flatter Files the item is uploaded to Autodesk servers using a developer service to create CAD view. The original CAD file uploaded to Autodesk servers is deleted but the remaining CAD view format remains on Autodesk servers. This CAD view is loaded each time the view is displayed within Flatter Files. A generic CAD file is typically used to create the CAD view although native CAD files are also supported.
The image below shows a handful of miscellaneous settings. The first allows you to change the default unit for display the Mass from lb to kg. The second option allows you to set the primary property. By default the primary property is equal to the part number but if you reuse part numbers then it might make since to change this to the filename or some other unique identifier. The primary property will be used through out in emails and display the item information when space is limited. For example, it is used when listing the items in the mobile applications.
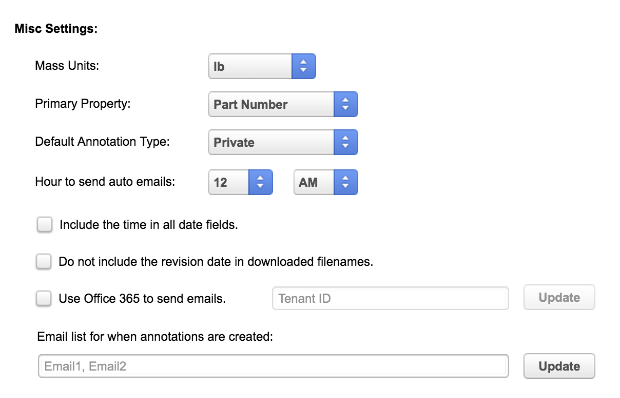
When you create an Annotation, there are three Types (Public, Default, and Private). Using the third misc setting allows you to designate which should be initially selected option. A Public annotation can be seen by all of your users that can access the item. A Default annotation can be accessed by all users that have the user setting enabled to show Default annotations. A Private annotation can only be seen by the person that creates it and the user/users that the annoation is sent to.
By default, the daily emails such as the update shared items emails are sent at midnight central daylight time. This time can be changed via the setting Hour to send auto emails. The next Misc setting is an option to display the time in all date fields.
The next option allows you to specify whether the revision date should be included in the filename when a user downloads a file.
When annotations are created within your account, it is useful to define a list of email addresses that should be notified. To do this, enter the email address into the input box below the text “Email list for when annotations are created”. Separate multiple email addresses with a comma. Once the list is complete, click the Update button.
Flatter Files includes the ability to integrate with Office 365 such that accounts can be configured to use a customers Office 365 account for sending emails. Once setup, the emails will originate from your actual Office 365 account. They will even be shown in the Sent Items folder for the particular user account that was used to send each email. For details on how to configure Office 365 integration please see this detailed post.
When browsing content or viewing search results in Flatter Files, users can modify the columns that are shown. In addition to changing the visibility, users can change the width and order. The button, “Update Default New User Column To Match”, will use your account’s current column configuration for all new User accounts that are created. The button “Update All User Columns To Match” will update the existing User accounts’ columns to match your account’s current column configuration. These two features are useful if you have a particular set of properties that are more important than the properties displayed by the default Flatter Files column configuration. Once you have updated your column configuration to be ideal for your company, use these two buttons to update other account’s column configuration.

The Company settings include the ability to modify the properties in Flatter Files. There are two ways properties can be modified. You can rename all of the modifiable properties to any display name that you would prefer. You can also hide any property from the Viewer user account type.
To display the Company Properties settings, click on Dashboard, then Settings and then Properties.
The display name for the modifiable properties can be renamed. For example, some companies primarily use “Drawing Number” instead of “Part Number.” The default in Flatter Files is “Part Number,” but it can be renamed. To do so, simply select the property you which to rename in the drop down menu and then enter the name that you would like to use instead. Click save to finalize the change. Repeat these steps for any additional properties you would like to rename.
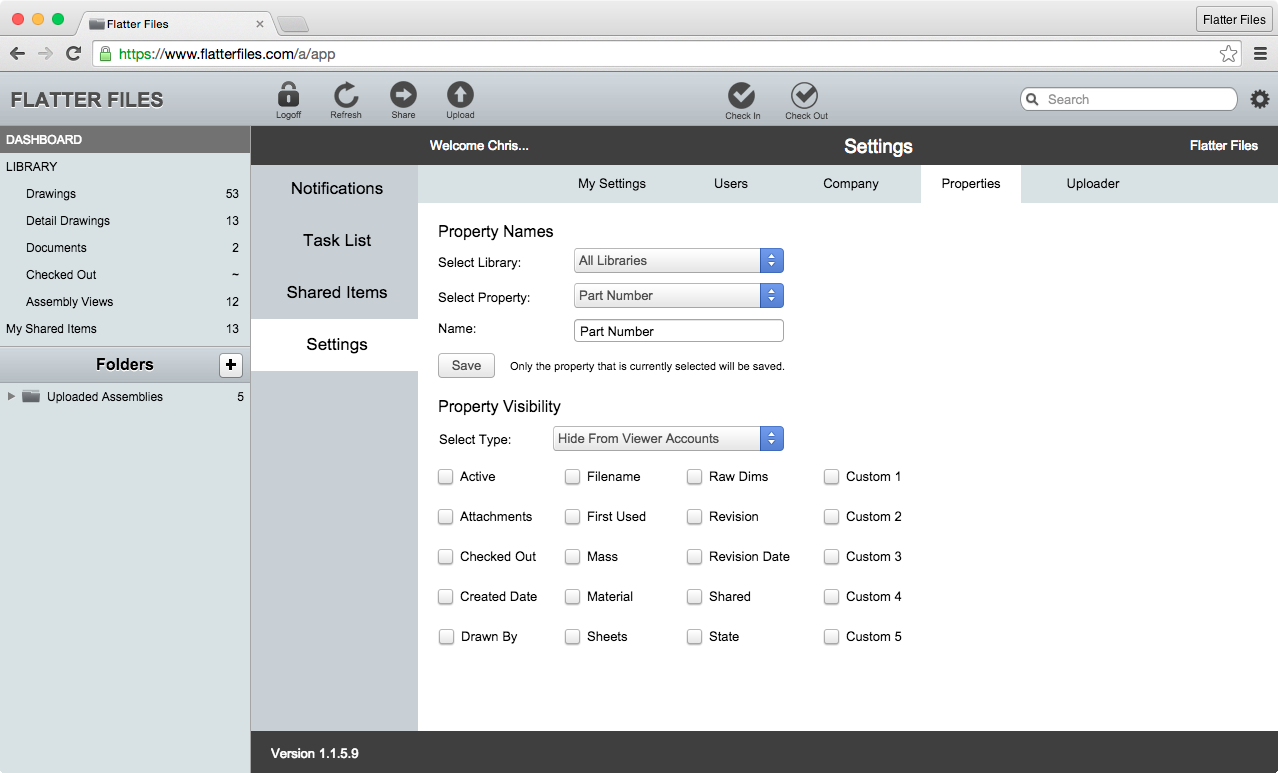
The property name is modified for all libraries by default or you can select the specific library and only change the property name for that specific library. This allows you to call a property a different name based on the library since some libraries might contain completely different types of documents relative to other libraries. For example, you may have multiple drawing libraries which all use the same property names but then you may have one library for engineering change orders and another for general specifications where both libraries might require completely different property names. Use the All Libraries option to initially set the primary property names for the majority of your libraries. Then select each specific library that needs custom property names and modify the property names as needed.
There are two options for Property Visibility. The options can be toggled by choosing the desired option from the Select Type drop down. The first option allows you to easily hide specific properties from the Viewer accounts. Check the box next to each property name that you would like to hide. This will prevent the Viewer from being able to view this property. All properties that are hidden from Viewer accounts are also hidden from external shared link viewers.
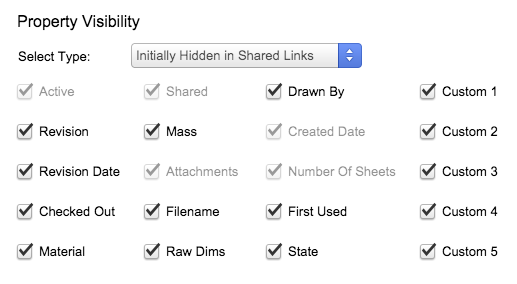
The second option for Property Visibility allows you to select which properties are initially shown when someone is viewing an external shared link. This only effects the initial columns that are displayed in the item list. The external viewer will still be able to view the properties by displaying the appropriate column or by right clicking and selecting the Properties option. Part Number and Description are always shown by default and can not be changed. In addition, the greyed out properties are hidden by default and can not be changed because the properties do not apply when viewing a shared link.
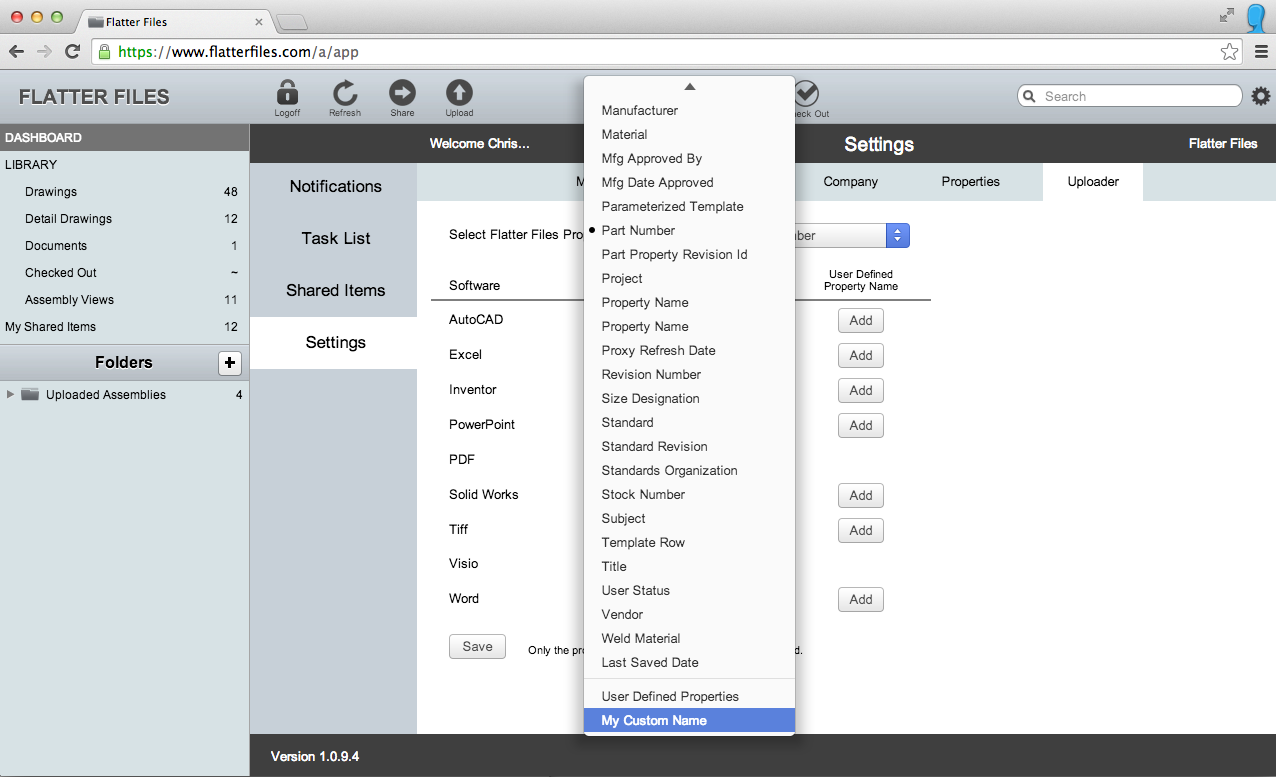
The last group of Company Settings are related to the how the Uploader application handles properties within the native files. Each Flatter Files property can be linked to any named property in the native file. The image below shows the Company Uploader Settings page. To get to this page, click Dashboard, then Settings and then Uploader.
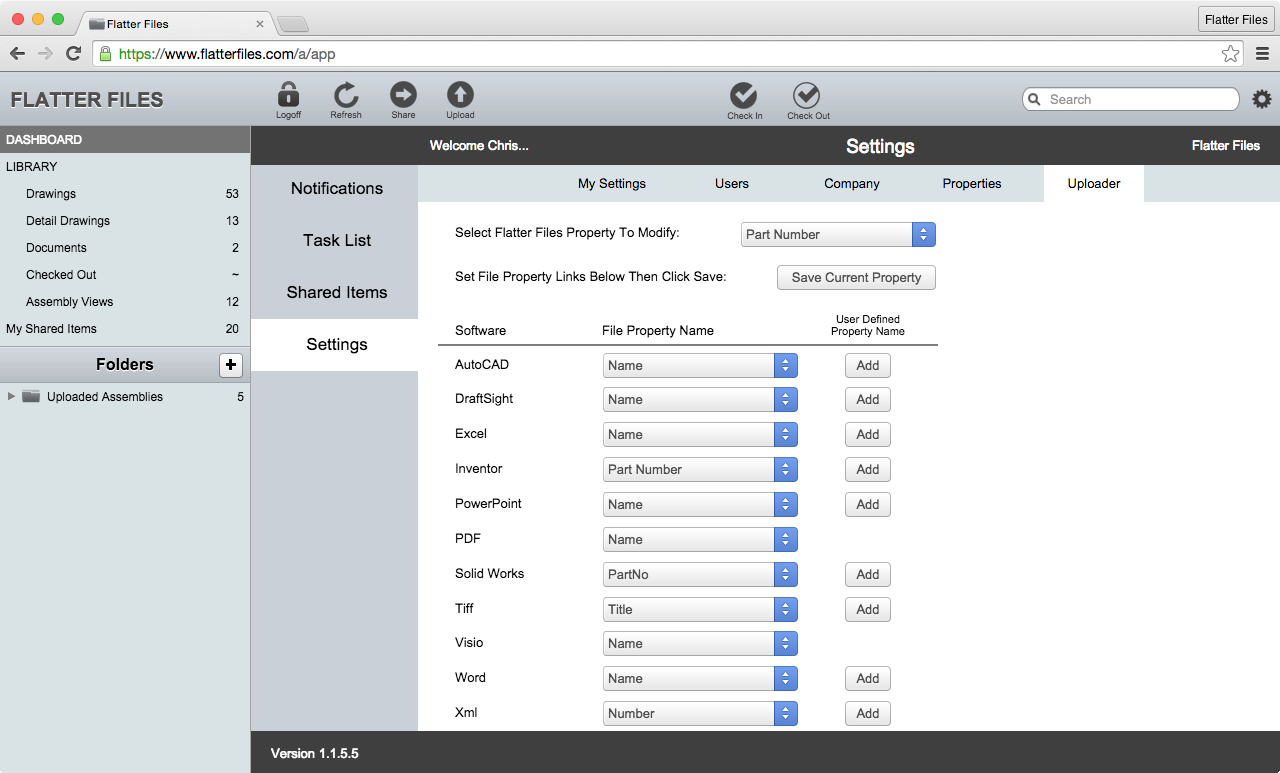
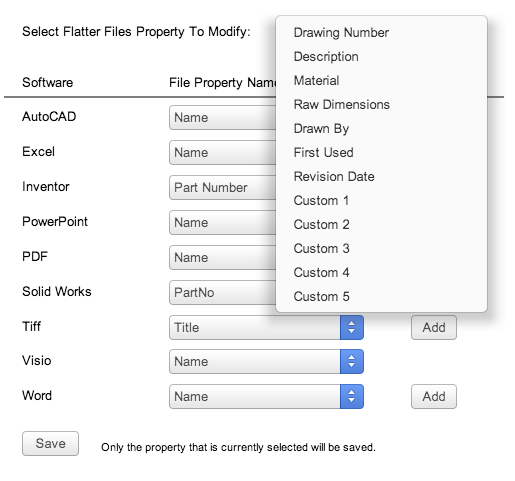
To link a Flatter Files property to a native file property, you must first select the Flatter Files property you would like to modify. Click the drop down menu next to the “Select Flatter Files Property to Modify”. This will display a list of the built-in Flatter Files properties. The name of these properties does not effect the link to that native file. The name of the Flatter Files property can be different than the name of the property in the native file. For renaming these built-in Flatter Files properties, please see the previous section.
After you select the built-in Flatter Files property that you would like to modify, the current name of the native file property for each application will be listed below. The property can be linked to a unique property name for each application. Click the drop down menu next to your application of interest to modify the property link. This drop down menu should equal the name of the property in the native file that you would like to link to. If the name does not exist, then click the add button across from the drop down menu. Enter the unique file property name and then click add. This will add the new name as a user defined property name.
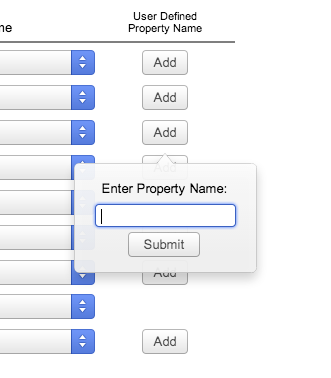
To select the user defined property name, click the drop down again and select it. It will have been added to the bottom of the list under User Defined Properties as shown below. Once you have selected the file property name next to each application you are using, click the Save Current Property button at the top right. You must click the Save Current Property button before changing the Flatter Files property to modify. If you do not click it, your selection change will not be saved.
Flatter Files does support multi property name links. For example, if you have two custom properties in a file called NAME1 and NAME2 but would like to link a single Flatter Files property to both then simply create a user defined property with a value of “NAME1 NAME2” to combine the values. If you would instead like the value to be NAME1 but if it doesn’t exist then the value should be NAME2 then create a user defined property with a value of “NAME1 OR NAME2.” The first property is the primary and will always be checked first but if the value doesn’t exist then the second properties value will be used.
This process of selecting the Flatter Files property to modify, setting the file property value for each application, and clicking save, should be repeated for each property that you want to link from the file to Flatter Files. This process allow you to populate the Flatter Files properties with any property values directly from your native files.