Getting Started - Viewer Access
Flatter Files gives you access to all of your companies important drawing and documentation content. This tutorial will show you how to get started viewing content on Flatter Files using the web application. Similar functionality is available on mobile devices by downloading the Flatter Files application from the Google Play or Apple App Store.
Prerequisite:
- While all modern internet browsers are supported, for the best user experience use Google Chrome or Mozilla Firefox.
- Username & password for Flatter Files. Typically emailed to you by your company’s administrator via [email protected].
1. Login to Flatter Files
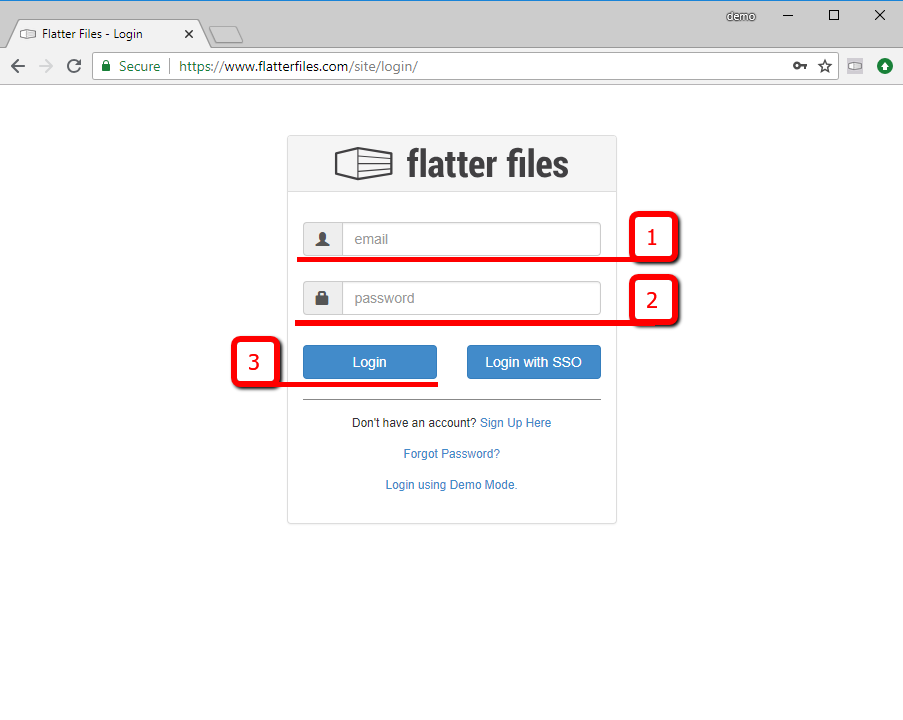
- Go to www.flatterfiles.com and click “Login” in the upper right corner or click here to go directly to the login page.
- Type in your account email address (1).
- Type in your password (2).
- Click login button (3).
- If your admin says that your password is the same as your desktop login then you should click “Login with SSO” button instead. This means your company uses single sign on and you will be directed to your company’s web login.
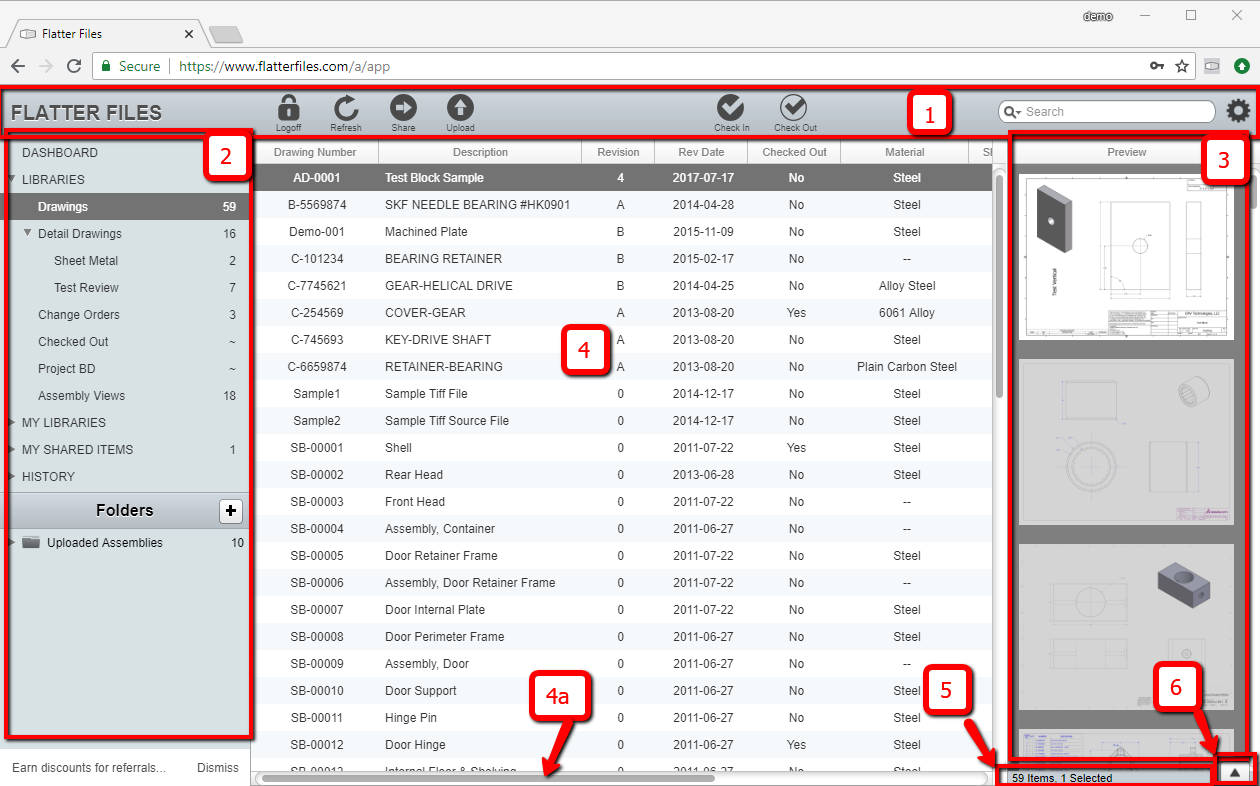
2. User Interface Overview
- Command bar (1)
- Location of primary commands such as search, share, log off, settings (gear icon), and more.
- Navigation Pane (2)
- Location of how items (files) are organized through expandable & collapsible categories such as Libraries, History, and Folders.
- Can be resized by dragging the vertical bar between area (2) and (3).
- Item Preview Pane (3)
- Thumbnail images of each item in the selected Library.
- Resizable larger or smaller by dragging the vertical bar between area (3) and area (4) making thumbnail images larger or smaller.
- Selecting a preview image will cause the item in the Properties Pane (4) to highlight the matching item row.
- Ctrl+select or Shift+Select multiple images will also select multiple item rows in the Item Properties Pane (4).
- Item Properties Pane (4)
- Main area where each item is listed in a row, with columns detailing additional property text for each item row, such as Part Number, Description, Revision, and more.
- Dragging the horizontal scrollbar (4a) right or left will revel additional property columns.
- Selecting an item row will cause the preview pane to scroll to the matching preview image.
- Selecting multiple items (rows) will also highlight multiple preview images.
- Double clicking an item row will open the item in the View Pane.
- Status Bar (5)
- Shows the number of items within the Properties pane (per search, or selected library). Will also show the quantity of highlighted /selected items within the Properties Pane.
- Toggle View Pane (6)
- Show view pane by clicking this arrow in the bottom right corner. Once clicked this arrow changes to an X. Clicking the X will Hide the view pane.
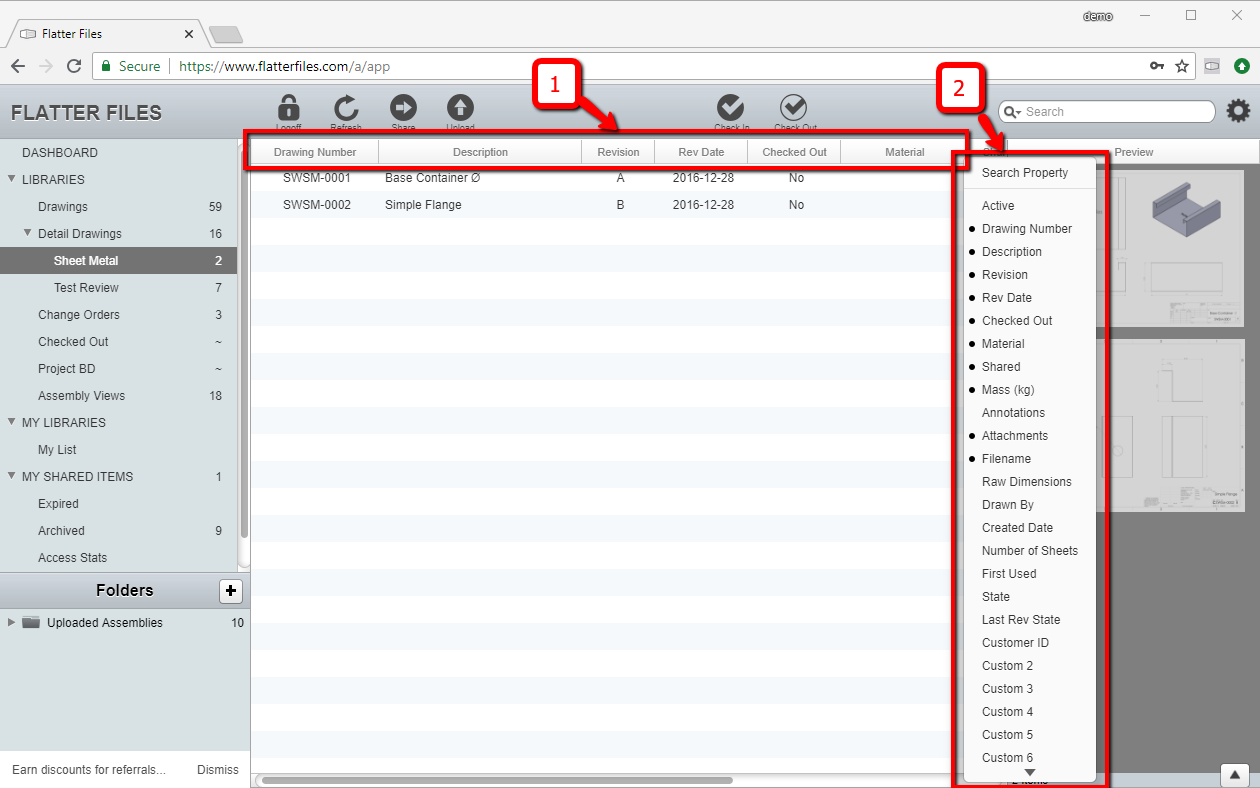
3. Customize Property Pane Headers
You can customize the Flatter Files property pane to be different than the company default or different from other coworkers. Changes below will only apply to your account.
- Add / Remove Property Columns and Preview Pane:
- Right click the property column header name (1) to reveal a list of property names (2)
- Clicking on an existing property name (indicated by a dot) will remove the existing column, where as clicking on property names without a dot will add a new column.
- Clicking on the “Show Preview” name at the bottom of the list will turn off the entire preview pane leaving more room for property columns, Clicking it again will turn the preview pane back on.
- Reorganize Column Order:
- Drag & drop column header name (1) right or left to change the order they are listed in.
4. Search
Searching is the most common task. As such as soon as the Flatter Files webpage is loaded, the keyboard focus is immediately ready to type within the search box. You only have to click in the search box if you have clicked somewhere else first. By default a search will search within ALL properties that contain the text.
- Search Box (1)
- Type in a description or part number into the search box & hit enter.
- The property pane will display the list of items in rows that match the search criteria.
- Status bar text updates with the quantity of results within the search
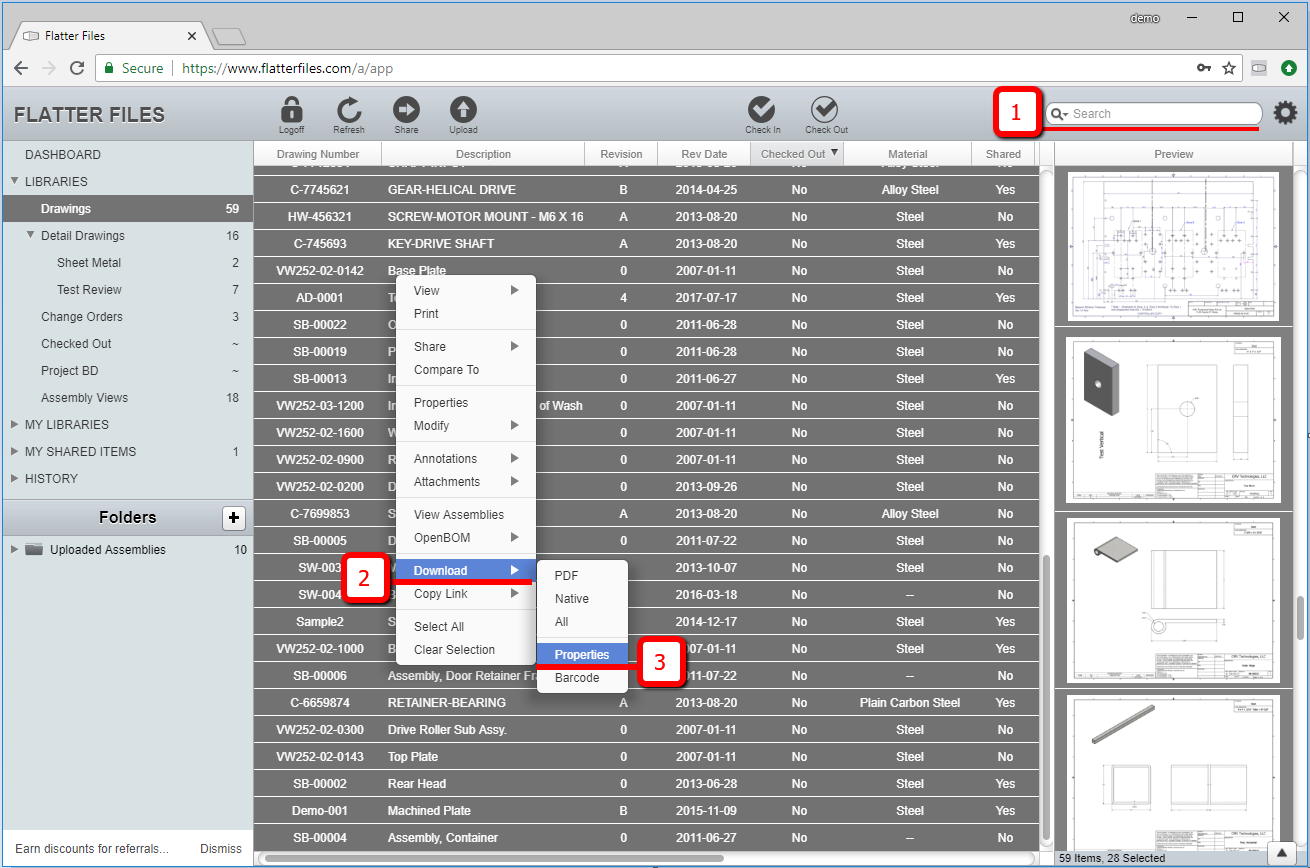
- Export Search results to Excel
- Select first search result row
- Scroll to the bottom
- Shift + select the last search result row to highlight all search results
- Right click -> Download -> Properties (2) (3)
- CSV file will be downloaded & can be opened in MS Excel
- Query Builder
- Advanced queries can be used to create very specific search results.
- Creating advanced queries can be done manually or you can use the Flatter Files Query Builder.
- Details on how to use the Query Builder can be found here.
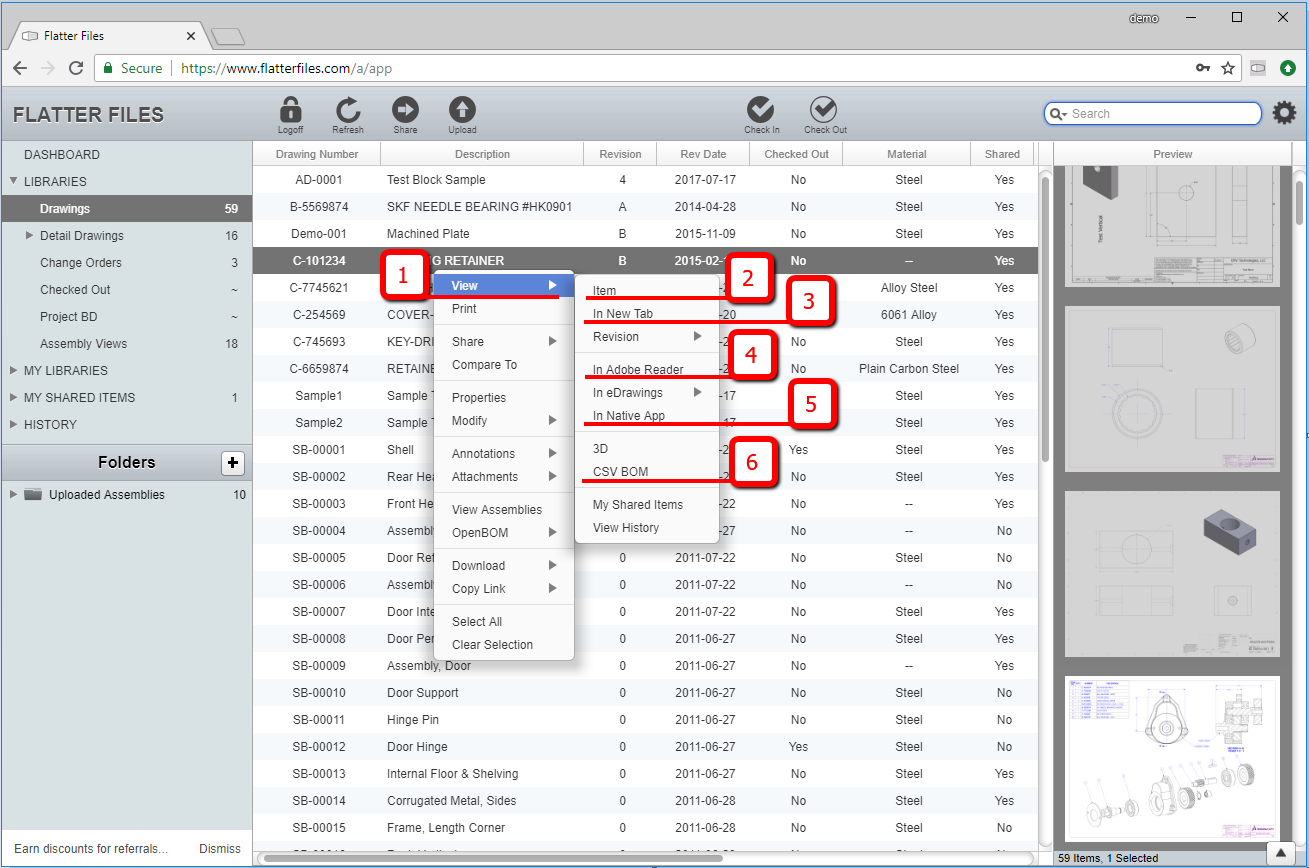
5. Viewing items
Multiple methods of viewing items are described below.
- In Current Tab (1) (2)
- Double click an item row, OR right click an item row -> View -> View Item
- User interface will split and reveal the View pane.
- Can drag the top of the view pane up or down to resize it larger or smaller
- In New Browser Tab (1) (3)
- Can view item even larger in a new browser tab.
- Right click an item row -> View -> View In New Tab
- Tip: Ctrl+select or Shift+select multiple item rows & then run this command to quickly load multiple items!
- Side by Side / Multi-Monitor Viewing
- Open 2 or more items in a new browser tab (ref above)
- Hold window key and tap arrow Left (Win+Left) to dock the browser to the left half monitor position.
- Drag an inactive browser tab down and away from the other tabs to open it in a new browser window.
- Hold window key and tap arrow Right (Win+Right) to dock the browser to the right half monitor position.
- Repeat for each tab and monitor you may have.
- Hold window key & tap the arrow key multiple times to move the window between all possible positions & onto another monitor if you have them
- In Adobe Reader (1) (4)
- To obtain the full functionality of the standalone Adobe Reader.
- Right click an item row -> View -> View In Adobe Reader
- In Native App (1) (5)
- If your company has this enabled you can open the source file in the native program it was created in, such as: MS Word, Excel, or your CAD system, as long as you have those apps installed.
- Right click an item row -> View -> View In Native App
- Note: These native files are assumed to be read only. Any changes to this native file will not be reflected on FF unless you overwrite the original native file.
- CSV BOM (1) (6)
- Applies only to drawings that contain a Bill of Material. Printing this will automatically split the BOM onto multiple pages & is dynamic to any size paper you select
- Right click an item row -> View -> CSV BOM
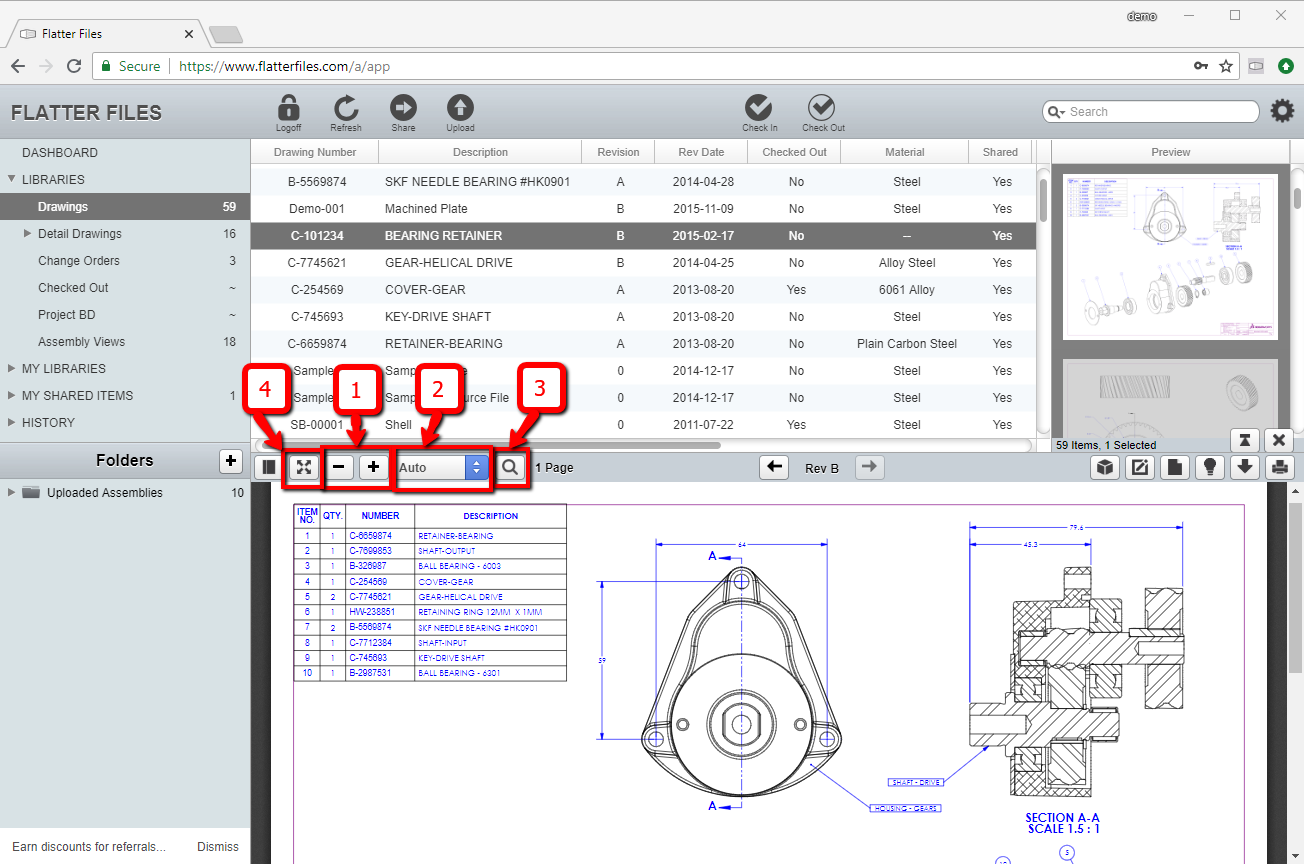
6. Viewing / Zoom
Once an item is viewed from any of the above methods. You may wish to get a closer look at the item by zooming in.
- Ctrl+Scroll
- Middle Mouse Wheel OR click the plus or minus buttons (1)
- Point mouse at an area you wish to zoom to
- Hold the Ctrl key on the keyboard and Roll the middle wheel on your mouse toward you to zoom in. Roll away to zoom out.
- Full Screen Zoom
- Click full screen icon (4)
- Ctrl+Scroll Wheel to zoom in & out (ref above)
- Scroll wheel to navigate from page to page, or use vertical scroll bar on the right.
- Escape key to leave full screen mode
- Predefined Zoom Scale
- Pick dropdown & choose any of the predefined zoom scale percentages or fit to window options (2)
- Dynamic Zoom
- Click magnifier icon (3) and Click & drag the mouse to draw a box around the area you want to zoom to.
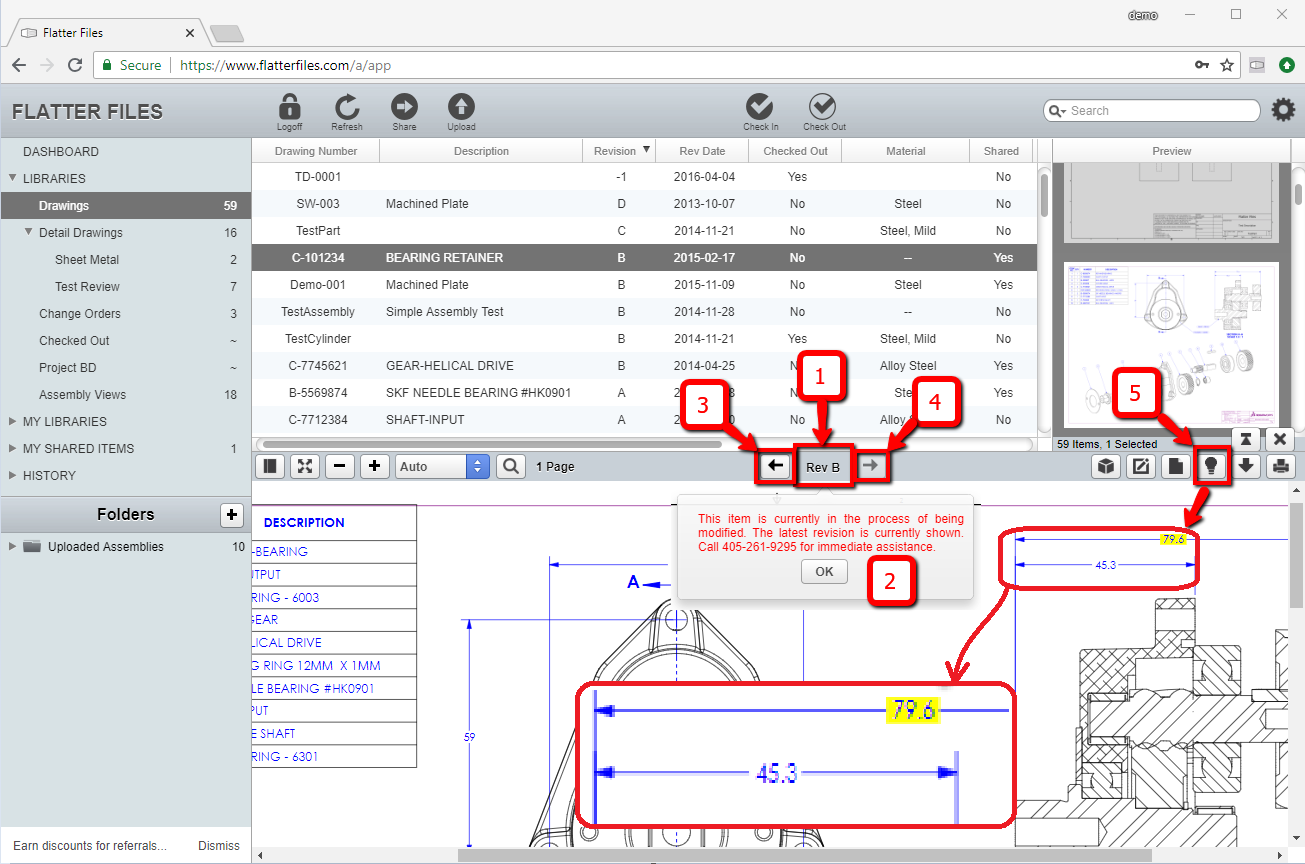
7. Viewing Revisions / Status
By default Flatter Files will always view the latest revision of any item. However you can choose to look at previous revisions, status of a revision, and highlight changes.
- Revision Indicator (1)
- The currently viewed revision will be shown in the center of the screen
- Status Indicator (2)
- Only shown if the source file is currently being modified. Can be customized with contact information, to help viewers know if they should wait for a future revision or continue as is.
- Previous Revision
- Click back arrow (3) to view the previous revisions. Arrow will grey once there are no more previous revisions to view
- Previous revision access is a user setting controlled by your company administrator. Thus, if your account does not have the previous revision button then you won’t be able to view the previous revisions.
- Next Revision
- Click forward arrow (4) to view the next revision. Only available after clicking the back arrow. Arrow will grey once you are viewing the latest revision.
- Highlighted Revision
- Sometimes it can be hard to find what is different between revisions. Click the light bulb icon (5) to highlight the text that is different between revisions! Then using the back arrow will help you to see what the previous value used to be on dimensions or notes.
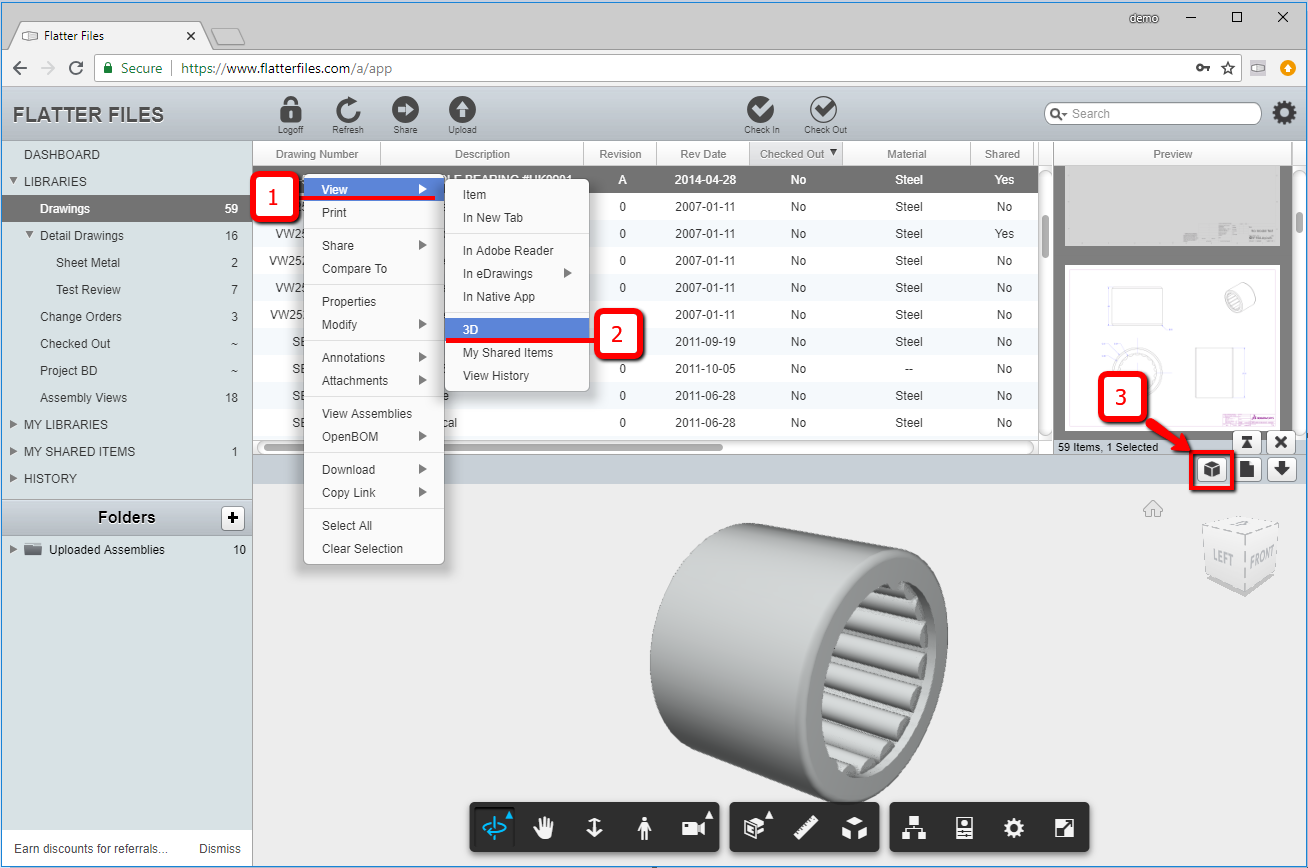
8. Viewing Item in 3D
Sometimes 2D drawings can be hard to interpret quickly. Viewing the item in 3D can quickly help the manufacturing team understand the design.
- When viewing the item, click the 3D Cube icon (3)
- Or Right click the item -> View -> 3D (1) (2)
- Wait for the 3D object to load within the browser
- 3D Zoom
- Scroll wheel - to zoom in & out on 3D model
- 3D Rotate
- 3D Pan
- Hold middle mouse button + drag
- Note: Additional 3D commands can be found at the bottom of the 3D view pane.
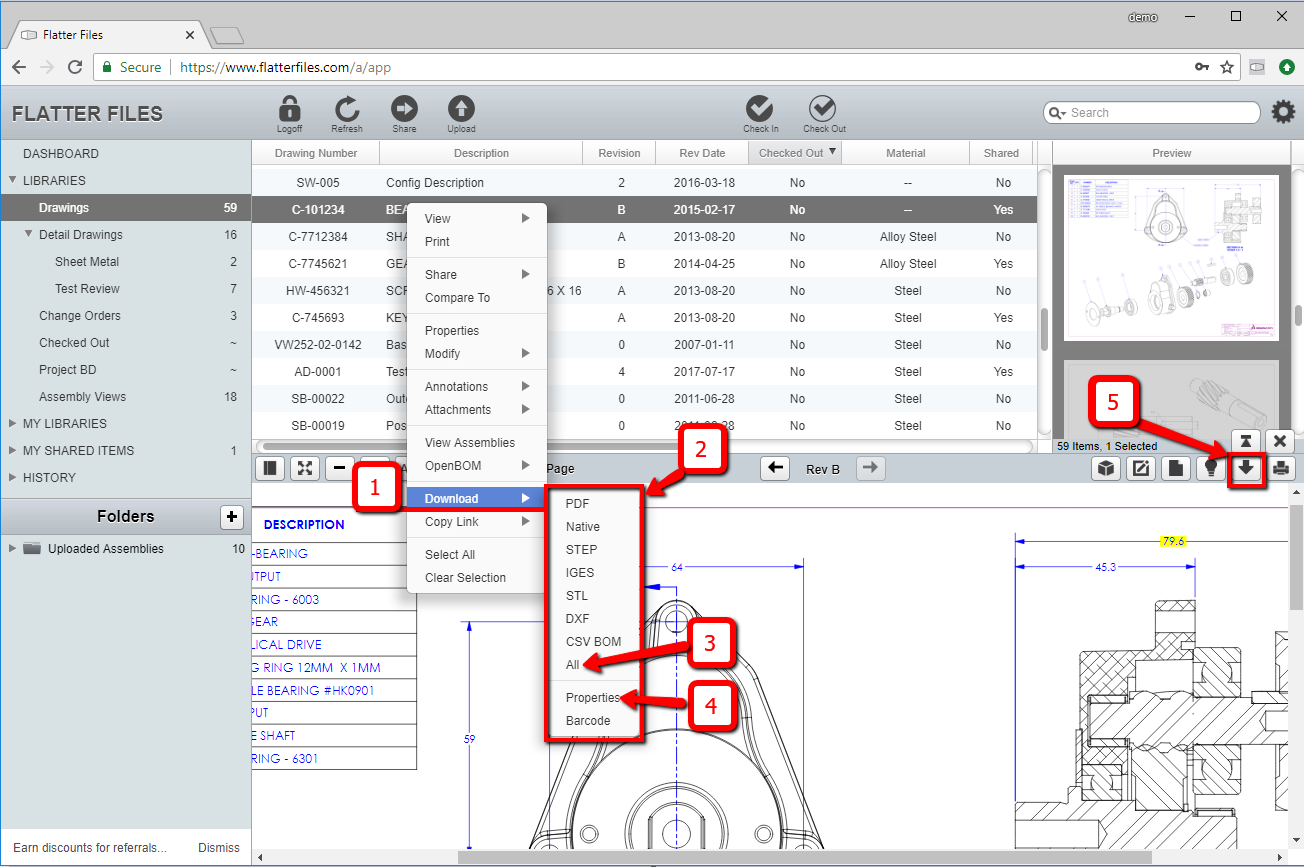
9. Downloading Items
You can download to your local computer the PDF or any other neutral file formats that have been uploaded to Flatter Files such as DXF, Step, Parasolid, etc. The ability to download is a user setting controlled by your company administrator. Thus, if your company administrator has disabled downloads for your user account then this section won’t apply.
- Individual Export Download
- Right click item row -> Download -> pick download type (1) (2)
- Download ALL
- Instead of manually downloading each export item individually, choosing “ALL” (3) will compress and download all of them into 1 zip file.
- Download Properties
- Select multiple item rows & choose “Properties” (4) command to export the highlighted items to a CSV file that can be opened in MS Excel.
- Note: All of the download functions can also be accessed from the Download arrow icon (5) in addition to the right click menu.
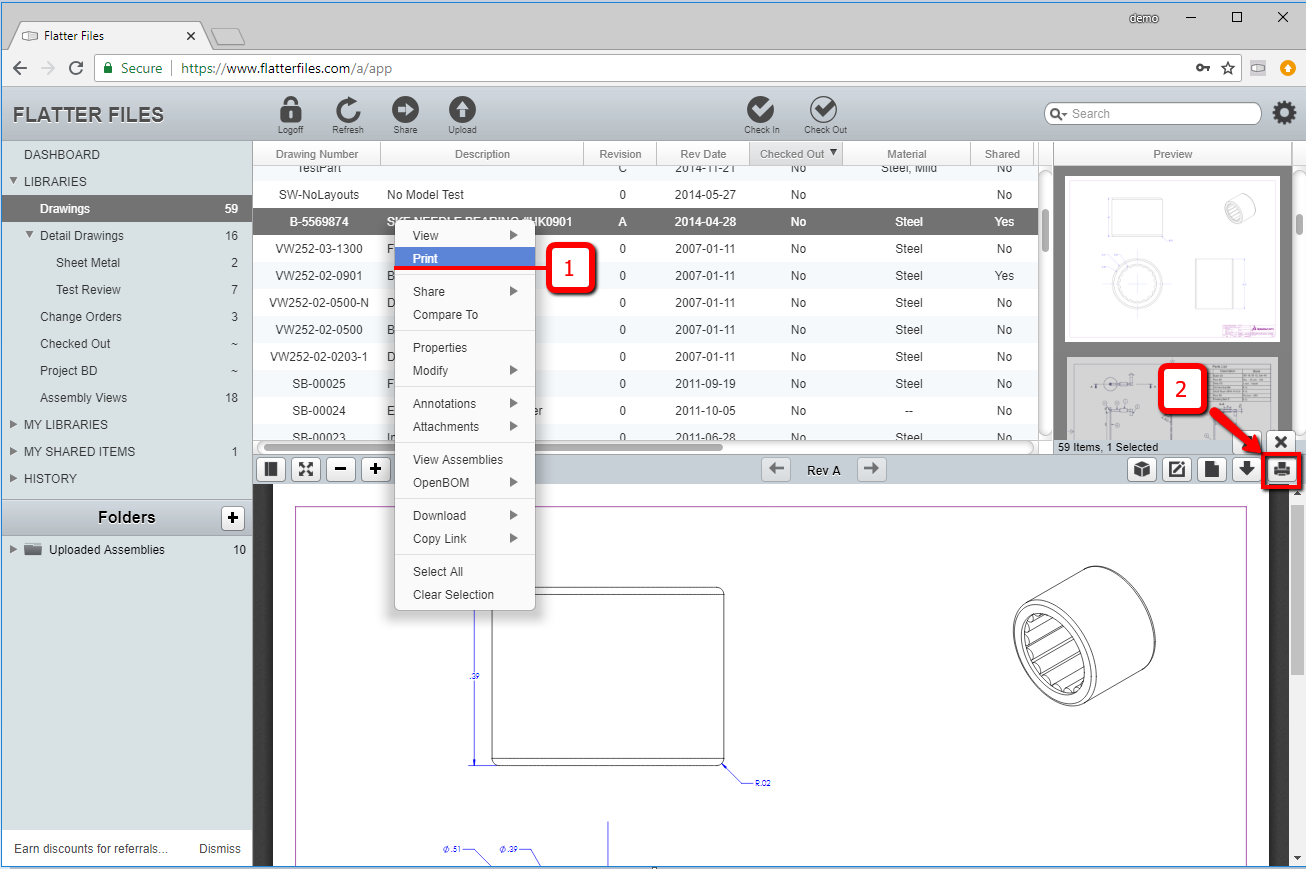
10. Printing
- Right click item row -> Print (1)
- View item -> Print icon (2)
- The first time you attempt to print a dialog will be displayed asking if you would like to use Adobe Reader for printing. Details regarding why you might want to print with Adobe Reader can be found here.
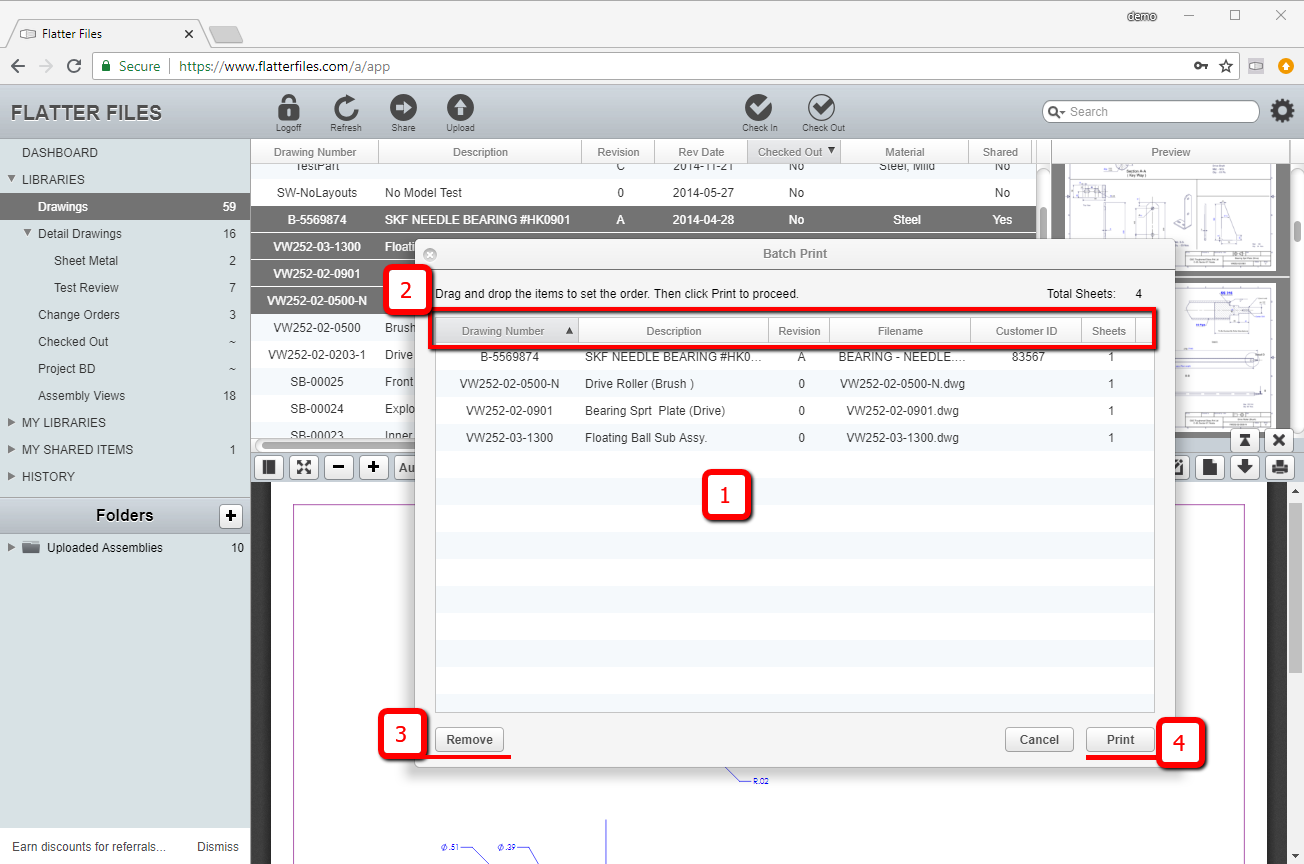
11. Batch Printing
Very similar to previous step except you select multiple items to be printed.
- Highlight multiple item rows
- Right click rows -> Print
- Batch Print dialog appears
- Drag and drop items (1) up or down, to set the print order,
- Optionally click column headers (2) to sort items to also set print order
- Click REMOVE button (3) if you accidentally have too many items in the batch print dialog.
- Click Print button (4) to send batch to your selected printer.
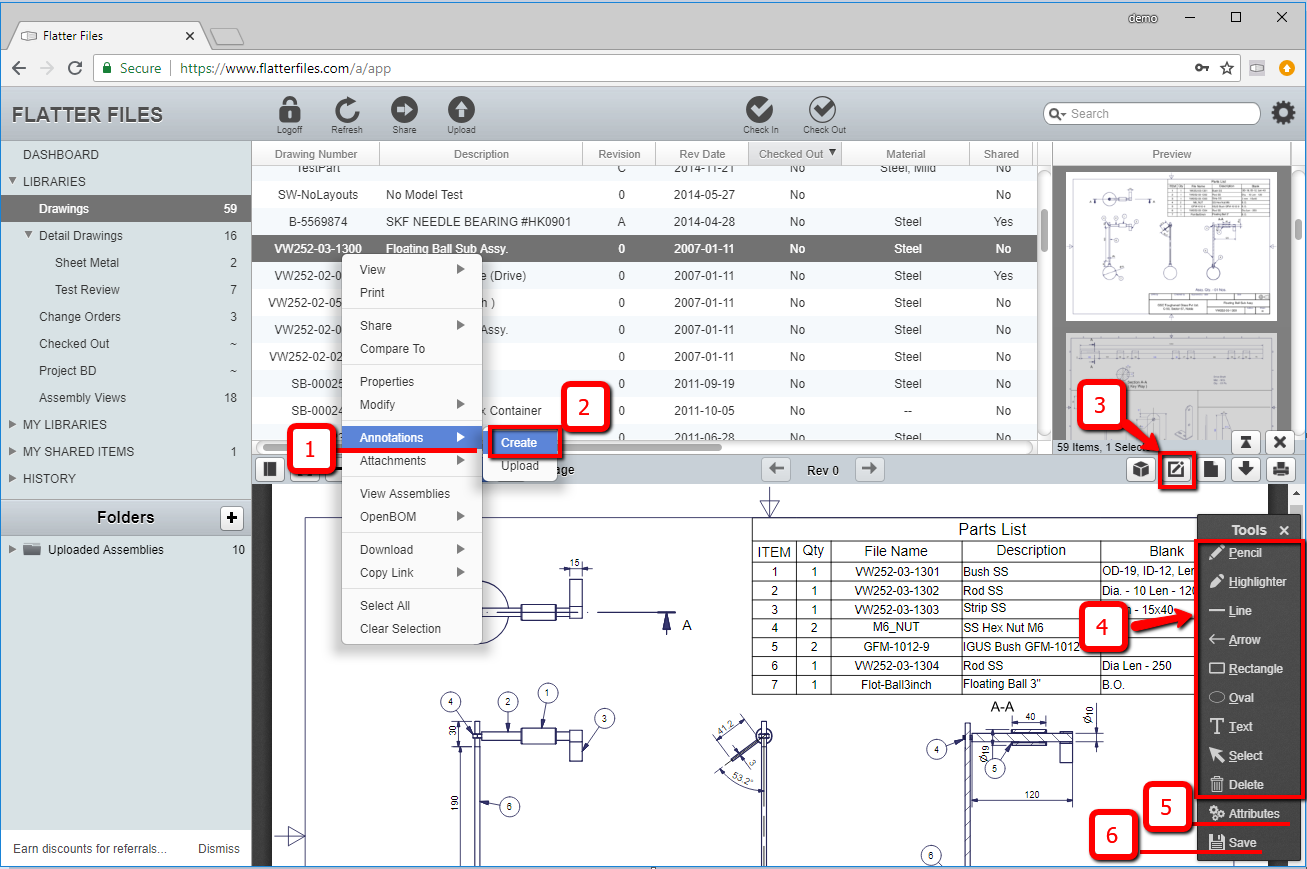
12. Annotations
Annotations are used to communicate back to the content creators a revision request or ask for clarification, Flatter Files provides digital tools to markup the items directly within the browser.
- Create Annotation - Right click item row -> Annotation -> Create (1) (2) or View item -> click Pen icon (3)
- Annotation toolbar
- Commands (4) - Select a command and then click & drag on the PDF as if your holding a pen with each command.
- Attributes(5) - Used to change color, or transparency of a selected annotation command.
- Save - Disk icon (6) to finalize the markups you have created and email a link to users
- Revision Request - Check mark only if you are requesting a change. If only asking a question do not check mark this item.
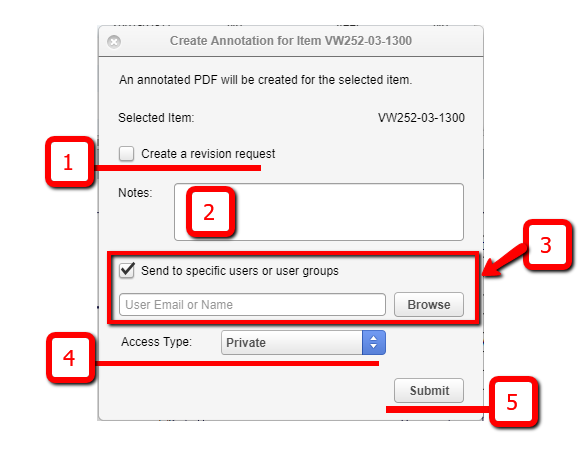
After clicking save in the previous step you can choose to notify the content creators or simply store the item for future reference.
- Create Revision Request (1) - Check this box if you are requesting a change to the document and would like to track the request with a specific revision request.
- Notes (2) - Type a message in this box to ask your question or to indicate the change requested.
- Send to specific users… (3) - Check this box if you wish to notify someone via email of your revision request or question. If there is no need to email anyone do not check this item.
- Browse button - Ctrl+Select multiple email addresses you wish to send email notifications to and click ADD. Alternatively you can type email addresses that are comma separated for emails that are not listed in the browser button.
- Access Types (4)
- Private - Used when you do not want anyone else other than the selected emails to be able to view the annotation.
- Default - Used in the event that the people you are notifying may not be available and you want others to be able to pick up and view the request (annotation) in their absence. Your company may have configured Default access type so that some Flatter Files user accounts may be excluded from viewing the annotation to possibly avoid any possibly confusion.
- ALL - Similar to Default except the user accounts that are normally excluded under the Default type are now able to access items
- Submit (5) - Finalize the annotation & send the email. Note: if your company has office 365 configured with Flatter Files then this email will appear in your sent items folder in MS Outlook!
This tutorial is now complete. You should now have a good basic understanding of Flatter Files functionality from a viewer account point of view. Still have questions? For additional help please email [email protected].