Flatter Files has been updated to integrate with SOLIDWORKS PDM Standard. PDM Standard is the replacement for SOLIDWORKS Workgroup PDM moving forward. Each seat of SOLIDWORKS Professional and Premium includes a seat of PDM Standard. PDM Standard is a limited version of SOLIDWORKS PDM Professional (formerly EPDM). Thus, it is built on the same technology as PDM Professional and functions in much the same way with the exception of a few capabilities.
One of the more significant limitations is that PDM Standard blocks access to the API, Tasks, and the ability to run Add-Ins. In addition, it does not have built in support for auto generating PDFs. Thus, Flatter Files is the only commercially available method for auto generating PDFs and making the PDFs easily accessible to your viewers.
It has been roughly three years since we first added integration with PDM Professional (EPDM). Since then we have found that the combination of PDM and Flatter Files creates the ultimate digital workflow for companies. As new revisions are added to your PDM vault, Flatter Files automatically processes the new revisions, creates a PDF, optionally creates any generic CAD format (STEP, DXF, etc…) and uploads it along with the item’s property data to the Flatter Files cloud. The latest revision along with previous revisions are then easily accessible within the Flatter Files web application and mobile applications. In addition, any external suppliers that have access to the updated items are notified via email such that they always have access to the latest revisions for the items they need.
The result of integrating Flatter Files with your PDM system is a much more efficient workflow for distributing your drawings to your internal viewers and external suppliers. In addition, the integration results in unlimited Viewers, ability to mark up drawings, Assembly Views and much more.
A step by step tutorial has been created for integrating Flatter Files with PDM Standard. In addition, if you have any questions or need help getting started please do not hesitate to contact us at [email protected].
Flatter Files was updated in early 2014 with the ability for companies to view when their external shared links had been accessed. Each specific link allowed you to view each time the link had been accessed. This proved to be very popular but recently it became obvious that more detail could be added to really make this feature even better. Thus, today we are happy to announce that the Access Stats have been completely overhauled and are now even more powerful.
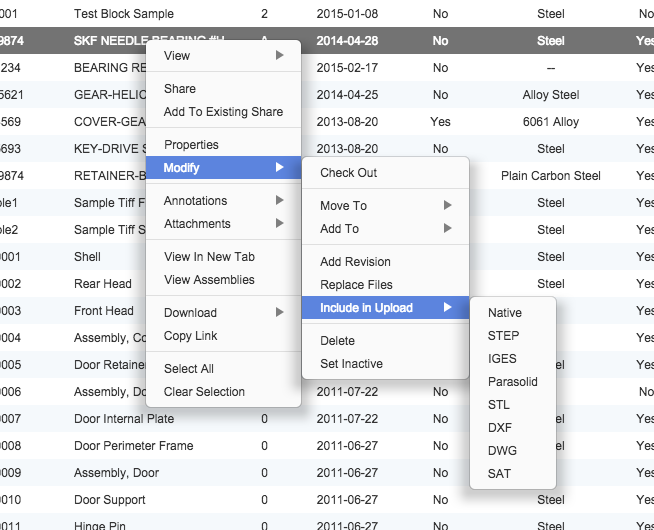
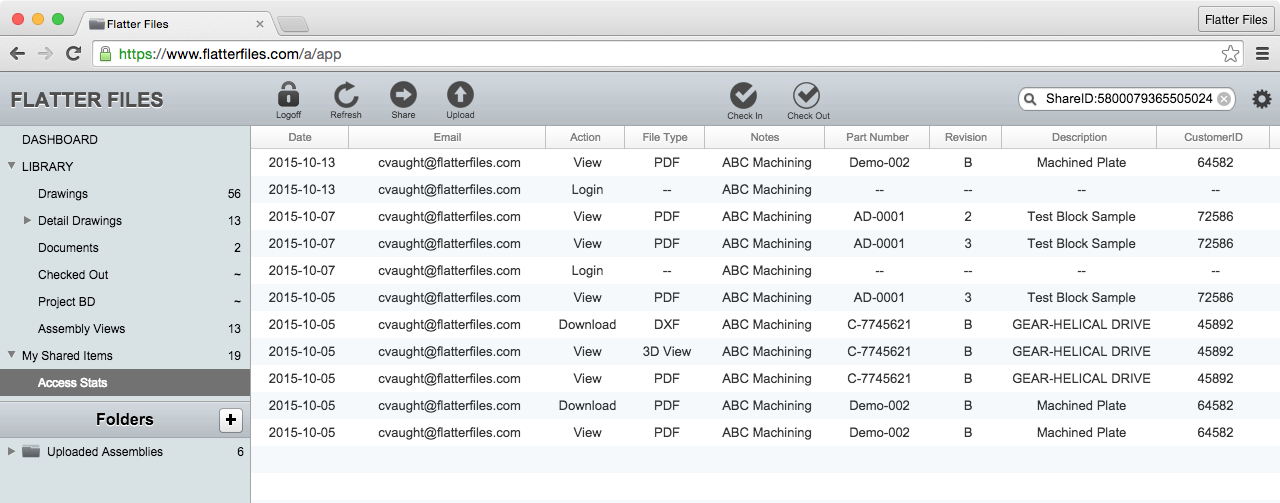
Each user that can share items externally and can access the stats will now see a new item under My Shared Items called Access Stats. Clicking this will display a new comprehensive list of stats for all of your Shared Items that you can manage. Every action possible with each Shared Link is now listed individually such that you can view exactly what was accessed and when. The new Access Stats page is shown below.
Each stat that is displayed contains multiple properties. This includes the action that occurred, the file type accessed, and the specific item properties. The possible Actions are Login, View, and Download. A Login only contains the email address and date since no item has been accessed yet. If a duplicate entry occurs the duplicate is not displayed.
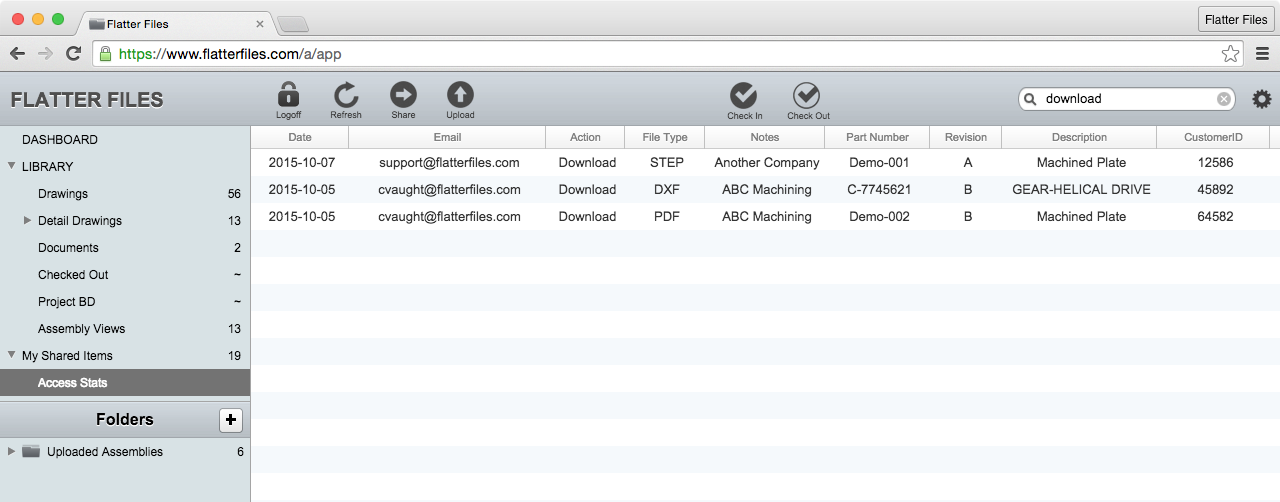
The list of access stats are fully searchable. Simply enter a value into the search box at the top right and click enter. All properties are searched and the results are displayed. The image below shows a sample search for all items that have a Download action.
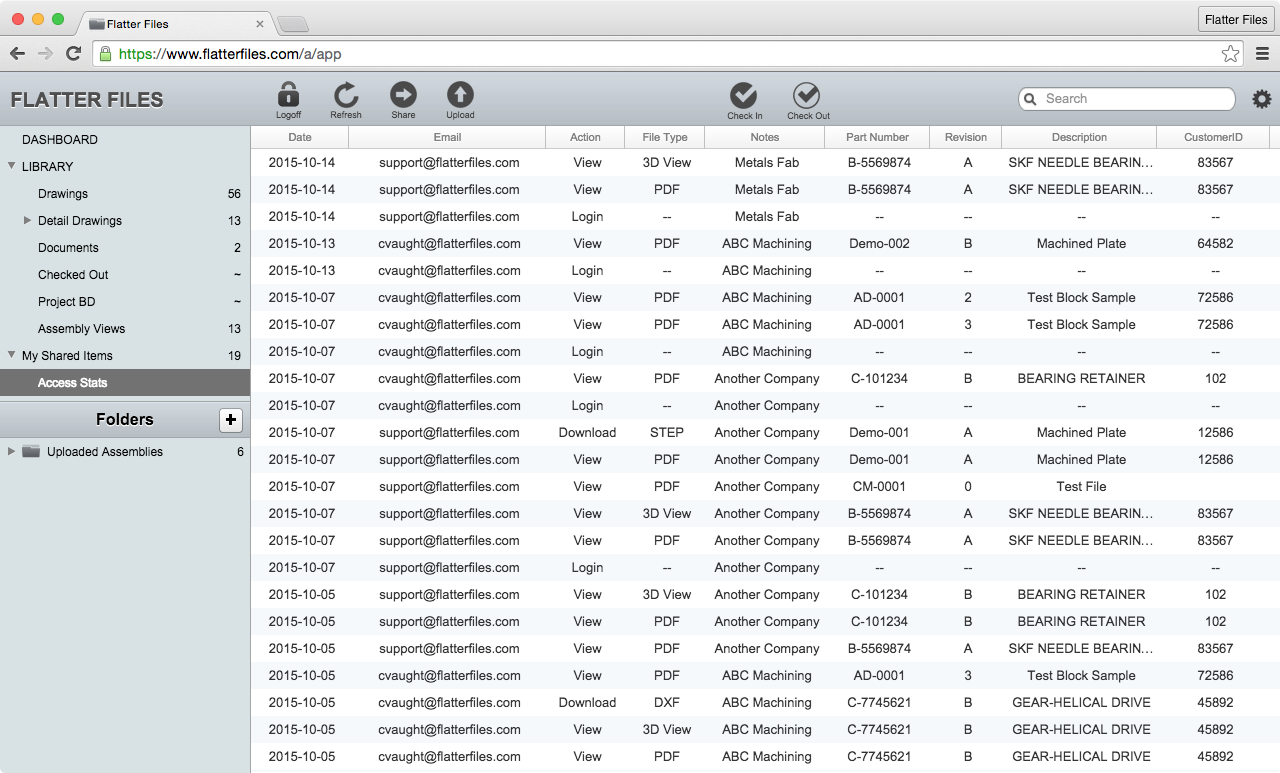
If you would like to view all of the Access Stats for a specific item, simply navigate to My Shared Items, right click the Shared Item and select “Access Stats.” This will automatically display the Access Stats page but instead of displaying all of the stats it will only show the stats for the right clicked Shared Item. An example of the stats for a specific Shared Item are shown in the image below.
As you can see, Access Stats are very powerful and allow you to see exactly when and what your suppliers are accessing. This makes your content more secure and improves supplier management. For full details, please view the documentation for the new Access Stats.
Flatter Files continues to improve and over the last month multiple features have been added that greatly enhance the usability. Below is a quick summary of the updates.
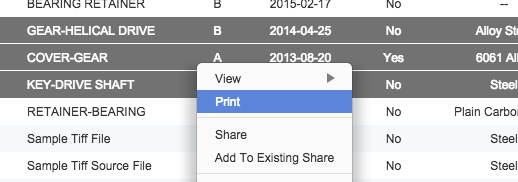
Batch Printing
Being able to print more than one item at a time has been a popular request recently. Doing this in the web application using a traditional method of sending multiple items to the printer is not possible. Thus, implementing batch printing requires that a new PDF is generated on the server containing all of the items you would like to print.
To batch print multiple items, simply select more than one item, right click, and then select Print. A message will then be displayed indicating that your multi item print will be available shortly. Once the PDF is ready, it will be opened automatically in your browser. In Chrome the Print dialog will automatically be displayed and when finished the tab will automatically be closed. If using another browser you will likely need to manually click the print button once viewing the new PDF.
Email Notifications
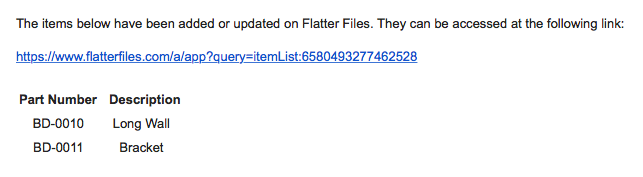
Previously Flatter Files supported the ability for individual users to receive an email anytime a new item or new revision was added to Flatter Files. This was useful, but especially for larger companies there is a need to be able to limit which items a user receive emails for based on which Library it is located within. This allows the user to only receive update emails that are pertinent to their department or products. Flatter Files now supports this by allowing you to configure which Libraries each user should receive email notifications from. Configuration for this is found under user options.
The email that is sent for this notification has also been updated. It now contains a link directly to a list containing all of the items updated. In addition, the formatting of the list of items have been updated to improve readability. A sample email is shown below:
Recently Updated Items
Previously, when you first logged into the web application the contents of your first Library was displayed. Instead of displaying the same thing each time, the web application will now display the most recently updated items. Thus, all of your items containing new revisions should be easily accessible as soon as you login. These items are sorted such that the absolute most recent item will appear at the very top of the list.
View Uploader Messages in Web App
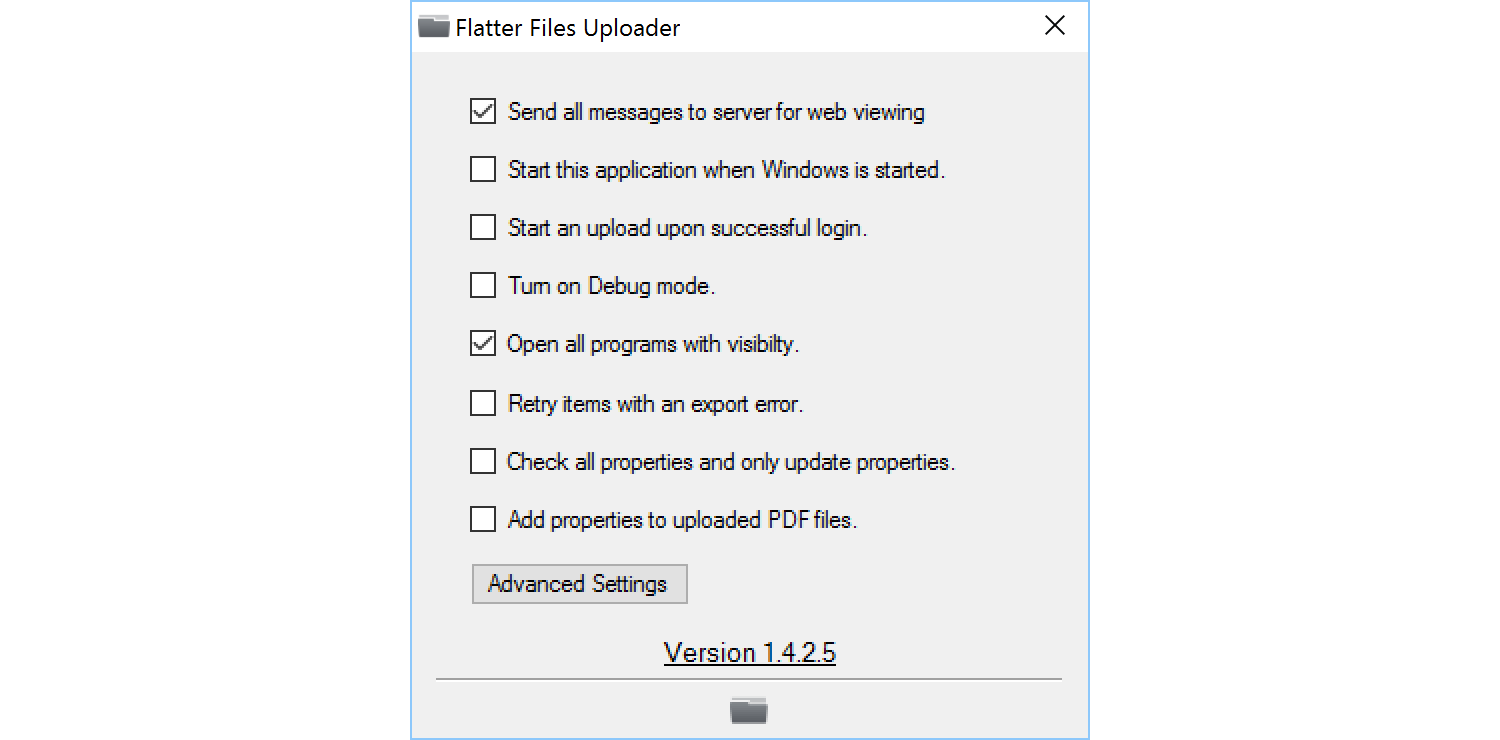
When the Uploader Application is running it continually updates the current status to a message log such that the user can stay informed and understand what is being uploaded. Often times the Uploader is located on a computer that you are not regularly using. Historically if you wanted to check on the status, you had to to either remote access into the computer or sit down in front of it. Now, you can simply view the messages within the web application. Both Administrators and Creator users can view this within the web app. In addition, viewers can have it enabled within their user options.
To enable web viewing of the uploader messages you must enable the option within the Uploader settings. The option is listed first in the image below.
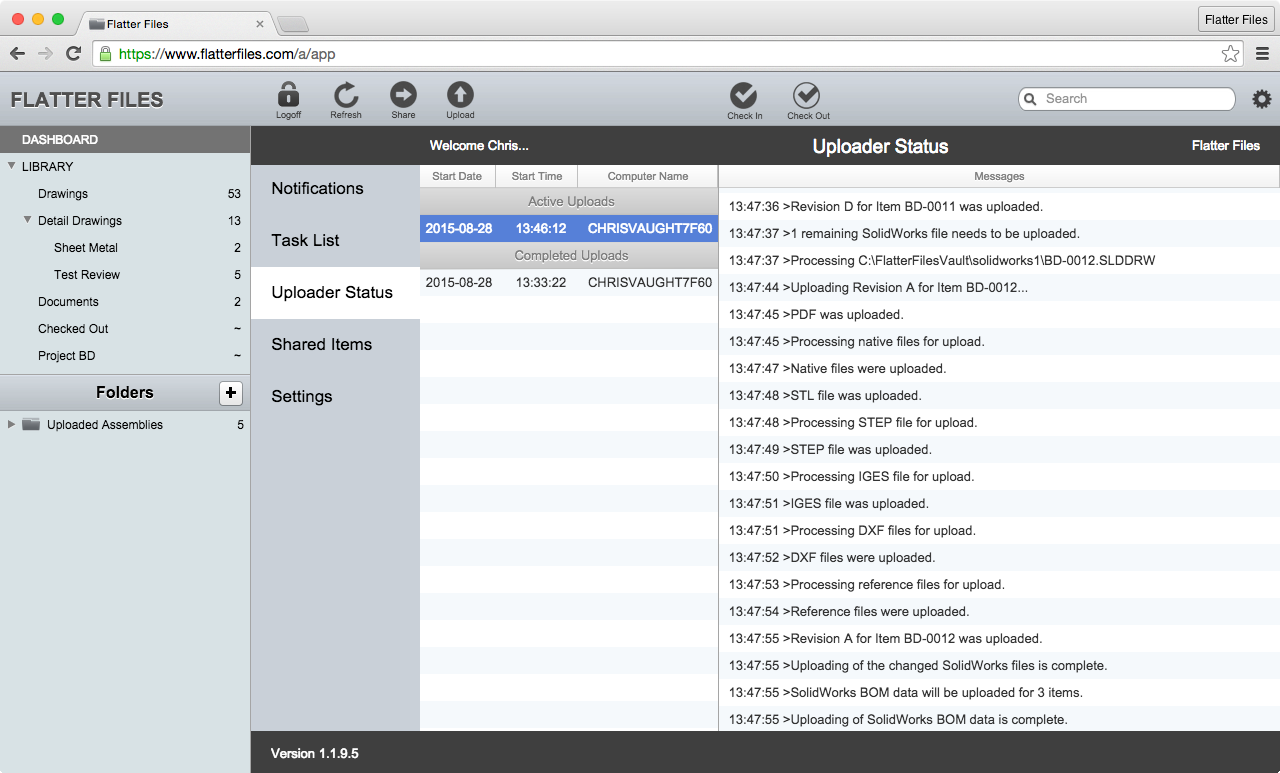
To view the messages, go to your Dashboard and click the Uploader Status option. The resulting view is shown below. The messages are organized into discrete uploads. Each upload can be selected at which point the messages will be displayed. If the upload is active and you display the messages, new messages will appear automatically. To see new uploads though you will need to click the web app’s refresh button at the top.
If an error occurs, the upload will be marked as having an error. In addition, the user that is logged into the Uploader will automatically receive an email notification indicating that an error occurred during the upload.
As you can tell from this post, we believe in continuous improvement and listen closely to what our customers need. Feel free to let us know what you think of these updates and if you have an questions or enhancement requests please do not hesitate to contact us at [email protected].
Flatter Files has recently been updated with some significant new capabilities. Below is a quick summary of the updates. As always, the updates have been added based on the excellent enhancement requests submitted by existing customers. Thus, please do not hesitate to pass along your own enhancement requests by contacting us at [email protected].
Sub Libraries and Sorting
Many customers organize their content into multiple Libraries. Flatter Files now supports the creation of Sub Libraries as well as the ability to manually sort the Libraries into any desired order. Sub Libraries are fully functional Libraries and operate with regard to access completely independent of their parent Library. Please view the documentation for how to create Sub Libraries as well as how to manually sort Libraries. The image below shows an example set of Libraries that include a few Sub Libraries as well as the new right click menu for modifying the Libraries. Modification of the Libraries can only be performed by Administrators.
IP Address Limits
To ensure only authorized access, Flatter Files now allows you to only allow access from specific IP addresses that your organization controls. This means that all other access to your account from IP addresses not listed will be blocked. It is likely that some of your users might need to access Flatter Files from outside of your companies IP address. For these specific Users, Flatter Files supports the ability to exclude those specific users from this IP address requirement.
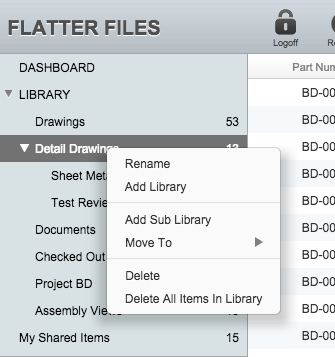
Include Generic CAD Files for Specific Items
When a generic CAD file format is enabled, all files in the configured upload folder will have the generic CAD file type exported. Sometimes it might desired to automatically create and upload a generic CAD file type for a specific file or files. Flatter Files now supports this via the right click menu as shown in the image below. The next time the Uploader processes your files, it will add the generic CAD files types you have selected in addition to the existing generic CAD file types configured for the upload folder. In addition, this setting is retained for future revisions.
Default Shared Link Settings
When users share items externally, there are a handful of options for each shared link that controls what the external users can access for the shared items. The default options for new shared items can now be set in the company settings. In addition, you can now also block viewers from being able to make any changes to the link options when they create a shared link or edit the options for an existing link. All shared links created by Viewers will always contain the default link options if you enable this option.
The ability to manually upload files from within the Web Application has been completely updated with all kinds of new features and capabilities. The new upload dialog, which is shown below now supports uploading multiple files at the same time. Simply click the Add Files button to add multiple files or drag and drop files into the table that displays the file queue. Once all of the files have been added simply click Upload to begin the upload process. Just as before, only PDFs can be uploaded when creating new items. Thus, the Uploader is still the primary method used to upload data to Flatter Files since it will automatically generate PDFs for many native drawing and document file types.
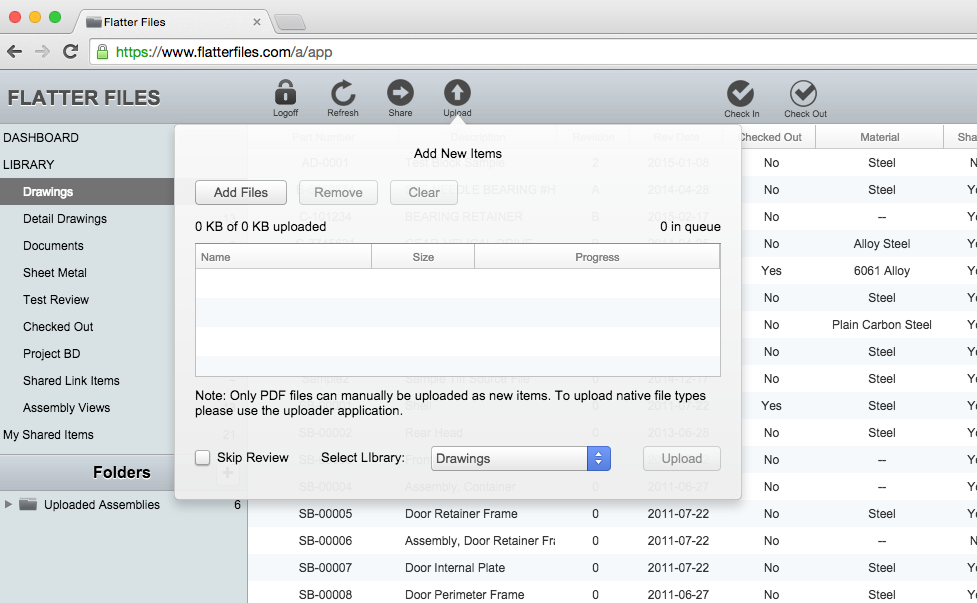
With the new file upload dialog, you can now use the Replace Files option to easily upload any file type to an existing item. The easiest way to replace an existing file or add a new file type for an item is to right click the item, navigate to Modify and then click the Replace Files option. The same dialog as shown above will appear but instead of adding new items you can add various file types that will be added as appropriate to the correct file type category for the item.
Consider the scenario where you want to include STEP files for all of your SolidWorks files. You have configured the Uploader to automatically generate the STEP files but a specific STEP file for an item contains information that you want to remove. For this scenario, simply manually create the STEP file you want to distribute for the item, then use the Replace Files option to upload the STEP file. This will replace the auto generated STEP file with your manually created STEP file. When users then access the item in Flatter Files and choose to download the STEP file they will receive the file that you manually created and uploaded.
For more details please see the documentation for Manual Uploads.